In my previous tutorial for installing Wordpress on a Raspberry Pi, I showed how to do a "quick and dirty" installation, by changing ownership of the whole Wordpress installation folder to the web server process (www-data). This gets the job done, because Wordpress is able to make changes to its own configuration files, themes and plugins. However, giving Apache the ability to modify the scripts it is executing is inherently insecure - a security flaw in one script could allow an attacker to make WordPress download a new script and execute it (like installing a new plugin), or modify an existing script for some malicious purpose. This tutorial will show you how to set up a local FTP server and change the ownership of your WordPress files to some other user (not www-data). When WordPress wants to modify one of these files, it must ask for that user's password and log in to the FTP server to make the changes, instead of having write access to absolutely everything without any checks in place.
File permissions and Ownership
Let's have a look at the current ownership and file permissions of the Wordpress files. You could use ls -l to do this, but it is a bit tedious because it doesn't list recursively so you's have to inspect each directory in turn. Instead, we'll use the tree command to will list all of the files in the /var/www directory and one subdirectory within it, showing file permissions and ownership. Assuming your Wordpress files are installed in Apache's root directory /var/www:
tree -L 2 -puga /var/www
NB: you may have to install tree first:
sudo apt-get update
sudo apt-get install tree
Ownership
To stop Apache from being able to modify Wordpress files on its own, we will set the files as owned by an existing system user. I'm going to use the username "pi" as an example - swap it for the username of the person who owns the site (e.g. for my brother's site tomhobbs.co.uk this was "tom").
sudo chown -R pi:pi /var/www
Now all of the files are owned by a user other than www-data, WordPress can't make changes to its own files. However, we do want Wordpress to be able to upload image files to /wp-content/uploads, so let's change the ownership of this directory back to www-data:
sudo chown -R www-data:www-data /var/www/wp-content/uploads
If you want to use the in-browser theme editor, you also need to allow Apache to write to /wp-content/themes. If you don't think you'll use the theme editor then don't do this:
sudo chown -R www-data:www-data /var/www/wp-content/themes
Some plugins may require write access to your .htaccess file (this is the override file for the Apache settings set in your Apache config and VirtualHost file for the site). One example of a plugin that does this is iThemes Security (formerly "Better WP Security"), which can do lots of fancy things like blocking IP addresses that make too many failed login attempts. If you want to use these capabilities, you need to set the .htaccess file (/var/www/.htaccess) to be owned by www-data... be careful though, I experienced some problems with the plugin where it tried to make lots of writes to the .htaccess file in a short period of time and ended up corrupting it, resulting in a 500 - internal server error.
Permissions
Now is a good time to check that your permissions are correct too. Assuming your Wordpress files are stored at /var/www/, the following command will change the permissions for all directories to 755 - (permission to "execute" a directory is required to list what is inside it; so 755 means everyone can read the files inside but only the owner can modify the directory).
sudo find /var/www/ -type d -exec chmod 755 {} \;
This command modifies the permissions for all files to 644 (everyone can read them, only the owner can modify them):
sudo find /var/www/ -type f -exec chmod 644 {} \;
FTP access
The changes we have made mean that WordPress can still upload image files to a specific directory, but it can no longer update itself and you can't install new plugins through the admin backend. Now we need to set up a local FTP server so that Wordpress can ask you for your system username and password and then use the credentials to log in to the FTP server to make its changes. I'm assuming that your server is behind a router with a firewall. This stage enables a FTP server on your Pi which will be accessible on your LAN. If you forwarded port 21 to the server on your router (don't!), anyone on the internet could access the server and you'd be hammered by bots trying to crack your password. If you are behind a router you'll be fine, but it's something worth bearing in mind. The FTP server we are going to use is called "Very Secure FTP Daemon" (VSFTPD). Install it like so:
sudo apt-get install vsftpd
The config file for vsftpd is at /etc/vsftpd.conf. Open it and uncomment the following line to tell VSFTPD to check usernames and passwords against the list of system users in /etc/passwd with PAM:
local_enable=YES
Also uncomment this line to allow authenticated users to write to the filesystem (default is read-only):
write_enable=YES
This is not a necessary step and won't even be used by WP, but you might as well do now because it's quick: if you have your own SSL certificate then you can override the deafaults to the location of your cert and its key file:
rsa_cert_file=/etc/ssl/certs/samhobbs.crt
rsa_private_key_file=/etc/ssl/private/samhobbs.key
If you don't have an SSL cert you can just use the default "snakeoil" certificate (leave the config file as it is) or use my CAcert tutorial to generate one yourself and get it signed for free. Now restart the FTP server:
sudo service vsftpd restart
That's it for FTP :)
Tell Wordpress to use FTP
Now all that's left is to tell WordPress to ask you for FTP credentials when it can't modify files itself. Open your WP config file at /var/www/wp-config.php and add these two lines at near the end of the file but above the line /* That's all, stop editing! Happy blogging. */. They tell Wordpress to connect to the local FTP server, and use the username "pi":
define( 'FTP_HOST', 'localhost' );
define( 'FTP_USER', 'pi' );
This is what you will see when you need to update a plugin: 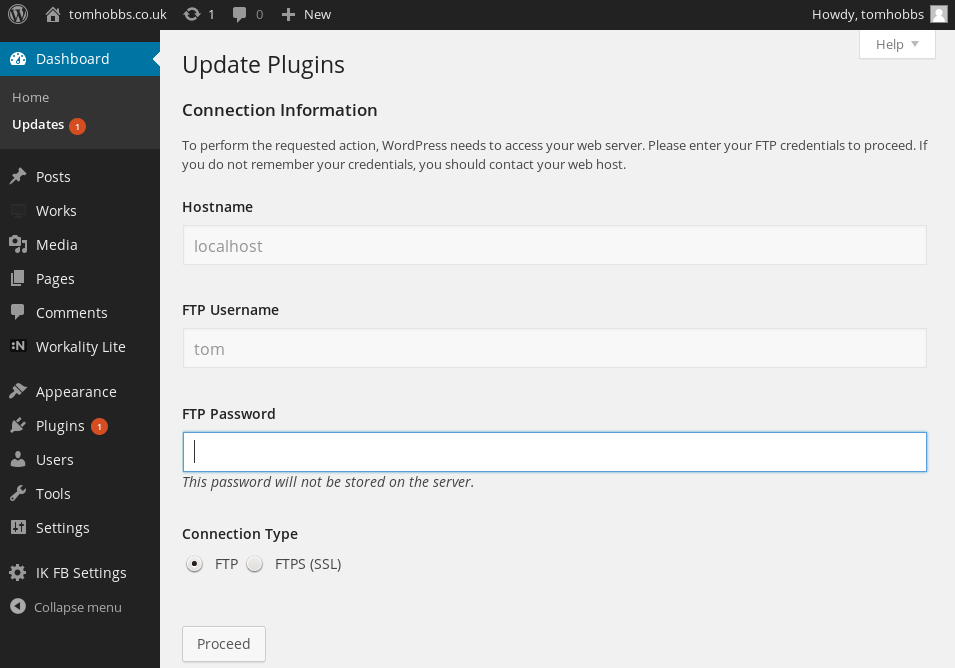 Cool eh? You can use a plain FTP connection because your password isn't sent over an unencrypted network - the FTP server is local, so it's all internal. While you're in your
 wp-config.php this file, you may also want to add this option to force administrative actions to be conducted over SSL (HTTPS).
define('FORCE_SSL_ADMIN', true);
That's it! Let me know if you run into difficulty.
Comments
Thanks for your clear
Thanks for your clear explanation.
I'd like to let wordpress make changes to images files, templates and plugins
AND to still be able to upload contents via ssh or/and winscp.
So if the we do sudo chown -R www-data:www-data /var/www/wp-content/uploads, will user "pi" be able to add images?
Isn't possible to give the rights to a group containing user "pi" and user "www-data"?
Thanks in advance.
Alex.
Good question!
sudo find /var/www/wp-content/uploads -type d -exec chmod 775 {} \;
sudo find /var/www/wp-content/uploads -type f -exec chmod 664 {} \;
That should do it. On a related note, you'll notice that a lot of log files in/var/logare owned by root with group adm. The user pi may or may not already be part of the adm group, you can find out by typing: when logged in as pi. If it's not part of the group and you want to add it, use: And then you can read log files as pi without usingsudoall the time :) SamThanks!
OK, that's great and is what I was looking for!
I will try it as soon as I get home this evening.
Just to be sure ; is it :
sudo usermod -a -G www-data pi or
sudo usermod -aG www-data pi ?
(I haven't tried yet)
Alex
They are equivalent
-aflag is important because it appends the group to the user data - if you used it without, it would replace the current list of groups with justwww-datai.e. you'd losesudoand other important stuff. You may need to reboot to make those changes take effect. Samit works!
I tried that and it does work perfectly (I had to reboot the Rpi though).
I have another question if you allow me: is it normal that my website loads so slowly when I try
to access it remotely? I thought may be Wordpress is too heavy for the Rpi?
fyi I'm using the one with 1 Gb of RAM (but with a wifi dongle) and no-ip free dynamic dns.
by the way, excuse my english I'm from France!
upload speed
upload speed
Ok, I will check the upload speed.
According to my internet provider it should be ~100 Mbps/s. (optic fiber)
but I know there is always a huge difference between theory and reality.
plus, the indicated number is the maximum capability and I suspect it's only the download speed.
I will also connect my Rpi with a wire (cable? well you know what I mean) because the wifi is always
slower.
Don't you have, by chance, an example of a Wordpress website on Raspberry pi?
Thanks!!
Alex.
ethernet > wifi
yes indeed : ethernet > wifi
Well, there is a huge difference when using ethernet!!
It works much much better!
I struggled a bit though! Eventually, I understood that the problem was my IP address.
The Rpi's IP address on wifi is different from the one it uses when on ethernet!
(may be I should have known this but i'm a beginner :) )
So I had to change my IP address to match the one I was using before on wifi.
(of course otherwise, the port forwading won't work and it looks like Wordpress had saved my old IP address too)
Anyway, everything seems to be working great right now!
Thank you very much for your help!
p.s. I didn't give mu Url here because I'm not quite sure yet about my server's security.
Anyway, for the moment it's just an empty template with random images I put there.
Thanks again.
Alex
Cool, glad you sorted it.
/var/log/apache2/access.logfor activity). Not posting links to the site will likely reduce the traffic, but don't see it as something that increases your security, because it doesn't! SamSecure server
OK, now I have to recognise that I hadn't read your post till the end (the FTP part)
because I was interested by the "Files permission and ownership" part in the beginning.
I haven't yet understood why using wp without FTP is not secure. (I'm going to read more about VSFTPD)
But what is the risk if I only make "www-data" the owner of /var/www recursively and don't use FTP?
sub-question: if I follow your method(by installing ftp), will forwarding port 80 be enough to access Rpi?
Alex
Cant install themes
Hi Thanks for the tutorial. getting a problem however :(
Downloading install package from https://downloads.wordpress.org/theme/diamond.1.1.6.zip…Unpacking the package…
Installing the theme…
Could not create directory. /var/www/wp-content/themes/diamond/
Theme install failed.
Any ideas? I have write-enable=yes uncommented any ideas where im going wrong?
permissions?
WP-Content
Hi Sam
I'm following your excellent tutorials to try and learn a bit about webhosting, Linux and Wordpress. So far, so good.
One quick question is when you mention changing the ownership of the /var/www/wp-content/uploads folder, I dont see an uploads folder so I presume I can just go and do a mkdir uploads folder in there and that will be OK ?
Sorry if its an obvious question, just dont want to mess it up now :)
Thanks
Matthew
yes that should be fine
Installing WordPress on server already with email and owncloud
Hi Sam,
Can I install WordPress on my Raspi that already has an email server and owncloud installed on it? If so, do I just follow this tutorial 'as is'?
Please advise.
Regards,
Jo
PS: Do you perhaps have a tutorial to backup a 'whole' system structure e.g. a whole SD card?
Yes it's possible
/var/wwwbut if it was me I would put wordpress in/var/www/wordpressand owncloud in/var/www/owncloud, then in the virtualhost file make/var/www/wordpresstheDocumentRoot, and useAlias /owncloud /var/www/owncloudto load owncloud from within that virtualhost, even though the files aren't within itsDocumentRoot. You can back up a whole SD card using theddcommand, like in the first part of this tutorial from a Linux laptop/desktop machine. SamThanks
Hi Sam,
Thanks for that...I shall attempt WordPress the weekend.
Regards,
Jo
Hi Sam,
Hi Sam,
I installed Worpress by following your well presented tutorial/s.
Had a bit of a struggle with the Virtual Hosts file, but managed to tweak it by doubling owncloud's VH settings to incorporate Worpress...it feels a bit long winded and I'm not sure if it's good protocol from my side in how it's laid out...but it works!
By changing the DocumentRoot to /var/www/wordpress/ and using the Alias /owncloud /var/www/owncloud didn't work for me completely, because it loaded owncloud properly, but loaded the wrong worpress file (i.e. the first installed version before I copied it to /var/www/wordpress...
Eventually it would load either my proper wordpress site using domain/wordpress or owncloud using domain/owncloud...anyway my workaround looks like this, which does the job:
<VirtualHost *:443>
ServerName mydomain
SSLEngine on
SSLCertificateFile /etc/ssl/certs/mycertfile
SSLCertificateKeyFile /etc/ssl/private/mycertkeyfile
DocumentRoot /var/www/wordpress/
Alias /wordpress /var/www/wordpress/
<Directory /var/www/wordpress/>
Options +FollowSymLinks
AllowOverride All
SetEnv HOME /var/www/wordpress
SetEnv HTTP_HOME /var/www/wordpress
</Directory>
ErrorLog ${APACHE_LOG_DIR}/wordpress/error.log
#LogLevel warn
CustomLog ${APACHE_LOG_DIR}/wordpress/ssl_access.log combined
Alias /owncloud /var/www/owncloud/
<Directory /var/www/owncloud/>
Options +FollowSymLinks
AllowOverride All
SetEnv HOME /var/www/owncloud
SetEnv HTTP_HOME /var/www/owncloud
</Directory>
ErrorLog ${APACHE_LOG_DIR}/owncloud/error.log
#LogLevel warn
CustomLog ${APACHE_LOG_DIR}/owncloud/ssl_access.log combined
Header add Strict-Transport-Security "max-age=15768000"
</VirtualHost>
Any advice or tweak it much appreciated.
Regards,
Jo
location of new wordpress files
/var/www/wordpress/wordpress... SamWordpress files
Hi Sam,
This is where my wordpress files are:
admin@pi-box:~ $ cd /var/www/
admin@pi-box:/var/www $ ls
html owncloud wordpress
admin@pi-box:/var/www $ cd wordpress
admin@pi-box:/var/www/wordpress $ ls
index.php wp-activate.php wp-comments-post.php wp-content wp-links-opml.php wp-mail.php wp-trackback.php
license.txt wp-admin wp-config.php wp-cron.php wp-load.php wp-settings.php xmlrpc.php
readme.html wp-blog-header.php wp-config-sample.php wp-includes wp-login.php wp-signup.php
My original installation before I moved it is in the home directory.
admin@pi-box:~ $ cd /var/www/wordpress/wordpress
bash: cd: /var/www/wordpress/wordpress: No such file or directory
Don't have the above...
Regards,
Jo
default blocking vhost
No access - apache2 won't reload
Hi Sam,
Before seeing this post I was also installing ModSecurty...and my Apache won't reload...see post from ModSecurity tutorial. I think once that is fixed, I can try as you suggested here.
Thx,
Jo
Apache error log
Hi Sam,
In a bit of a pickle...disabled modsecurity and restarted apache2.
At the moment no access to wordpress, owncloud or squirrelmail. The apache2 error log shows this:
[Wed Apr 13 23:11:51.467867 2016] [unique_id:alert] [pid 1064] (EAI 3)Temporary failure in name resolution: AH01564: unable to find IPv4 address of "pi-box"
AH00016: Configuration Failed
No errors logged in the log files for wordpress, owncloud or squirrelmail itself only in /var/log/apache2/error.log
Hope you can help me out of this one.
Regards,
Jo
I think you probably made an
Reverted to backup
Hi Sam,
Thanks for the reply. Had a quick look and changed everything back to the normal virtual host settings, but still not working...I made a backup before I installed wordpress and modsecurity. I think I'll revert back to that working image and then take it slowly with wordpress again and sort everything out before doing modsecurity again.
Regards,
Jo
Thanks for a clear/succinct explanation of the www-data issue
Thank you Sam!
I am in the process again of setting up Wordpress on a Pi for the first time in a few years and have successfully negotiated some new hurdles this time around (not least of which was getting mysql working with new MariaDB). My previous attempts, years back, were frustrated by trying to ensure a reasonably secure setup with FTP edit access to the headless Pi server. I could never find a decent explanation for how to do it but more importantly WHY it needed to be done a certain way. Maybe its partly from reading dozens of threads on the subject over the last couple of days (with conflicting advice and no reasoning) but yours is the most succinct, informative and reasoned explanation I have come across. I now look forward to following these instructions in the next day or so.
So again, thank you for putting this together and sharing it.
Peter
Thanks for the feedback
Add new comment