![]() This is the third part of a five part tutorial that will show you how to install a full featured email server on your Raspberry Pi. This tutorial covers how to set up Webmail with Squirrelmail.
This is the third part of a five part tutorial that will show you how to install a full featured email server on your Raspberry Pi. This tutorial covers how to set up Webmail with Squirrelmail.
The parts are:
The Introduction & Contents Page (read first)
Raspberry Pi Email Server Part 1: Postfix
Raspberry Pi Email Server Part 2: Dovecot
Raspberry Pi Email Server Part 3: Squirrelmail
Raspberry Pi Email Server Part 4: Spam Detection with Spamassassin
Raspberry Pi Email Server Part 5: Spam Sorting with LMTP & Sieve
Installing Apache
If you don't already have apache installed (you might if you've followed my wordpress tutorial), then install it now.
sudo apt-get update
sudo apt-get install apache2
Enable the SSL apache module so that you can use HTTPS:
sudo a2enmod ssl
There are some "pre-made" virtualhost configurations that come with apache. This command will enable the "default-ssl" virtualhost, by creating a symbolic link from /etc/apache2/sites-available/default-ssl to /etc/apache2/sites-enabled/default-ssl:
sudo a2ensite default-ssl
Now reload apache to make the changes take effect:
sudo service apache2 reload
If you type the IP address or hostname of the pi into a web browser now, you should see the default Apache test page: 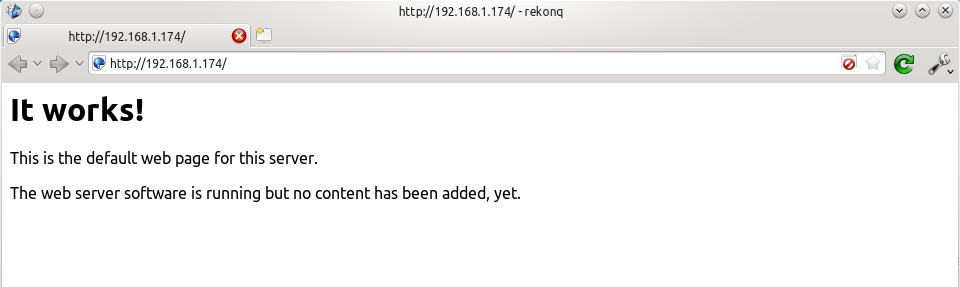 If you try the https version, you'll get a certificate error because you are using a self-signed SSL certificate. If you like, you can follow my CAcert tutorial to get a free SSL certificate for your domain, or you can just store an exception for the certificate and generate a proper one later.
  That's it for Apache. If you want to know more about setting up Apache for multiple websites, subdomains, and SSL configurations, I suggest you read my tutorial explaining Apache's VirtualHost files.
Installing Squirrelmail
Now we need to install squirrelmail:
sudo apt-get update
sudo apt-get install squirrelmail
The basic configuration for squirrelmail is really easy, and can be done with the setup script. To run the script, use this command:
sudo squirrelmail-configure
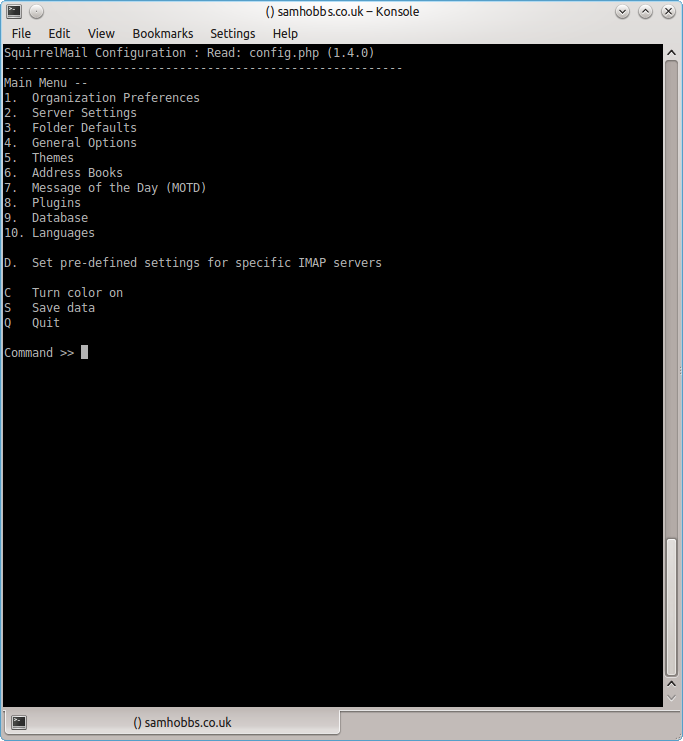 Choose “D” for pre-defined settings
 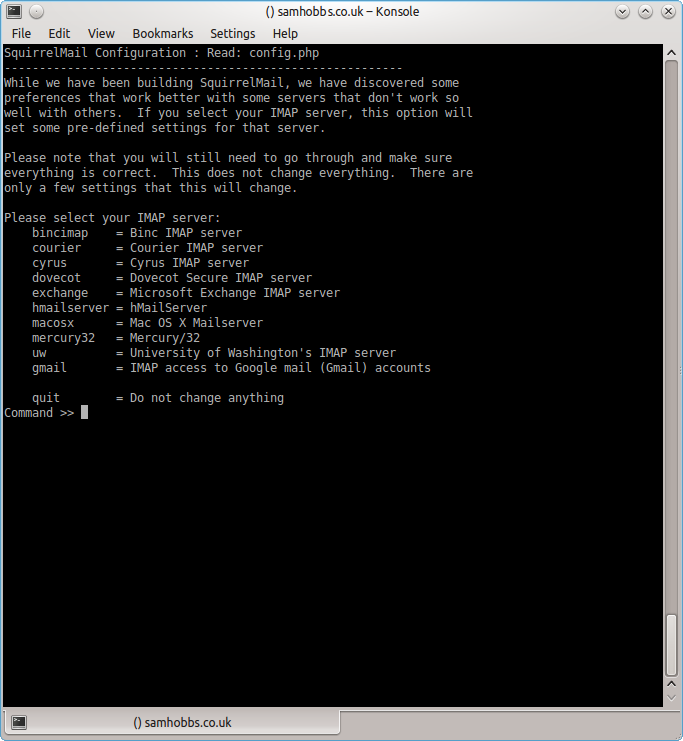 Now type “dovecot” and hit enter
 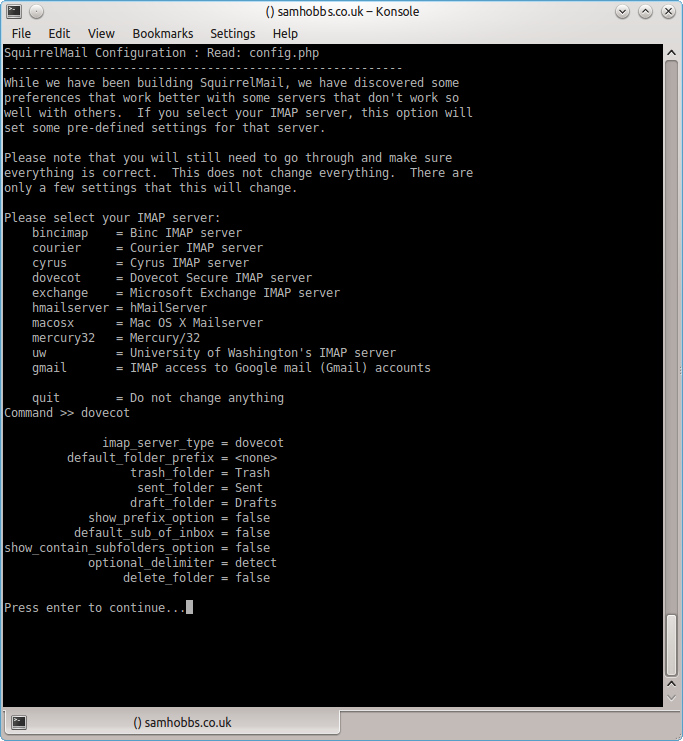 Press enter to continue, then save and quit (press Q and save when prompted, or press S then Q). The configuration script creates a configuration file for apache in
 /etc/squirrelmail/apache.conf. You need to create a symbolic link so that Apache2 will load your Squirrelmail apache configuration file when it starts up. On Raspbian Wheezy, the command is:
sudo ln -s /etc/squirrelmail/apache.conf /etc/apache2/conf.d/squirrelmail.conf
On Raspbian Jessie, the apache configuration directory structure is more like ubuntu, with separate folders for configuration files that are available and files that are enabled. This command will create a symlink from the directory where enabled configuration is stored, to squirrelmail's apache configuration file:
sudo ln -s /etc/squirrelmail/apache.conf /etc/apache2/conf-enabled/squirrelmail.conf
On a related note, there's a convenience command a2enconf that works similarly to a2ensite: it creates a symlink from the conf-available directory to the conf-enabled directory. You should use this in situations where config already exists in conf-available, e.g. sudo a2enconf squirrelmail would create a symlink for a file called squirrelmail.conf. Now reload Apache one more time so that it reads the config file we just symlinked:
sudo service apache2 reload
Now visit the IP address or hostname of your Pi again, but add /squirrelmail to the path, e.g. 192.168.1.174/squirrelmail, you should see the login page: 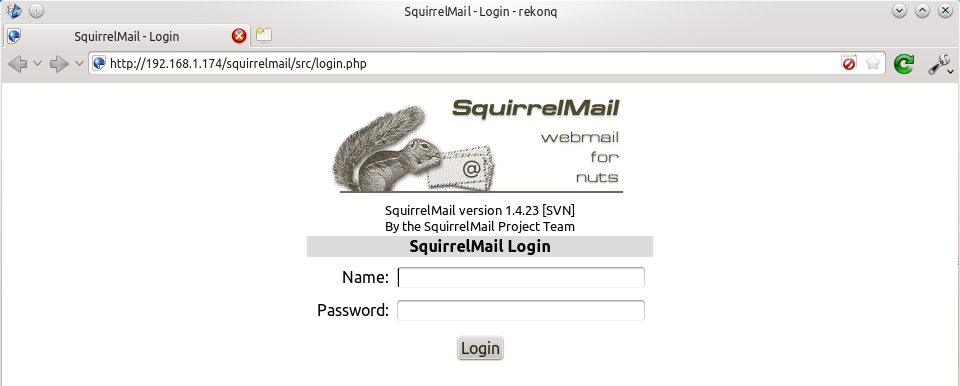 The squirrelmail configuration file just adds an alias that should affect every virtualhost, so if you install a wordpress site or something like that on your pi, you will be able to get to the squirrelmail login page by visiting yourdomain.com/squirrelmail.
Redirect http to https for secure login
Since you don't want to send your login details and confidential information over the internet without SSL, it's best to redirect all http URLs to https. The default squirrelmail apache configuration file at /etc/squirrelmail/apache.conf contains some rewrite rules we can use, we just need to uncomment them. Open the file and uncomment the lines by removing the # at the start of each so that it looks like this:
<IfModule mod_rewrite.c>
  <IfModule mod_ssl.c>
    <Location /squirrelmail>
      RewriteEngine on
      RewriteCond %{HTTPS} !^on$ [NC]
      RewriteRule . https://%{HTTP_HOST}%{REQUEST_URI}  [L]
    </Location>
  </IfModule>
</IfModule>
This configuration makes sure that the rewrite and ssl modules are enabled, and does nothing if they aren't. We already enabled the ssl module earlier, so all we need to do now is enable the rewrite module:
sudo a2enmod rewrite
And reload Apache:
sudo service apache2 reload
Now if you visit the HTTP page, you should be redirected to HTTPS.
Optional: Configuring Apache to serve Squirrelmail on a subdomain
If you would like to move the login page to the root of your domain (i.e. so that yourdomain.com would serve the login page for squirrelmail), or if you would like to serve it on a subdomain like mail.yourdomain.com, you can edit the configuration file. If not, you can skip this section. By default, this line in /etc/squirrelmail/apache.conf means that http://www.yourdomain.com/squirrelmail will load squirrelmail:
Alias /squirrelmail /usr/share/squirrelmail
If you would rather have webmail on a subdomain like mail.yourdomain.com then you could edit the /etc/squirrelmail/apache.conf file to look like this (comment out the rest):
<VirtualHost *:80>
  DocumentRoot /usr/share/squirrelmail
  ServerName mail.yourdomain.com


<Directory /usr/share/squirrelmail>
  Options FollowSymLinks
  <IfModule mod_php5.c>
    php_flag register_globals off
  </IfModule>
  <IfModule mod_dir.c>
    DirectoryIndex index.php
  </IfModule>

  # access to configtest is limited by default to prevent information leak
  <Files configtest.php>
    order deny,allow
    deny from all
    allow from 127.0.0.1
  </Files>
</Directory>
</VirtualHost>
Note that if you want to serve mail on a subdomain, then that subdomain needs a DNS record, so edit your records with your DNS provider accordingly. However, the virtualhost code above only does HTTP. You also want an HTTPS virtualhost for the subdomain on port 443:
<IfModule mod_ssl.c>
<VirtualHost *:443>
  DocumentRoot /usr/share/squirrelmail
  ServerName mail.yourdomain.com

<Directory /usr/share/squirrelmail>
  Options FollowSymLinks
  <IfModule mod_php5.c>
    php_flag register_globals off
  </IfModule>
  <IfModule mod_dir.c>
    DirectoryIndex index.php
  </IfModule>

  # access to configtest is limited by default to prevent information leak
  <Files configtest.php>
    order deny,allow
    deny from all
    allow from 127.0.0.1
  </Files>
</Directory>

ErrorLog ${APACHE_LOG_DIR}/error.log
LogLevel warn
CustomLog ${APACHE_LOG_DIR}/ssl_access.log combined

SSLEngine on
SSLCertificateFile    /etc/ssl/certs/your-ssl-certificate.crt
SSLCertificateKeyFile /etc/ssl/private/your-ssl-certificate-keyfile.key


</VirtualHost>
</IfModule>
If you use this configuration, the rewrite rules from the "rewrite to HTTPS" section (the ones from the default config file) won't work. If you want an HTTPS-only solution, you can replace the virtualhost for port 80 with this:
<VirtualHost *:80>
ServerName mail.yourdomain.com
<IfModule mod_rewrite.c>
  <IfModule mod_ssl.c>
    <Location />
      RewriteEngine on
      RewriteCond %{HTTPS} !^on$ [NC]
      RewriteRule . https://%{HTTP_HOST}%{REQUEST_URI}  [L]
    </Location>
  </IfModule>
</IfModule>
</VirtualHost>
As before, make sure you have the rewrite module enabled:
sudo a2enmod rewrite
Now reload apache:
sudo service apache2 restart
If you get an error like this:
[....] Restarting web server: apache2[Fri Dec 06 15:54:04 2013] [warn] _default_ VirtualHost overlap on port 443, the first has precedence
Then add NameVirtualHost *:443 to the start of the SSL VirtualHost block, i.e.:
NameVirtualHost *:443
<IfModule mod_ssl.c>
<VirtualHost *:443>
  DocumentRoot /usr/share/squirrelmail
  ServerName mail.yourdomain.com
...
For more info on HTTP and HTTPS VirtualHost configuration on Apache2, see this tutorial of mine. If all went to plan then you can navigate to mail.yourdomain.com and you should see the squirrelmail login page (you might need to forward some ports on your router if you haven't already - see the next section): 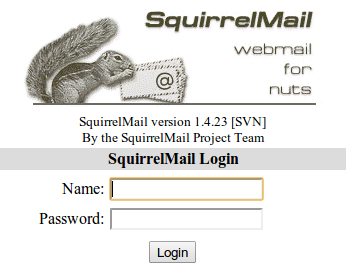
Port Forwarding
Squirrelmail will log in to your IMAP server on port 143 to display your emails. It doesn’t need to authenticate because it’s in your network (remember the permit_mynetworks parameter from the previous tutorials?). You don’t need to worry about it being an unencrypted connection, because the data isn't actually travelling over any insecure networks (the connection is internal). Similarly, you don’t need to open port 143 (“plain” imap without SSL/TLS) on your router because the connection happens within the Pi, and the content is actually served to you, the user, on port 443 (https). So you do need to open ports 80 and 443 for http and https like below: 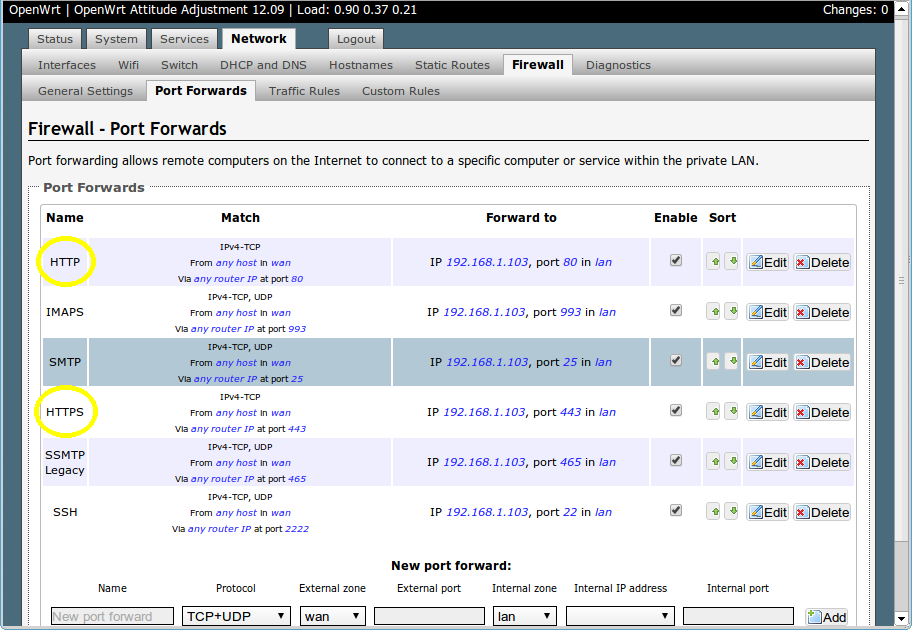
Testing
Before you start testing your webmail, make sure that the permit_mynetworks parameters are uncommented in your postfix confuguration file /etc/postfix/main.cf (in both your smtpd_recipient_restrictions and smtpd_helo_restrictions). Now reload your postfix configuration:
sudo service postfix reload
Try sending and receiving emails from within Squirrelmail. You should have no problems, but if you do please post a comment and I’ll try to help you out.
Customising the Squirrelmail Login
To customise the login page, run the configuration wizard:
sudo squirrelmail-configure
- Select “1″ (organisation preferences)
- Select “7″ and change to your domain (e.g. http://www.samhobbs.co.uk)
- Select “8″ and change to you/your organisation’s name
Squirrelmail Plugins
There are loads of plugins available for Squirrelmail, for all kinds of things. On most systems, these plugins are installed by downloading a .zip file to your server, unzipping the plugin to the right location and then tinkering with the settings manually. Thankfully, some of the most commonly used plugins are available from the Raspbian repositories, so installation is much simpler. Here is a list of the plugins in the repo:
- squirrelmail-compatibility
- squirrelmail-decode
- squirrelmail-locales
- squirrelmail-lockout
- squirrelmail-logger
- squirrelmail-quicksave
- squirrelmail-secure-login
- squirrelmail-sent-confirmation
- squirrelmail-spam-buttons
- squirrelmail-viewashtml
The one I think is most useful and the one I’m going to use as an example is lockout. To use the lockout package, we need to install the compatibility package, which basically makes sure that plugins built for different versions of squirrelmail can still work with the version you are running.
sudo apt-get update
sudo apt-get install squirrelmail-compatibility
Now we need to enable the plugin:
sudo squirrelmail-configure
- select “8″
- select “compatibility”
- select “S” (to save)
- select “Q” (to quit)
That’s all you need to do for the compatibility plugin. Now we can install the lockout plugin:
sudo apt-get install squirrelmail-lockout
Now for the configuration:
sudo squirrelmail-configure
Make sure that lockout is enabled Now we can manually edit some settings. Before starting, I like to back up the default config files for reference:
cd /etc/squirrelmail
sudo cp lockout-table.php lockout-table.php.BAK
sudo cp lockout-config.php lockout-config.php.BAK
Now edit the lockout-table.php file. Read the comments in the file for an explanation of how the table works. I wanted to disable logins for the user “admin”, so I commented out the examples at the end of the file and replaced them with this:
user: admin locked_out.php
Now edit lockout-config.php and set $use_lockout_rules = 1; to turn on lockouts. Now try and log in as the user you locked out, and you should get this message: “Access Denied / Please contact your system administrator”. We can also lock out IP addresses of users who enter incorrect username/password combinations repeatedly. To do this, open lockout-config.php and set $max_login_attempts_per_IP = '3:5:0'. The first number in this parameter is the number of incorrect attempts that are allowed before a ban. The second number is the time frame for these incorrect attempts, and the last number is the amount of time the ban lasts for when activated (0 is forever). So, the setting I gave you above means that anyone who makes 3 incorrect attempts to authenticate in 5 minutes is permanently banned. When a successful login is made, the count is reset to 0. Data on current bad login attempts and bans is stored here: /var/lib/squirrelmail/data/lockout_plugin_login_failure_information The plugin will add entries like this to keep track of bad logins:
999.999.99.99_login_failure_times=1386774015:1386774034:1386774053
999.999.99.99_TOO_MANY_FAILED_LOGIN_ATTEMPTS=PERMANENT
…where 999.999.99.99 is the offending IP address If you accidentally ban yourself, you’ll have to log in via SSH and edit this file to remove those lines. That’s it, you’re done! Have fun exploring the other plugins! The next two tutorials, Part 4 and Part 5 deal with spam detection and filtering.
Comments
Squirrelmail send problem
I now have squirrelmail sending email! Funny how it works when you get the correct settings for SMTP. :) This is for a standalone owncloud pi and a standalone email server pi.
Here are the squirrelmail settings that work on the owncloud pi.
SMTP Settings
4. SMTP Server : mydomain.com
5. SMTP Port : 465
6. POP before SMTP : false
7. SMTP Authentication : login (with IMAP username and password)
8. Secure SMTP (TLS) : true
9. Header encryption key :
IMAP Settings
4. IMAP Server : mydomain.com
5. IMAP Port : 993
6. Authentication type : login
7. Secure IMAP (TLS) : true
8. Server software : dovecot
9. Delimiter : detect
I'm really excited about getting this to work!!!!! Now I'm making email accounts for the family :)
Thanks again for all your help. You deserve a free hike in the mountains - It's on me - enjoy it!
Congratulations!
Relay access denied
Hi,
I've followed your tutorials closely. However, when I log in using my username and password and then try to send a mail in squirrelmail. I get the following error:
"Message not sent. Server replied:
Transaction failed
554 5.7.1 <************@******>: Relay access denied"
Any idea what's happening?
Cheers,
Richard
Looks like you could be
permit_sasl_authenticatedin your recipient restrictions list, but if you've done all the testing stages you should have caught that. So, it could be a missingpermit_mynetworks- since squirrelmail is running on localhost it shouldn't have to authenticate to send email. SamOutgoing mail now working
Hi Sam, thanks for the suggestions. I still had the permit_mynetworks option commented out from an earlier tutorial in /etc/postfix/main.cf. Any reason why this should still be commented out?
Also, do you know why I am able to receive mail to a google account and not an Outlook Webapp account? Is it relating to the strictness of their filters?
Thanks for the great tutorials. I'll refer you on my website!
Cheers,
Richard
Missed step in part 2, try setting SPF
Squirrelmail can sent mail but not receive
Hi Sam,
Thanks for a brilliant tutorial. I've followed it step by step and everything went well, till now. I am able to log in at Squirrelmail and sent an email to my Gmail account. Unfortunately Squirrelmail isn't recieving any emails. Do you have any suggestions to solve this problem?.
Thanks in advance.
Micha
Telnet
IMAP
Hi Sam,
Thnaks for your fast reply. I did telnet localhost 143 with this result:
* FLAGS (\Answered \Flagged \Deleted \Seen \Draft)
* OK [PERMANENTFLAGS (\Answered \Flagged \Deleted \Seen \Draft \*)] Flags permitted.
* 0 EXISTS
* 0 RECENT
* OK [UIDVALIDITY 1425234174] UIDs valid
* OK [UIDNEXT 1] Predicted next UID
* OK [NOMODSEQ] No permanent modsequences
b OK [READ-WRITE] Select completed.
Looks like a DNS issue? How can I check?. I have already checked my domain with dig MX ...... It looked ok to me.
Micha
Domain name
Domain name
That's OK. My domain name is michavanaken.nl I've checked it with mxtoolbox.com and it returns an error about smtp connection. It failed to connect. I hope you can help me with this.
Micha
port forwards
Checked
Checked MX url and port forward. Both are OK.
Tested and it seems OK... weird
mail.logas it got processed... my server made a successful connection first time and the email was accepted. Can you see the message? I don't get why gmail can't send you email... unless you missed the step in part 2 "Tell Dovecot where your Mailbox is"? Several people have missed that, and what happens is postfix accepts email but stashes it in/var/mail(so it would be accepted but you wouldn't see it in your maildir). Also, take a look in your/var/log/mail.logand see if Postfix/Dovecot are throwing any errors. Samit works - weird
Hi Sam,
I've checked the mail.log and saw your connection and found your mail! Maybe it triggered something because now I can send and receive mails and see them in Squirrelmail. I didn't change a thing so it's still a bit weird why it is working now. Hopefully it keeps working.
Thanks for your help.
Micha
Great :)
Stopped
Hi Sam,
My mailserver worked fine for a few days. Now I have the same problems as a few days ago. I can't connect anymore. I can send mail from Squirrelmail, but I can't receive external mails anymore. Can you please check my connection like you did a few days ago. Maybe it will trigger some magic again!
Only thing changed is that I tried getting a CaCert certificate. Just followed your tutorial. It didn't work well so I reversed back to the original pem and key files.
Thanks.
Micha
I can't connect
SSL problem?
Hi Sam,
My IP is still the same and I don't use dynamic DNS.
I've found this warning in my mail.log. warning: TLS library problem: 3566:error:140760FC:SSL routines:SSL23_GET_CLIENT_HELLO:unknown protocol:s23_srvr.c:649:
Could this be the problem?
Micha
I don't think that's it
not receiving any emails except from users@mydomain.com
Hi Sam,
great tutorials I have learnt a lot thanks to you! thanks a million
I am having a problems though, I followed your guides without getting any errors but I still dont receive any emails from external email accounts. It works between users on the server but that would be all. I can send emails and they ended in the spam folder but I know whats the cause of that.
I have redone all steps three times to unsure i havent missed anything, its frustrating...
also, I got my cert and the key with your guide, but I still get a warnings when I try to access mail.mydomain.com or logging through IMAPS on email client...
any clues mate? I would be grateful!
cheers,
Matt
Hi!
cert and mail problem
Sam,
I have downloaded it and copied it to
-rw-r--r-- 1 root root 8250 Mar 12 00:48 /etc/ssl/certs/cacert-root.crt
my .crt and .key files are different and they are in /etc/ssl/certs/ and /etc/ssl/private/
cert is for *.koltunm.com
my domain is koltunm.com
dns A is set to my WAN
and MX is set to koltunm.com
any idea?
matt
error while trying send email from external email
The error that the other server returned was:
451 4.3.5 : Helo command rejected: Server configuration error
SSL problem not authenticated
I got it fixed I commented out the check_helo_access hash:/etc/postfix/hello_access in the postifx/main.cf and all messages emails come through now! yay :)
the only problem I stayed with is the SSL cert, it's still not recognized by any browser....
could you help me to trouble shoot this issue? I have double checked the cert and I have created one cert more, still the issue is happening
Syntax error?
SSL problem not authenticated
well I haven't applied any certs to a browser on my machine... I thought there is a way to apply the cert on the server so it will be authenticated on clients like gmail email on android or through web with squirrel mail on computers in college for example.
if the cert is not authenticated, the msgs are still encrypted, correct?
matt
That's not what the CAcert
Postfix + SquirrelMail Error
Thanks Sam for this tutorial, anyway I'm running a Raspberry Pi 2nd Generation Model B and my Error comes up when i try to send to my google mail for testing.
451 4.3.0 : Temporary lookup failure
I have tried sending to other users registered in my mail server and it has worked. I don't see why it won't work with other email addresses.
Mail log
/var/log/mail.log? SamAdd new comment