 This is the second part of a five part tutorial that will show you how to install a full featured email server on your Raspberry Pi. This tutorial covers Dovecot, which provides SASL authentication and IMAP capabilities.
The parts are:
The Introduction & Contents Page (read first)
Raspberry Pi Email Server Part 1: Postfix
Raspberry Pi Email Server Part 2: Dovecot
Raspberry Pi Email Server Part 3: Squirrelmail
Raspberry Pi Email Server Part 4: Spam Detection with Spamassassin
Raspberry Pi Email Server Part 5: Spam Sorting with LMTP & Sieve
Fixing the errors that appeared during dovecot installation
In part 1, when you installed Dovecot I mentioned that you might see some errors like this:
Creating config file /etc/dovecot/conf.d/20-imap.conf with new version
[....] Restarting IMAP/POP3 mail server: dovecotError: socket() failed: Address family not supported by protocol
Error: service(imap-login): listen(::, 143) failed: Address family not supported by protocol
Error: socket() failed: Address family not supported by protocol
Error: service(imap-login): listen(::, 993) failed: Address family not supported by protocol
Fatal: Failed to start listeners
 failed!
invoke-rc.d: initscript dovecot, action "restart" failed.
dpkg: error processing dovecot-imapd (--configure):
 subprocess installed post-installation script returned error exit status 1
Setting up dovecot-ldap (1:2.1.7-7) ...
These errors are caused by the lack of IPv6 support, which I mentioned in the previous tutorial. To remove the errors, open the main dovecot configuration file (/etc/dovecot/dovecot.conf) and find this line:
listen = *, ::
And change it to:
listen = *
The * means “all IPv4 addresses”, the :: means “all IPv6 addresses”. Now restart Dovecot, and you shouldn’t get any errors:
sudo service dovecot restart
Note: since I wrote this tutorial, there have been a few small changes to the default configuration file - you may find that the line is commented (with a # at the start of the line). If so, remember to uncomment it when you make your changes!
Tell Dovecot where your Mailbox is
Open /etc/dovecot/conf.d/10-mail.conf and find this line:
mail_location = mbox:~/mail:INBOX=/var/mail/%u
Change it to this:
mail_location = maildir:~/Maildir
Instruct Postfix to use Dovecot SASL
Now we need to tell Postfix that we would like to use Dovecot for SASL authentication. Open /etc/postfix/main.cf and add these lines:
smtpd_sasl_type = dovecot
smtpd_sasl_path = private/auth
smtpd_sasl_auth_enable = yes
Now tell Dovecot to listen for SASL authentication requests from Postfix. Open /etc/dovecot/conf.d/10-master.conf and comment out the current block that begins with service auth (place a # at the start of each line). Replace it with this:
service auth {
        unix_listener /var/spool/postfix/private/auth {
                mode = 0660
                user = postfix
                group = postfix
        }
}
Now you want to enable plain text logins. Do it by adding these two lines to /etc/dovecot/conf.d/10-auth.conf. Make sure they are not already present in the file, or your settings may be overwritten with the default ones if the default is declared later in the file than the lines you add. If the parameters are already present, you can either modify the existing lines or comment them out and add these new ones:
disable_plaintext_auth = no
auth_mechanisms = plain login
Note that although the logins are in plain text, we will be setting Postfix up later so that it only allows you to use plaintext logins from within SSL/TLS. This means that your login and password will sent in an encrypted session - you wouldn't see them in plain text if you used a packet sniffer, for example. For now, we’re allowing unencrypted plain text logins so that we can test logging in with Telnet. Since the connection is local (from the Pi to the Pi), your password isn’t being sent over any insecure networks so this is fine.
Testing SASL
Creating a new user for testing purposes is a good idea. Let’s call this temporary user testmail and give it the password test1234 Use this command to add the user, and follow the prompts including setting a password.
sudo adduser testmail
Now restart Postfix and Dovecot:
sudo service postfix restart
sudo service dovecot restart
We’re now going to try and send an email after authenticating with SASL. The server is expecting to see a base64 encoded version of your username and password, so we have to convert it first. There are three ways of doing this, so I've given examples below using the testmail username and test1234 password:
#Method No.1
echo -ne '\000testmail\000test1234' | openssl base64

#Method No.2
perl -MMIME::Base64 -e 'print encode_base64("\0testmail\0test1234");'

#Method No.3
printf '\0%s\0%s' 'testmail' 'test1234' | openssl base64
I have discovered that if your password starts with a number, methods 1 and 2 don’t work. Assuming the username and password are testmail and test1234, the commands produce this:
AHRlc3RtYWlsAHRlc3QxMjM0
WARNING: If you’re having problems with authentication and you paste examples to forums or mailing lists, be aware that it is really easy to convert this back into your username and password (hence the creation of a test user). If you're using your real username and password to test, redact it before posting! Now, still logged into the Pi via SSH, you can telnet port 25 to test whether or not SASL is working. There’s only one extra step, which is the AUTH PLAIN command that comes after ehlo but before mail from. For testing, the permit_mynetworks parameter should be commented out under your postfix smtpd_recipient_restrictions block in /etc/postfix/main.cf. If you’re following on from Raspberry Pi Email Server Part 1: Postfix then this should already be the case. If you have to change it, remember to reload postfix (sudo service postfix reload) after you change the value. Here’s an example:
telnet localhost 25 Trying 127.0.0.1... Connected to localhost. Escape character is '^]'. 220 samhobbs ESMTP Postfix (Debian/GNU) ehlo facebook.com 250-samhobbs 250-PIPELINING 250-SIZE 10240000 250-VRFY 250-ETRN 250-STARTTLS 250-AUTH PLAIN LOGIN 250-ENHANCEDSTATUSCODES 250-8BITMIME 250 DSN AUTH PLAIN AHRlc3RtYWlsAHRlc3QxMjM0 235 2.7.0 Authentication successful mail from:testmail 250 2.1.0 Ok rcpt to:me@externalemail.com 250 2.1.5 Ok data 354 End data with. Subject: This is my first email that has been authenticated with Dovecot SASL Woop woop . 250 2.0.0 Ok: queued as B87133F768 quit 221 2.0.0 Bye Connection closed by foreign host.
Now try again but enter the username/password incorrectly (base64 encode something random) – you should get an error message and the email won’t send. If everything went to plan, then SASL is working properly! You can now uncomment permit_mynetworks again.
Separating Incoming email (unauthenticated) from Outgoing Email (SASL authenticated)
It’s probably a good idea to have a dedicated port for sending outgoing email…here’s why: Port 25 doesn’t require (but does offer) SSL/TLS encryption. If you mess up configuring your mail client you could end up letting it authenticate with SASL over insecure connections. Using a different port that only accepts SSL/TLS connections removes the risk that a poorly configured email client could be sending your password unencrypted over dodgy networks. There are two ports you can use for this:
- 465: SMTP over SSL
- 587: Email submission
587 is the “official” port for email clients (like K9 mail, Thunderbird and Outlook) to use when submitting messages to the Mail Submission Agent (your email server) – the submission may be encrypted or unencrypted depending on the server configuration. 465 was a port that was assigned for SMTP with SSL/TLS before the STARTTLS protocol was introduced, back in the days when you chose your port and that decided on the type of connection you were going to get (encrypted or unencrypted). STARTTLS changed things because it allows you to connect with an unencrypted connection (like the one you get with Telnet), and then upgrade to an encrypted connection without changing port… so when STARTTLS was introduced, SMTPS on port 465 was removed from the standard because you could do the same thing with a single port (25). However, I think there is some value in specifying a port for submission that only accepts SSL/TLS encrypted connections, and won’t work if the connection isn’t encrypted. This means that if you misconfigure your email client it just won’t work, instead of working and sending your password in an unencrypted format. So, anyway… Here’s how to set up Postfix to listen on port 465 for encrypted connections. The first step is telling Postfix to listen on port 465, so open /etc/postfix/master.cf and uncomment the line:
smtps inet n - - - - smtpd
Now restart Postfix:
sudo service postfix restart
Test whether Postfix is listening on port 465:
telnet localhost 465
Trying 127.0.0.1...
Connected to localhost.
Escape character is '^]'.
220 samhobbs.co.uk ESMTP Postfix (Debian/GNU)
ehlo samhobbs.co.uk
250-samhobbs
250-PIPELINING
250-SIZE 10240000
250-VRFY
250-ETRN
250-STARTTLS
250-AUTH PLAIN LOGIN
250-ENHANCEDSTATUSCODES
250-8BITMIME
250 DSN
quit
221 2.0.0 Bye
Connection closed by foreign host.
OK, so now it’s listening on the right port, but it’s allowing unencrypted connections. Here’s how you force TLS on port 465: open /etc/postfix/master.cf and find the line you uncommented earlier. Below it are some options, you want to edit them so that they look like this (i.e. uncomment lines 2 and 3):
smtps     inet  n       -       -       -       -       smtpd
  -o syslog_name=postfix/smtps
  -o smtpd_tls_wrappermode=yes
Line 3 is forcing TLS on port 465, and line 2 means that connections to port 465 have a different label in the logs, which can be useful for debugging.
sudo service postfix restart
Now try connecting with Telnet again… you should be able to establish a connection, but not receive any prompts from the server:
telnet localhost 465
Trying 127.0.0.1...
Connected to localhost.
Escape character is '^]'.
exit
exit
Connection closed by foreign host.
Now try openssl:
openssl s_client -connect localhost:465 -quiet
depth=0 CN = samhobbs
verify error:num=18:self signed certificate
verify return:1
depth=0 CN = samhobbs
verify return:1
220 samhobbs.co.uk ESMTP Postfix (Debian/GNU)
quit
221 2.0.0 Bye
Good: we are able to start a TLS encrypted connection. We got some errors because the certificate is self-signed (it's not signed by a certificate that is in the trusted root store on the server) but this is OK because we're just using the certificate for testing for now. When you come back later to set up a proper certificate, you can use this command to verify it. The -CApath option tells openssl where the trusted certificates are stored on your system:
openssl s_client -connect localhost:465 -quiet -CApath /etc/ssl/certs
Successful validation looks something like this:
sam@samhobbs:~$ openssl s_client -connect localhost:465 -quiet -CApath /etc/ssl/certs
depth=3 C = SE, O = AddTrust AB, OU = AddTrust External TTP Network, CN = AddTrust External CA Root
verify return:1
depth=2 C = GB, ST = Greater Manchester, L = Salford, O = COMODO CA Limited, CN = COMODO RSA Certification Authority
verify return:1
depth=1 C = GB, ST = Greater Manchester, L = Salford, O = COMODO CA Limited, CN = COMODO RSA Domain Validation Secure Server CA
verify return:1
depth=0 OU = Domain Control Validated, OU = PositiveSSL, CN = samhobbs.co.uk
verify return:1
220 samhobbs.co.uk ESMTP Postfix (Ubuntu)
quit
221 2.0.0 Bye
There are a couple more changes we want to make here: first, tell Postfix to only advertise SASL authentication over encrypted connections (so that you don’t accidentally send your password in the clear). Open /etc/postfix/main.cf and add this line:
smtpd_tls_auth_only = yes
sudo service postfix reload
Now connect to port 25 and you shouldn’t see AUTH advertised:
telnet localhost 25
Trying 127.0.0.1...
Connected to localhost.
Escape character is '^]'.
220 samhobbs.co.uk ESMTP Postfix (Debian/GNU)
ehlo samhobbs.co.uk
250-samhobbs.co.uk
250-PIPELINING
250-SIZE 10240000
250-VRFY
250-ETRN
250-STARTTLS
250-ENHANCEDSTATUSCODES
250-8BITMIME
250 DSN
Lastly, we want to override the smtp_recipient_restrictions for port 465 so that it doesn't accept incoming messages from unauthenticated users. At first, I didn't make this change and I noticed that some spam emails were coming in on port 465 and bypassing my spam filter, which I configured to scan all incoming email on port 25, but not 465 because I only expected it to be used for outgoing email. We can do this by overriding the smtp_recipient_restrictions list for port 465 in /etc/postfix/master.cf. Open master.cf and find the smtps line. Add a new recipient restrictions list option like this:
smtps     inet  n       -       -       -       -       smtpd
  -o syslog_name=postfix/smtps
  -o smtpd_tls_wrappermode=yes
  -o smtpd_recipient_restrictions=permit_sasl_authenticated,reject
Now reload postfix:
sudo service postfix reload
Perfect! Postfix configuration is now complete.
Testing IMAP
There are two main protocols for fetching mail: POP and IMAP. The main difference between them is what they do with emails when they collect them: a POP client will fetch email from your server and remove it from the server when it’s done. This is inconvenient if you want to connect with two or more devices (like a phone and a computer) and have complete copies of all your emails on both. IMAP, on the other hand, makes a copy of the emails on the server and leaves the originals there. For this reason, I think IMAP is much more useful than POP and I didn’t even bother to set up POP on my server. We can now test the IMAP server with Telnet in a similar way to SMTP & SASL testing earlier. This time, we’ll be using port 143, the standard port for IMAP. The stages are:
- establish a connection with
telnet localhost 143 - log in with
a login "USERNAME" "PASSWORD"" (not base64 encoded this time) - select inbox to see messages inside
b select inbox - logout with
c logout
In case you're wondering, the "a b c" thing is done because a client can send multiple commands to the server at once, and they might not come back in the same order depending on what they are. So, the responses have the same letter as the commands they are responding to so that the client doesn't get muddled. Here’s an example, using the testmail user we created earlier:
telnet localhost 143
Trying 127.0.0.1...
Connected to localhost.
Escape character is '^]'.
* OK [CAPABILITY IMAP4rev1 LITERAL+ SASL-IR LOGIN-REFERRALS ID ENABLE IDLE STARTTLS AUTH=PLAIN AUTH=LOGIN] Dovecot ready.
a login "testmail" "test1234"
a OK [CAPABILITY IMAP4rev1 LITERAL+ SASL-IR LOGIN-REFERRALS ID ENABLE IDLE SORT SORT=DISPLAY THREAD=REFERENCES THREAD=REFS MULTIAPPEND UNSELECT CHILDREN NAMESPACE UIDPLUS LIST-EXTENDED I18NLEVEL=1 CONDSTORE QRESYNC ESEARCH ESORT SEARCHRES WITHIN CONTEXT=SEARCH LIST-STATUS SPECIAL-USE] Logged in
b select inbox
* FLAGS (\Answered \Flagged \Deleted \Seen \Draft)
* OK [PERMANENTFLAGS (\Answered \Flagged \Deleted \Seen \Draft \*)] Flags permitted.
* 1 EXISTS
* 0 RECENT
* OK [UNSEEN 1] First unseen.
* OK [UIDVALIDITY 1385217480] UIDs valid
* OK [UIDNEXT 2] Predicted next UID
* OK [NOMODSEQ] No permanent modsequences
b OK [READ-WRITE] Select completed.
c logout
* BYE Logging out
c OK Logout completed.
Connection closed by foreign host.
Adding TLS support
Now that we know IMAP is working, we need to enable IMAPS (imap with SSL/TLS). The standard port for this is 993. Many other tutorials that were written for older versions of dovecot will tell you to do this in different ways that won’t work, I tried 3 different methods before I ended up with a working one. First, edit /etc/dovecot/conf.d/10-master.conf, find the “service imap-login” block and uncomment the port and SSL lines so that it looks like this:
service imap-login {
  inet_listener imap {
    port = 143
  }
  inet_listener imaps {
    port = 993
    ssl = yes
  }
}
Edit 14/10/2015: the default dovecot configuration files changed recently after Jessie became the new stable distribution of Debian, which caused some users problems; TLS on port 993 used to be enabled by default but now it isn't. We need to re-enable it. In /etc/dovecot/conf.d/10-ssl.conf, find ssl = no and change it to:
ssl = yes
There have been some security vulnerabilities discovered in older versions of the SSL protocol in recent times. SSLv2 is disabled by default, but it doesn't harm to explicitly disable it again. SSLv3 is vulnerable to an attack called POODLE, so we will disable it too. In the same file, find the ssl_protocols parameter line, uncomment it and add !SSLv3 to the end, like this:
ssl_protocols = !SSLv2 !SSLv3
Edit 02/09/2017: if you're using Debian Stretch or later, or one of its derivatives, then you will need to edit that line to match the following. The SSLv2 option is no longer recognised as an option for ssl_protocols because it has been removed entirely:
ssl_protocols = !SSLv3
For some bizarre reason, the Dovecot package for Raspberry Pi (and possibly newer versions of Ubuntu) does not create a self-signed certificate during installation like it used to. So, we have to create one manually. If you look in /usr/share/dovecot/ you will find the script that used to be used to generate the certificate; we can use it ourselves to simplify the process. The script is located at /usr/share/dovecot/mkcert.sh and looks like this:
#!/bin/sh

# Generates a self-signed certificate.
# Edit dovecot-openssl.cnf before running this.

OPENSSL=${OPENSSL-openssl}
SSLDIR=${SSLDIR-/etc/ssl}
OPENSSLCONFIG=${OPENSSLCONFIG-dovecot-openssl.cnf}

CERTDIR=/etc/dovecot
KEYDIR=/etc/dovecot/private

CERTFILE=$CERTDIR/dovecot.pem
KEYFILE=$KEYDIR/dovecot.pem

if [ ! -d $CERTDIR ]; then
  echo "$SSLDIR/certs directory doesn't exist"
  exit 1
fi

if [ ! -d $KEYDIR ]; then
  echo "$SSLDIR/private directory doesn't exist"
  exit 1
fi

if [ -f $CERTFILE ]; then
  echo "$CERTFILE already exists, won't overwrite"
  exit 1
fi

if [ -f $KEYFILE ]; then
  echo "$KEYFILE already exists, won't overwrite"
  exit 1
fi

$OPENSSL req -new -x509 -nodes -config $OPENSSLCONFIG -out $CERTFILE -keyout $KEYFILE -days 365 || exit 2
chmod 0600 $KEYFILE
echo
$OPENSSL x509 -subject -fingerprint -noout -in $CERTFILE || exit 2
If you were going to use this certificate for any significant length of time, it would be worth editing the parameters in the config file it uses (/usr/share/dovecot/dovecot-openssl.cnf) to set the proper common name and contact details on the certificate. However, I suggest you leave the defaults as they are, use this certificate just for testing, and then come back later and generate a new cert when everything is working (more on that later). You must be in the same folder as the configuration file when you run the script, or it will not find the config and the certificate generation will fail. The following two commands will change to the right folder and then execute the script:
cd /usr/share/dovecot
sudo ./mkcert.sh
You should see a message "writing new private key to '/etc/dovecot/private/dovecot.pem'" and then some details about the certificate. Next, find the following two lines in /etc/dovecot/conf.d/10-ssl.conf and uncomment them:
#ssl_cert = </etc/dovecot/dovecot.pem
#ssl_key = </etc/dovecot/private/dovecot.pem
Now reload dovecot to apply the changes:
sudo service dovecot reload
Since IMAPS is a connection over SSL/TLS, we can’t use Telnet to test it. Instead, we use openssl to create a secure connection. There are two versions of the command, one will show you LOADS of information about the certificate used to encrypt the connection, and the other will suppress this info. I recommend trying the long version out of interest, but both will work the same for the test: For full information:
openssl s_client -connect localhost:993
For minimal information:
openssl s_client -connect localhost:993 -quiet
I won’t print the output of the first command, because it’s ridiculously long. Here’s an example of the second, including a login test:
admin@samhobbs /etc/dovecot/conf.d $ openssl s_client -connect localhost:993 -quiet
depth=0 O = Dovecot mail server, OU = samhobbs, CN = samhobbs, emailAddress = root@samhobbs.co.uk
verify error:num=18:self signed certificate
verify return:1
depth=0 O = Dovecot mail server, OU = samhobbs, CN = samhobbs, emailAddress = root@samhobbs.co.uk
verify return:1
* OK [CAPABILITY IMAP4rev1 LITERAL+ SASL-IR LOGIN-REFERRALS ID ENABLE IDLE AUTH=PLAIN AUTH=LOGIN] Dovecot ready.
a login "testmail" "test1234"
a OK [CAPABILITY IMAP4rev1 LITERAL+ SASL-IR LOGIN-REFERRALS ID ENABLE IDLE SORT SORT=DISPLAY THREAD=REFERENCES THREAD=REFS MULTIAPPEND UNSELECT CHILDREN NAMESPACE UIDPLUS LIST-EXTENDED I18NLEVEL=1 CONDSTORE QRESYNC ESEARCH ESORT SEARCHRES WITHIN CONTEXT=SEARCH LIST-STATUS SPECIAL-USE] Logged in
b logout
* BYE Logging out
b OK Logout completed.
Connection closed by foreign host.
Good stuff: SSL/TLS is working on port 993, and you can log in successfully. Note that by default Dovecot uses a “snakeoil” self-signed certificate. SSL/TLS certificates are used for two purposes: encryption and verification. The “snakeoil” certificate will encrypt your content but it won’t verify that you’re talking to your server – you could be talking to someone imitating your server (anyone can create a self-signed certificate claiming to be any website). If you’d like to get your certificate signed without forking out loads of money to a cert signing authority, I’d recommend CAcert. I've written a tutorial explaining how to generate your own cert and get it signed here. If you opt for a commercial certificate, you can use the CAcert tutorial to generate the certificate and then this tutorial will explain the differences in the installation/configuration of commercial certificates once you have it signed. If you're testing a proper certificate, use this command to tell openssl where the trusted root certificates are stored:
openssl s_client -connect localhost:993 -quiet -CApath /etc/ssl/certs
Tidying up and enabling WAN access
Before opening the ports on your router to the world, it’s a good idea to delete that test user because the password is so easy to guess.
sudo userdel testmail
Also, if you still use the "pi" login, for goodness' sake change the password from "raspberry"! You can do this using the passwd command when logged in as pi:
passwd
Or you can achieve the same thing when logged in as another user by using sudo to gain root privileges:
sudo passwd pi
Now you can open a few ports on your router’s firewall. Make sure your Pi has a static LAN IP address and then forward these ports from WAN to its LAN IP address:
- Port 25 for SMTP (used for receiving emails)
- Port 465 for secure SMTP (used for sending emails after SASL authentication)
- Port 993 for IMAPS (used to receive emails on your phone/tablet/computer)
Here’s an example on my router, running OpenWrt: 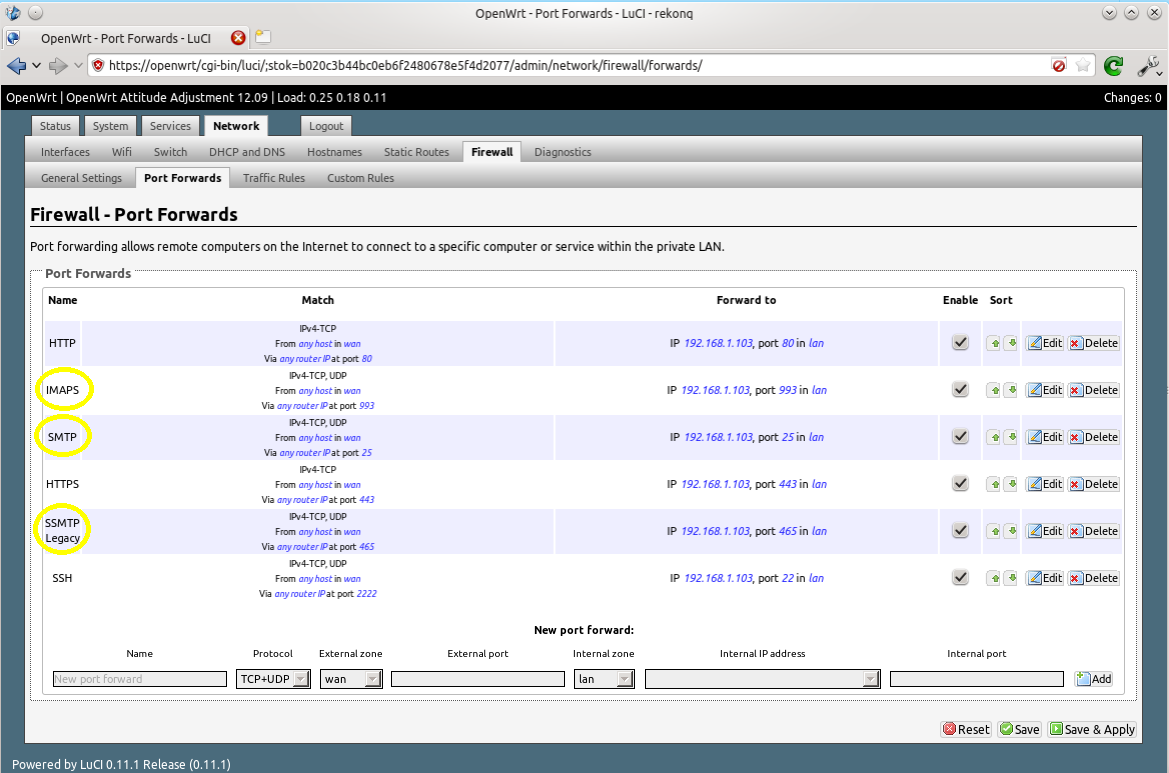
Setting up IMAP Email Clients
I’m now going to run through setting up IMAP email clients quickly, using K9 Mail on Android and Thunderbird on GNU/Linux as examples. The setup for Thunderbird on Windows and Mac OSX should be very similar. The basics are this:
- Select an IMAP connection
- Your login is your username only (omit @yourdomain.com), and you password is…your password!
- For incoming emails: select use SSL/TLS always and the program should automatically select port 993
- For outgoing emails: select SSL/TLS always. The program may suggest port 587, but you want port 465
K9 Mail
Open K9 Mail and select add new account. Type in your account information (you@yourdomain.com and password) and then select manual setup. Select IMAP and then enter your information as follows… Incoming email: 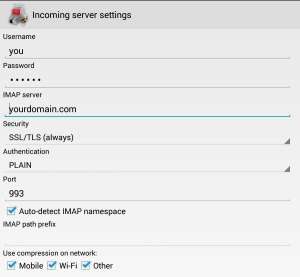 Outgoing email:
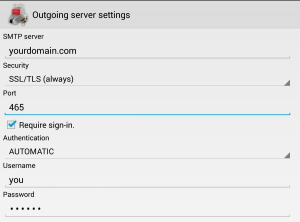
Thunderbird
Open Thunderbird, and then click Account Actions –> Add Mail Account. Fill in your password and email address, which is your username followed by your fully qualified domain name (FQDN), i.e. username@yourdomain.com: 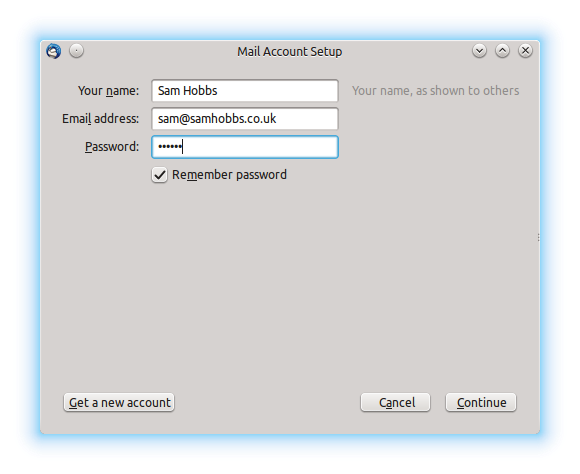 Thunderbird will try to auto-detect settings and fail. Don’t worry, this is normal. Select “manual config”:
 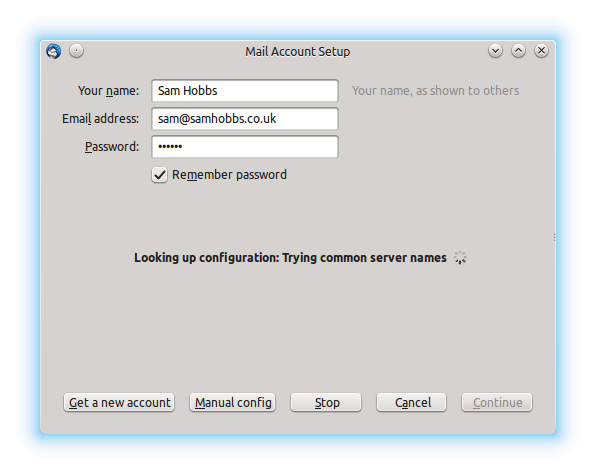 Now edit the settings as appropriate. I had to remove a period (.) from in front of my “server hostname”, and edit the SSL and Authentication settings. If you select “SSL/TLS” for both incoming and outgoing, ports 993 and 465 are automatically selected:
 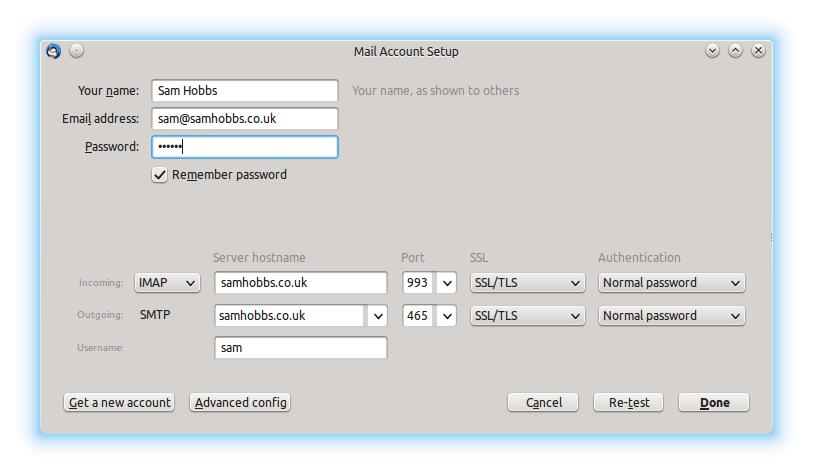 Now try emailing yourself from your external email address, and see if your email gets through. If you are having problems, be sure to check you’ve set up an MX record as well as a DNS A record.
Stuck in spam filters?
A few people have contacted me recently to say that their email server is working fine but their emails are getting sent to Gmail's spam folder. If you are experiencing problems like this (or even if you're not), try setting up an SPF and/or PTR record as explained in my DNS basics tutorial. You might also want to check if your domain name or IP address are on any blacklists. There's a handy website called MX toolbox that lets you do this (choose blacklist check from the dropdown menu).
Almost done…
Good news! If you’ve reached this far and everything is working, then you’re almost done. The next step (Webmail with Squirrelmail) is optional but by far the easiest of the three steps. If you’ve hit a rut, please post a comment and I’ll try and help you out. If not… continue to Raspberry Pi Email Server Part 3: Squirrelmail
Comments
identities
myorigin. There is no authentication built into the SMTP protocol itself - the headers can say whatever you like. The way postfix is configured in this tutorial, once you have authenticated with SASL the server will let you send email from any address. Samtelnet localhost 465: Address familiy not supported
Hi Sam,
nice tutorial. I am stuck at listening to port 465. Here is my Postfix test:
user@raspberry /etc/postfix $ telnet localhost 465
Trying 127.0.0.1...
Trying ::1...
telnet: Unable to connect to remote host: Address family not supported by protocol
user@raspberry /etc/postfix $ nmap -v -sT localhost
Starting Nmap 6.00 ( http://nmap.org ) at 2016-01-23 22:45 UTC
Initiating Ping Scan at 22:45
Scanning localhost (127.0.0.1) [2 ports]
Completed Ping Scan at 22:45, 0.01s elapsed (1 total hosts)
Initiating Connect Scan at 22:45
Scanning localhost (127.0.0.1) [1000 ports]
Discovered open port 443/tcp on 127.0.0.1
Discovered open port 25/tcp on 127.0.0.1
Discovered open port 22/tcp on 127.0.0.1
Discovered open port 80/tcp on 127.0.0.1
Discovered open port 143/tcp on 127.0.0.1
Discovered open port 993/tcp on 127.0.0.1
Discovered open port 9000/tcp on 127.0.0.1
Discovered open port 631/tcp on 127.0.0.1
Discovered open port 3690/tcp on 127.0.0.1
So there is no listener on port 465. /etc/dovecot/conf.d/10-master.conf:
service auth {
# auth_socket_path points to ... permissions).
# unix_listener auth-userdb {
#mode = 0666
#user =
#group =
# }
# Postfix smtp-auth
unix_listener /var/spool/postfix/private/auth {
mode = 0660
user = postfix
group = postfix
}
# Auth process is run as this user.
#user = $default_internal_user
}
I do not see the mistake/error. Do you have an idea and can you give me a hint?
Which stage are you at?
/etc/postfix/master.cf: Do you have that line? Once you enable tls wrappermode, you won't be able to telnet to port 465 either, you'll have to useopenssl s_client. SamThanks
That was it. I did not see for hours that I had uncommented the smtp line.
multiple domains
...further to my previous message, I still run my old Blackberry Bold with the Blackberry Internet Service. I just tried adding george@domain2 as a new email account to the blackberry service and it says that it's already there (meaning that it doesn't differentiate between george@domain1 and george@domain2). Which means I can only reply from george@domain1 from my phone. I can live with this, but I am quite surprised by the way this muti-domain scheme works (unless I have made a mistake of course)
I've done a bit of research
Self Signed Certificates
Hi again Sam, continuing the process of tying up loose ends I have certificate issues with squirrelmail, When I open Outlook I get a warning from outlook telling me that the server security certificate can't be verified (target principal name is incorrect). So I went back to revisit the installation of dovecot (is that where the problem might be) and I tried following the steps leading up to running mkcert.sh. However, when I do: 'cd /usr/share/dovecot' and then 'sudo ./mkcert.sh', I get "sudo ./mkcert.sh: command not found" . Just wondering if you have any ideas. One thing I am wondering about is, do I need to upgrade something as some of the files seem to be missing, for example, I can't find the file: /usr/share/dovecot/dovecot-openssl.cnf.
certificate signing
Email Server
The (excellent) tutorial has got me to the point where I need to setup my mail account. First, dovecot now includes certificates so the mkcert.sh process is not needed - in fact, mkcert.sh is not provided.
I have installed the email server on a Pi2 which is on my LAN behind a Draytek router. Incoming WAN port 25 is NATed to the Pi2 (192.168.1.21 port 25).
I have a namecheap domain xxx.co.uk with a MX record pointing to my WAN IP address. If I use my normal mail to send a message to myself at user@xxx.co.uk I can see that this arrives on the Pi2 at /home/user/Maildir/new. Hurrah!!
The current problem is setting up an mail account (on a Mac using Apple Mail). Should the incoming mail server be xxx.co.uk or 192.168.1.21? Same for outgoing server? Is the user/password that for the Pi2?
When an account is setup with incoming mail server 192.168.1.12 and outgoing xxx.co.uk, IMAP port 993.
Although mail is present, I cannot load it using the new account: if I try and send email to my normal ISP email account I get a message:
The server response was: jmn@<ISP email acount> Rleay access denied.
Confused - would appreciate your advice.
John
Hi John,
/etc/issue.net. The Postfix and Dovecot package verisons would be handy too for the record: The incoming and outgoing mail servers should be your domain name (xxx.co.uk). The username and password are the system logins and passwords (you can change a password with thepasswdcommand by the way - better do that if you still have the default pi/raspberry combination). Not sure why you're getting that response from your ISP's email server. Try sending a message to me (email address is on the contact page), I'll be able to check the logs at this end. I'd still prefer to troubleshoot it in comments here though, because there's a chance someone else will have the same problem in the future. SamMail Server
Hi Sam,
Current Pi2 download is from 2015-05-05-raspbian-wheezy.zip; /etc/issue.net gives: Raspbian GNU/Linux 7 and post sudo apt-cache policy gives:
postfix:
Installed: 2.9.6-2
Candidate: 2.9.6-2
Version table:
*** 2.9.6-2 0
500 http://mirrordirector.raspbian.org/raspbian/ wheezy/main armhf Packages
100 /var/lib/dpkg/status
dovecot-core:
Installed: 1:2.1.7-7+deb7u1
Candidate: 1:2.1.7-7+deb7u1
Version table:
*** 1:2.1.7-7+deb7u1 0
500 http://mirrordirector.raspbian.org/raspbian/ wheezy/main armhf Packages
100 /var/lib/dpkg/status
The problems I reported were self-inflicted. In reviewing everything I did I found I had skipped over an essential detail in dovecot..master.conf in not setting up the service imap-login block. After I fixed that everything fell into place. No further funny messages from my ISP's mail server.
The mail server will only be used by those on my LAN. The new xxx.co.uk domain shares the same (static) IP address as that provided by my ISP (Demon) - of course. It seems reasonable (faster?) to use the LAN IP address of the RPi mailer (192.168.1.21) for both incoming and outgoing mail. Everything is working. (Many thanks, again.)
I have obtained certificates from CaCert but am still trying to understand how these can be used such that https://www.xxx.co.uk will be accepted by Firefox. If I cannot solve this puzzle (means learning about root/signed/user certificates) I might have to come back to you for explanations/guidance. I am not convinced that I have got the correct certifcates for my new domain since I have had to mark them as trusted.
John
IP address vs domain name
Hit the wall in user's config (probably in Dovecot part of it)
General config of email setup seems to be fine (and I am using it quite happily for about two months now). If I add an user with 'adduser' command I can send/receive mails for the new user just fine.
But I have had an user (pre-existing) where I followed the procedure: copied the Maildir with subdirs to appropriate places, did chown and chmod per your instructions. I tried, checked and rechecked few times, and I could not get it working with Squirrelmail or Thunderbird.
So I gave up on that. I rebooted , deleted the user in question, deleted its home directory and rebooted again. Than I created new user with the same name and - again ended up at the same point as before: neither Squirrelmail nor Thunderbird are able to communicate with this user. Tried to create two different users again (different names of course) - it all works OK for those users. So it looks like I did something to one of many config files which makes impossible to use this specific user name (???).
If I am not asking too much - can you suggest where are the most possible points where I could have made such kind of mess?
Anything useful in the logs?
/var/log/mail.logand/var/log/auth.logwhen you try to log in as that user? SamHi,
Hi,
Thanks for a very quick response.
It turned out the problem was not with the mail system at all. Until you suggested check the auth.log I was lost. But when I did it was easy to track down whati is thappening. It found remote autentication failures from dovecot rhost trying to connect to the 'problem' user's mail. At first I had no idea why is that. But when I tried to remotely ssh connect as that user it was quickly clear what the problem is. Slovenian keyboard is QWERTZ variety and not more common UK/US QWERTY. Evidently I have some glitch in Jessie setup - when I set a new password to an user i.e 'yale' it does not get writen correctly, it is instead saved as 'zale'. When I am login to desktop on RPi, when I type (and see) 'yale' it gets accepted, but when I try to login remotely, I cannot login unless I use 'zale' as a password.
I'll try to fix this tomorrow. Unfortunatelly that kind of issue is not uncommon for us in Slovenia (even in non Linux ambient). It is only that this time only this user had pasword containing an letter which is placed differently in UK/US and Slovenian kbd layout otherwise I may have noticed it earlier (and wit some luck it would not seem as an issue with mail. It is to my comfort that the Frenchies have the same problem, only more so :)
I know my English is so, so, but I hope my reply was clear enough. Please do excuse me for bothering you on Sunday and thanks you very much for a very quick an effective help.
Regards, Vladimir
never would have guessed that
domain name and email server ip
Hi Sam,
I finally managed to get Outlook to work by using my email server static IP address (RasPi) where the domain name should go. I also realized that if I want to connect from within my LAN, I must use the static IP 192.168.1.99. I've looked through all the tutorial again and can't see where I've gone wrong. Outside my LAN I have to use my domain for it to work - courseworkresources.com.
Any ideas how I can use my domain name from within my LAN for it to work. Thunderbird is not working at all even if I remove the period before the domain name...
Regards,
Jo
change the /etc/hosts file on your router
/etc/hostsfile to resolve your domain name to the LAN IP address. That way any clients inside your LAN using the router as a DNS resolver will get the LAN IP. SamShell Access to TalkTalk Router
Hi Sam,
Thanks for that.
I'll do some research and try to fix it this weekend. Any success and I'll let you know.
Regards,
Jo
Switch to ipv6 connection
After switching to a new ISP I received an
ipv6ip adress. Are there any big changes I have to make in my email server? It doesn't seem to work anymore after this change.When trying to test openssl I instantly get this error:
gethostbyname failureI allready enabled ipv6 again in my postfix config and enabled the kernel atconnect:errno=110
/etc/modules. After doing this I'm not getting the Ipv6 warnings anymore but still the server doesn't seem to respond when trying to connect to it. Also telnet to port 25 doesn't seem to work anymore.Do you have any tips to set my mail server up so it works fine again?
Check DNS and hosts file?
- Check your DNS records resolve to your WAN IPv6 IP address. If you tried to connect with openssl from another computer, that could be the cause of the problem.
- Make sure your
My/etc/hostsfile has an IPv6 loopback address - that could be the cause if you tried to connect to "localhost" when you were testing openssl./etc/hostsfile looks like this:sam@samhobbs:/var/log/named$ cat /etc/hosts 127.0.0.1 localhost 127.0.1.1 samhobbs # The following lines are desirable for IPv6 capable hosts ::1 ip6-localhost ip6-loopback fe00::0 ip6-localnet ff00::0 ip6-mcastprefix ff02::1 ip6-allnodes ff02::2 ip6-allroutersSamNew ipv6 connection
My
/etc/hostsfile looks fine just like yours. I'm wondering what the actual ipv6 address of my router is?When checking at websites like http://whatismyv6.com my ipv6 address changes every day and is also different on all my devices on this network. Do you have any idea where to find my actual ipv6 address to use for an AAAA record to connect to my domain/server?
router's admin panel?
New ipv6 connection (connection got refused)
After some troubleshooting and reading around on the internet I found out every device on an IPV6 connection got their own global IP address so not just the one from the router. I setup a static IPV6 address in my
/etc/network/interfacesand added this to an AAAA record on my domain.This morning I was able to send 2 messages to my gmail account using thunderbird but I was still unable to receive messages (Connection refused). Also after sending a message I still got the error
Can't connect to the mail server: Connection refused (Translated from my own language)when thunderbird tried to save the mail in the send folder. Also when trying to receive any emails thunderbird instantly returnsConnection refusedHere is my
mail.logwhen trying to send an email to my gmail account:Feb 6 15:25:32 raspberry-mail postfix/smtps/smtpd[19439]: connect from unknown[2a02:a212:1d80:1800:98d8:6f4a:6835:6e06]
Feb 6 15:25:34 raspberry-mail postfix/smtps/smtpd[19439]: 5354440A6D: client=unknown[2a02:a212:1d80:1800:98d8:6f4a:6835:6e06], sasl_method=PLAIN, sasl_username=stefan
Feb 6 15:25:34 raspberry-mail postfix/cleanup[19446]: 5354440A6D: message-id=<56B61064.7020404@mydomain>
Feb 6 15:25:34 raspberry-mail postfix/qmgr[2867]: 5354440A6D: from=, size=633, nrcpt=1 (queue active)
Feb 6 15:25:34 raspberry-mail postfix/smtps/smtpd[19439]: disconnect from unknown[2a02:a212:1d80:1800:98d8:6f4a:6835:6e06]
Feb 6 15:25:35 raspberry-mail postfix/smtp[19447]: 5354440A6D: to=<[username]@gmail.com>, relay=gmail-smtp-in.l.google.com[2a00:1450:4013:c00::1a]:25, delay=0.72, delays=0.2/0.07/0.29/$
Feb 6 15:25:35 raspberry-mail postfix/cleanup[19446]: 1299340A6F: message-id=<20160206152535.1299340A6F@mydomain>
Feb 6 15:25:35 raspberry-mail postfix/bounce[19448]: 5354440A6D: sender non-delivery notification: 1299340A6F
Feb 6 15:25:35 raspberry-mail postfix/qmgr[2867]: 1299340A6F: from=<>, size=3203, nrcpt=1 (queue active)
Feb 6 15:25:35 raspberry-mail postfix/qmgr[2867]: 5354440A6D: removed
Feb 6 15:25:35 raspberry-mail dovecot: lmtp(19452): Connect from local
Feb 6 15:25:35 raspberry-mail dovecot: lmtp(19452, stefan): j2qUEm8Qtlb8SwAA0kC7uw: sieve: msgid=<20160206152535.1299340A6F@mydomain>: stored mail into mailbox 'INBOX'
Feb 6 15:25:35 raspberry-mail postfix/lmtp[19451]: 1299340A6F: to=, relay=mydomain[private/dovecot-lmtp], delay=0.67, delays=0.02/0.1/0.12/0.43, dsn=2.0.0, status$
Feb 6 15:25:35 raspberry-mail dovecot: lmtp(19452): Disconnect from local: Client quit (in reset)
Feb 6 15:25:35 raspberry-mail postfix/qmgr[2867]: 1299340A6F: removed
Do you have any idea what went wrong? I have no idea at the moment.
try mutt for testing
Mutt
Yes mutt seems to work fine I'm receiving all the emails I'm sending from my gmail account to my mail server.
But before switching hosts my thunderbird was just working fine. So I'm not sure if its thunderbird establishing the TLS connection.
Thunderbird should be able to use IPV6 right?
try a different email client?
ssl_protocolsin/etc/dovecot/conf.d/10-ssl.confto allow SSLv3 and see if you can connect with thunderbird. Which OS are you using BTW (the one with Thunderbird on)? SamReply from googles mail server
After some looking around I found this in the attachments of a mutt message which was returned from the google mail servers:
gmail-smtp-in.l.google.com[ipv6 address from google (I think)] said: 550-5.7.1

    [ipv6 address] Our system has detected that

    550-5.7.1 this message does not meet IPv6 sending guidelines regarding PTR

    550-5.7.1 records and authentication. Please review 550-5.7.1

    https://support.google.com/mail/?p=ipv6_authentication_error for more 550

    5.7.1 information. n123si7512581wmb.41 - gsmtp (in reply to end of DATA

    command)
So I'm going to take a look at the guidelines and also enabling SSLv3 and SSLv2 didn't help receiving any emails in my thunderbird client.
The OS I'm using is: Windows 10
Dovecot tutorial
Hi Sam,
(Apologies - me again...)
My current mail server was created under wheezy and is still OK. Since I have a new Pi (for the backup) I decided to use this to generate a replacement SD card with Jessie and repeat the Postfix/Dovecot tutorials. All OK up to the point where it necessary to use mkcert.sh to generate certificates. Since I had already signed up to CaCert and obtained xx.crt and xx.key certificates which are already in use in the mail server, I did not go through the mkcert.sh process but just wget the cacert root certificate and installed mine in /etc/ssl/certs and private..
Then modified 10-ssl.conf and main.cf to point to my crt and key files.
At the openssl s_client test I get these errors:
jmnpi3:~> openssl s_client -connect localhost:993 -quiet
depth=0 CN = *.xxxx.co.uk
verify error:num=20:unable to get local issuer certificate
verify return:1
depth=0 CN = *.xxxx.co.uk
verify error:num=27:certificate not trusted
verify return:1
depth=0 CN = *.xxxx.co.uk
verify error:num=21:unable to verify the first certificate
verify return:1
* OK [CAPABILITY IMAP4rev1 LITERAL+ SASL-IR LOGIN-REFERRALS ID ENABLE IDLE AUTH=PLAIN AUTH=LOGIN] Dovecot ready.
* BYE Disconnected for inactivity.
main.cf and 10-ssl.conf look much the same on wheezy and jessie.
I seem to have done something wrong with the certificates but not sure what. Could you advise please?
Thanks ...John
Hi again,
Add new comment