 Google Analytics is everywhere. Seriously, everywhere. So much so that Google probably has a complete record of you hopping from site to site during your normal browsing, information that happens to be both extremely valuable to them and a pretty serious invasion of your privacy. When I set this website up initially, I wanted some usage statistics so that I could use to understand how people were using the site (if at all!). Without thinking about it much, I slapped Google Analytics on using a WordPress plugin called “Google Analytics for WordPress” by Joost de Valk. This plugin adds some JavaScript to the header of each page on the site that instructs your browser to make a connection to Google when it loads the page, which is how Google gets all that information about your browsing habits. When I learned about how Analytics works, it really bothered me. I started looking into ways to block Google from tracking me and then realised how hypocritical it was to dislike it myself and simultaneously enable Google to collect data about other people. As it turns out, there are lots of free (libre) open source alternatives to Google Analytics that are easy to set up and will give you very similar information: Webalizer is just one of them. I was putting off installing one because I thought it would be difficult and take ages, but it wasn’t difficult and it didn’t take long at all.
How Webalizer Works
Ever taken a look in /var/log/apache2/? The log files in this directory contain a wealth of information. Take a peek at your access log with this command:
cat /var/log/apache2/access.log | less
Each entry contains:
- The client’s IP address
- A time stamp
- The page they requested
- The response code
- The amount of data that was transferred
- The referrer (previous page they were on)
- Info about their OS, browser type and version
Here is a typical example:
118.100.99.66 - - [05/Jan/2014:07:25:32 +0000] "GET /2013/10/install-owncloud-on-your-raspberry-pi/ HTTP/1.1" 200 12135 "/2013/10/speed-up-your-pi-by-booting-to-a-usb-flash-drive/" "Mozilla/5.0 (Windows NT 5.1; rv:26.0) Gecko/20100101 Firefox/26.0"
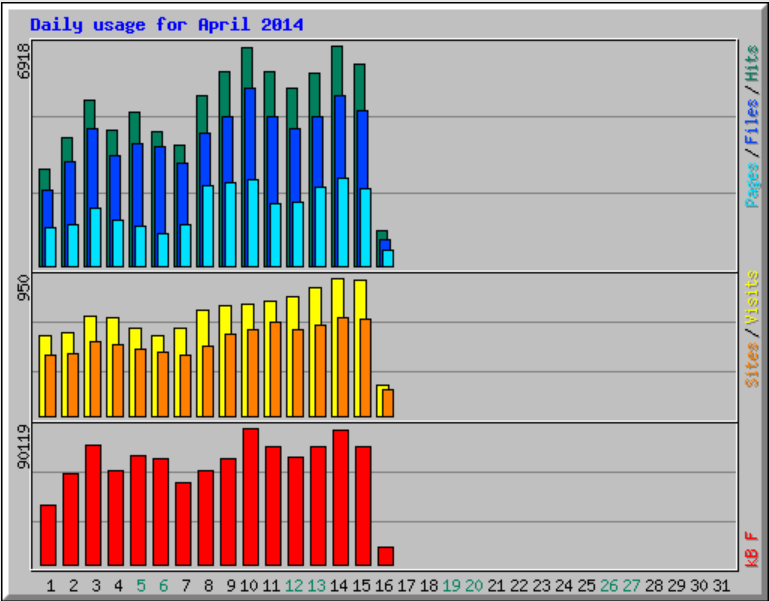
So this tells us that on 5th Jan someone with IP address 118.100.99.66 using Firefox on Windows was on this page and they clicked a link to this page. The request was approved (code 200) and 12135 bytes of data were transferred. Reading through the log files manually is a little tedious, though, so what Webalizer does is takes all of this information and sorts it intelligently: it does the obvious things like summing how many times a specific page has been requested, but it also does clever things like grouping requests from the same IP address into a single visit etc. Webalizer can even look up IP addresses in a database to determine which country the requests are coming from. It then produces graphical and tabulated statistics as HTML pages that you can visit to get useful sttistics, instead of trawling through log files. When run at regular intervals using CRON, it will periodically update the web page and keep the information current, so you can set it up and then leave it running instead of logging in to run the command each time… simple!
Organising your Log Files
First things first: let’s make sure that your Apache logs are in a Webalizer friendly format. By default on Raspbian (and Debian), Apache writes its access log to /var/log/apache2/access.log, and rotates the log once a week. You can control where the log file is written to using directives in Apache’s VirtualHost blocks. If you run more than one website on the same machine, you might find it useful to write different log files for each site. For example:
<VirtualHost *:80>
  ServerName www.samhobbs.co.uk:80
  ErrorLog ${APACHE_LOG_DIR}/samhobbs/error.log
  LogLevel warn
  CustomLog ${APACHE_LOG_DIR}/samhobbs/access.log combined
</VirtualHost>

<VirtualHost *:80>
  ServerName www.tomhobbs.co.uk:80
  ErrorLog ${APACHE_LOG_DIR}/tomhobbs/error.log
  LogLevel warn
  CustomLog ${APACHE_LOG_DIR}/tomhobbs/access.log combined
</VirtualHost>
If you want to do this, the directory you specify has to already exist (e.g. I had to create /var/log/apache2/samhobbs and /var/log/apache2/tomhobbs). Reload Apache to make the changes take effect.
sudo service apache2 reload
We’re going to run Webalizer once a day with Cron, so it’s best if your log files are also rotated once a day. To change this, open /etc/logrotate.d/apache2. If you stuck with the original Apache log, then edit the block inside. If you stashed the log files in a different directory, then add a new block to the end, for example:
/var/log/apache2/*.log {
        weekly
        missingok
        rotate 52
        compress
        delaycompress
        notifempty
        create 640 root adm
        sharedscripts
        postrotate
                /etc/init.d/apache2 reload > /dev/null
        endscript
        prerotate
                if [ -d /etc/logrotate.d/httpd-prerotate ]; then \
                        run-parts /etc/logrotate.d/httpd-prerotate; \
                fi; \
        endscript
}


/var/log/apache2/samhobbs/*.log {
        daily
        missingok
        rotate 365
        compress
        delaycompress
        notifempty
        create 640 root adm
        sharedscripts
        postrotate
                /etc/init.d/apache2 reload > /dev/null
        endscript
        prerotate
                if [ -d /etc/logrotate.d/httpd-prerotate ]; then \
                        run-parts /etc/logrotate.d/httpd-prerotate; \
                fi; \
        endscript
}
Make sure you change the path at the start of the block and edit these values: change “rotate 52″ to “rotate 365″ and “weekly” to “daily”. This means your log files will be rotated once a day and you will keep the last 365 days of logs. That’s all for the log files themselves. Next we’ll install and configure Webalizer:
Webalizer
Install Webalizer:
sudo apt-get update
sudo apt-get install webalizer
Change directory into the Webalizer config folder and back up the default config:
cd /etc/webalizer
sudo cp webalizer.conf webalizer.conf.BAK
The default cron.daily will run Webalizer against each *.conf file in /etc/webalizer, so the plan is to add one for each website you run on the server. Now edit webalizer.conf and change or add the following values as appropriate:
LogFile /var/log/apache2/samhobbs/access.log.1
OutputDir /var/www/webalizer
Incremental yes
HostName www.samhobbs.co.uk
GeoIP yes
GeoIPDatabase /usr/share/GeoIP/GeoIP.dat
HideReferrer www.samhobbs.co.uk
HideReferrer samhobbs.co.uk
HideURL *.ico
HideURL /wp-content/plugins/*
HideURL /wp-content/themes/*
HideURL /wp-includes/*
HideURL /wp-cron.php
IgnoreURL /webalizer/*
Also, uncomment the whole block of GroupAgent and HideAgent parameters.
- LogFile specifies the log file you want Webalizer to run on – I’ve chosen access.log.1 instead of access.log so that data is never missed out – the logs are rotated once a day and Webalizer reads it after Apache is done writing to it.
- OutputDir is where you want the html files to go. If your site’s root is /var/www then choosing /var/www/webalizer means that webalizer will be on yourdomain.com/webalizer
- Incremental processing allows for log file rotation – at the start of each run, Webalizer loads information from last time, and adds the current run to it
- HostName tells Webalizer what to put at the top of the report, and also determines which domain to request URLs from if you click a link in the report (e.g. clicking the page /tutorials in the stats would take you to http://www.samhobbs.co.uk/tutorials)
- GeoIP tells Webalizer that you want it to sort visitors into countries based on their IP addresses
- GeoIPDatabase tells Webalizer the location of the database it should use to look up IP addresses
- HideReferrer can be used to make sure your site doesn’t fill up the “top referrers” table from where people have clicked links on your site to other pages on the site
- HideURL allows you to hide pages that aren’t actually content, like template files etc. or they’ll appear in your “top URLs” table, which isn’t helpful!
- IgnoreURL is similar to HideURL but it makes Webalizer completely ignore URLs instead of just hiding them from the tables: hits to /webalizer won’t be counted at all.
- GroupAgent & HideAgent allow you to group browsers into types. The author of Webalizer clearly has a sense of humour: look at what he called the Internet Explorer category!
One more thing to do is make the output directory:
sudo mkdir /var/www/webalizer
If you are hosting multiple websites, you might find it useful to rename the configuration file to make it clear which domain it is for, and then copy it before editing the details for the next domain:
sudo mv webalizer.conf samhobbs-webalizer.conf
sudo cp samhobbs-webalizer.conf tomhobbs-webalizer.conf
Now edit tomhobbs-webalizer.conf to update the necessary values. When webalizer runs with Cron, it will run using both configuration files, so you can generate analytics for both sites at once.
Controlling Access
If you don’t want everyone to have access to your webalizer stats then you can do a couple of things to keep them private using .htaccess files. If you’re sure you’ll only want to see them at home, then you can use this:
#/var/www/webalizer/.htaccess
order deny,allow
deny from all
allow from 192.168.1.0/24
That will block anyone except IP addresses 192.168.1.* ... if your router’s IP address is 192.168.0.1 then use 192.168.0.0/24 instead. If you think you might like to log in from elsewhere, then you can password protect this folder:
#/var/www/webalizer/.htaccess
AuthUserFile /a/full/path/.htpasswd
AuthType Basic
AuthName "Password for Analytics"
Require valid-user
Make sure that the AuthUserFile isn’t stored somewhere that is inside your Apache content directory (/var/www) or someone could open it and read the passwords you are about to create! Then change to the directory you want to store the .htpasswd file in and use this command:
sudo htpasswd -c .htpasswd USER
where USER is your username. You’ll be asked to choose a password for the user you specified. Now when you navigate to https://www.yourdomain.com/webalizer you should be asked for a username and password before you’re allowed to access. Remember to use https or you’ll be sending the password in the clear and someone could steal it. If you want to add a new username/password combination to your .htpasswd file you can use this command:
sudo htpasswd /path/to/.htpasswd NEWUSER
where NEWUSER is the new username you’d like to add.
Generating stats from old logs
Webalizer can be run from the command line to generate data from old log files. This command specifies a configuration file with the -c option and tells Webalizer which log file to generate info from. The program can read compressed files, you don’t need to decompress anything first:
sudo webalizer -c /etc/webalizer/samhobbs-webalizer.conf access.log.8.gz
Remember to process them in reverse order (oldest first) because Webalizer stores the timestamp of the last record it processed in a temporary file and ignores any entries that are older than it – this is done so that when you use incremental logs Webalizer doesn’t duplicate entries.
Warnings at runtime
Don’t worry if you get lots of errors about Webalizer ignoring records because they are too long etc. when you run it at the commandline. Webalizer skips some entries if they’re beyond a certain size.
Comments
Hello, wish you have a wonderful year and an answer offer.
Hi Sam,
How are you? A new year just begins. Thanks you latest year devotion on this site. I fellow your guide, but I got a message as bellow:
Forbidden

You don't have permission to access /webalizer on this server.
Do you know any configurations? I get lost on this and wish you advice. Thank you.
Best regards,
Jeff
Jeff,
Thank you.
Hello~
Now it is working well. Yesterday morning it worked and I had no idea. Anyway, thank your mention and advice. You work out some of new articles. Really thanks.
Hi Sam,
Hi Sam,
How are you ? I'm a bit novice with webalizer, I follow your tuto but how to run webalizer and see the graphic ?
Have a nice day !
Hi Fabian,
/var/www/webalizer/, so if your apache document root is/var/www(it might not be) then you can view the files by visiting yourdomain.com/webalizer. Note that the url path depends on the relative location of the webalizer files and the document root for the virtualhost. Check out my virtualhost tutorial for more information on configuring apache. SamAdd new comment