![]() OwnCloud is a free (libre), open source equivalent to DropBox. As well as the program you install on your server, it has free desktop sync clients for Linux, Windows and Mac, and apps for Android and iOS. I’m just going to cover the server side of things for your Pi in this tutorial, because the desktop client can be found in the Ubuntu repos, and the app is on the Play Store. If you want the Android app free of charge, then install it via F-Droid.
OwnCloud is a free (libre), open source equivalent to DropBox. As well as the program you install on your server, it has free desktop sync clients for Linux, Windows and Mac, and apps for Android and iOS. I’m just going to cover the server side of things for your Pi in this tutorial, because the desktop client can be found in the Ubuntu repos, and the app is on the Play Store. If you want the Android app free of charge, then install it via F-Droid.
First, install Apache 2 and some other bits.
These are all the bits you need to install before you can run OwnCloud.
sudo apt-get install apache2 php5 php5-gd php-xml-parser php5-intl
sudo apt-get install php5-sqlite php5-mysql smbclient curl libcurl3 php5-curl
Next, Download and Install OwnCloud
If you visit the Owncloud installation page here, you will find the installation file. Choose “Tar or Zip File” under the server heading. 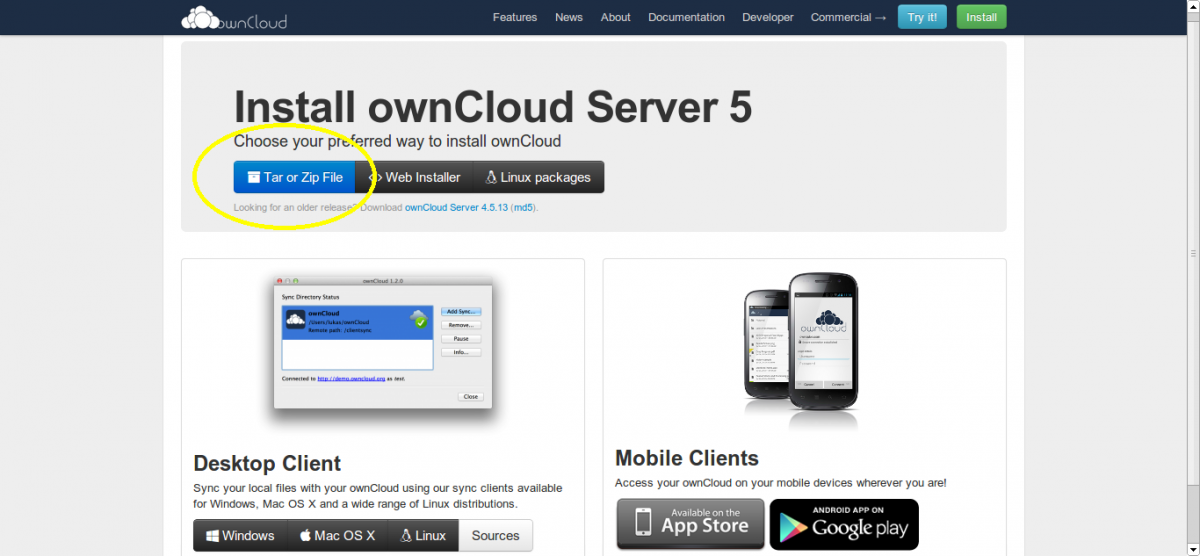 Now copy the link address of .tar.bz2 file (you can do this by right clicking and choosing “Copy Link Address” in Chrome or Chromium). At the time of writing, this address is http://download.owncloud.org/community/owncloud-5.0.12.tar.bz2, but it will change when a new version comes out, so it’s worth checking.
 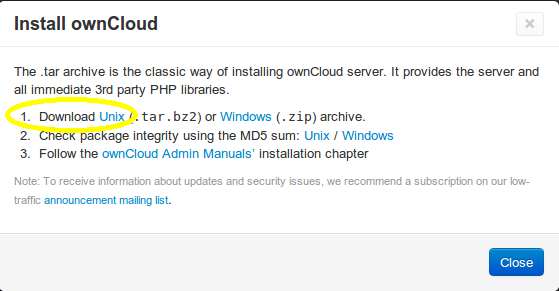 Save the address of the UNIX .tar.bz2 file (right click, copy link address in Chrome). Now, open a secure shell (SSH) into your Pi, and download the file:
wget http://download.owncloud.org/community/owncloud-5.0.12.tar.bz2
The zip file will be downloaded to your home directory (unless you were in some other directory before you ran that command, in which case it will be in there). Now extract the .tar file:
tar -xjf owncloud-5.0.12.tar.bz2
You will now have a sub-directory in your home directory called owncloud. Copy it to Apache’s data directory:
cp -r owncloud /var/www/
This will copy all your owncloud stuff into a directory at /var/www/owncloud, meaning that your owncloud website will be located at yourdomain.com/owncloud/.
Optional: Move OwnCloud to the Root Apache2 Directory
If you would like owncloud to be on the root of your domain (i.e. yourdomain.com takes you straight to owncloud) then you can move the contents of /var/www/owncloud up a directory into /var/www/ with the following command:
cd /var/www/
sudo find owncloud -maxdepth 1 -mindepth 1 -exec mv {} . \;
sudo rmdir owncloud
I got that handy tip from this website, check it out for a great explanation.
A Few Final Touches
Now, make sure that Apache owns all of those files you just added:
sudo chown -R www-data:www-data /var/www/
Now open your Apache virtual host file and change it to enable .htaccess files for OwnCloud (this is necessary so that OwnCloud can do things like override the global maximum file size for uploads):
sudo nano /etc/apache2/sites-enabled/000-default
Change AllowOverride None to AllowOverride All in the Directory /var/www/ section of the file. Now check if an .htaccess file for OwnCloud exists. If it doesn’t, create it:
cd /var/www/ #use /var/www/owncloud if you didn't move it to /var/www/
ls -al
#look for .htaccess. If it exists, skip the next two lines
sudo touch .htaccess
sudo chown www-data:www-data .htaccess
Now run the following two commands to enable some apache modules, and restart apache2:
sudo a2enmod rewrite
sudo a2enmod headers
sudo service apache2 restart
Port Forwarding and DNS
If you want to access your ownCloud installation from outside your LAN, you'll need to forward ports 80 and 443 (for HTTP and HTTPS) to the Pi from your router. If you haven't done this already, you may want to use my tutorials to set up a DNS A record to map your domain name to your public IP address, and make use of ddclient to update your DNS records when they change if you have a dynamic IP address.
Testing
Test your installation, by visiting your server’s URL. Either use http://yourdomain.com/owncloud if you didn’t move owncloud to Apache’s root directory, or http://yourdomain.com if you did. You should be greeted with an installation wizard. 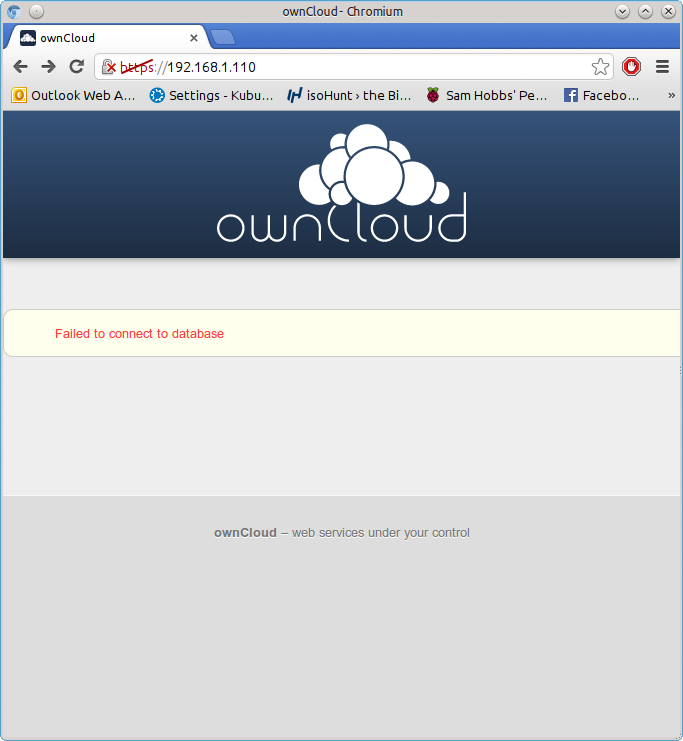 If you get an error about database drivers, then try installing php5-mysql again – for some reason, it didn’t install properly first time for me, although no errors were shown:
sudo apt-get install php5-mysql
sudo reboot
You should no longer see the error if you visit the page again.
Database Username and Password
The OwnCloud installation wizard will ask you for a database username and password. If you haven’t set up any other databases on this server before (and therefore don’t have a root database user and password) then you will have to create a root database username and password before you can continue. If you are already using software that uses databases (like WordPress) then you probably already have a database root username and password, and can skip this step. Install mysql server and client:
sudo apt-get update
sudo apt-get install mysql-server mysql-client
The package installation will bring up a configuration wizard. Enter the username you’d like to use, and a password. Write these down, you’ll need them later. Now you can complete the installation. Go back to your browser with the OwnCloud setup wizard, and choose a username and password for your OwnCloud user account. You also need to enter the database root username and password, and choose a name for the OwnCloud database (“owncloud” will do). The database location is localhost.
Some extras
1) Cut Page Loading Times with a PHP Cache
PHP is a server side scripting language. When you request a page on the server, the server has to compile the page from the PHP source. Because your Pi is such a low powered machine, this can be really slow. Luckily, there’s a PHP cache you can use that will store a pre-compiled copy of pages in your RAM after they have been visited already. This makes a MASSIVE difference – before installing the cache, it took 21 seconds to load the index page, afterwards a mere 7-8 seconds. Install it by using this command:
sudo apt-get install php-apc
Now restart the Apache web server using:
sudo service apache2 restart
The first time you visit a page may be slow, but if you navigate away and then come back to it you should notice a significant improvement. Thanks to Steve Riley at Kubuntuforums for this tip.
2) Put all your data on an external hard drive
If you have moved your Pi’s root filesystem to a USB flash drive then you may have enough storage to use OwnCloud as it is. However, one of the main advantages of using OwnCloud instead of Dropbox is that you can easily plug in as many hard drives as you like and wave goodbye to that 5GB storage limit. I attached a self-powered 500GB hard drive to mine, and it works beautifully. Remember, the Pi doesn’t have enough power to run a passport drive without an external hub to provide power. Before we start, format your hard drive with a journalling filesystem such as ext3 or ext4. First, make the directory ready to mount your drive:
sudo mkdir /media/owncloud
Plug in your drive to your Pi, and type:
sudo blkid
Make a note of the output for the device you want to mount. Here’s an example (it’s for one of my laptop’s partitions, hence /dev/sda6, yours will be a whole drive, e.g. /dev/sdX)
/dev/sda6: LABEL="Data" UUID="f052e620-9e88-4b19-9b9a-d6dce4d6603b" TYPE="ext4"
Now edit the file /etc/fstab, which controls how and where drives are mounted at boot.
sudo nano /etc/fstab
Edit the file so it looks something like this, but replace my UUID with yours and update the filesystem type from ext4 to whatever you are using if necessary:
proc            /proc           proc    defaults          0       0
/dev/mmcblk0p1  /boot           vfat    defaults          0       2
/dev/mmcblk0p2  /               ext4    defaults,noatime  0       1
UUID="96f64567-c459-4d3d-9f52-e6aabee544d2"     /media/owncloud         ext4    defaults    0       2
# a swapfile is not a swap partition, so no using swapon|off from here on, use  dphys-swapfile swap[on|off]  for that
Now reboot the Pi and check your drive is mounted properly:
cd /media/owncloud
ls -al
Stop Apache2:
sudo service apache2 stop
Now we need to move Owncloud’s data directory, and create some symbolic links so that the rest of Owncloud still knows where to look for data. Where you’re moving stuff from depends on whether or not you moved owncloud to Apache’s root (/var/www). If you did move it, then owncloud is currently installed at /var/www; if you didn’t move it then it’s in /var/www/owncloud. I’m going to assume that you did move Owncloud. If you didn’t, then you need to insert /owncloud after /var/www in each of these steps. Move /var/www/data to /media/owncloud:
sudo mv /var/www/data /media/owncloud/data
Create a symbolic link to the new owncloud directory.
sudo ln -s /media/owncloud/data /var/www/data
Now do the same for the config folder:
sudo mv /var/www/config /media/owncloud/config
sudo ln -s /media/owncloud/config /var/www/config
Now check that the ownership of the moved files is Apache (www-data): sudo chown -R www-data:www-data /media/owncloud Now start Apache2 again:
sudo service apache2 start
Any data you now upload should go in your external hard drive. I owe thanks to Steve Riley (again!) at OwnCloud forums for this one.
3) Force SSL (https) Connection
You can force your users to connect to OwnCloud using an HTTPS connection. Simply change the virtual hosts file for apache2 to enable .htaccess as before: open /etc/apache2/sites-available/default-ssl and change AllowOverride None to AllowOverride All under the Directory /var/www/. Make sure you have the line SSLEngine on, and your SSLCertificateFile and SSLCertificateKeyFile point to the certificates you’d like to use. Now enable the Apache SSL module:
sudo a2enmod ssl
Enable the SSL site:
sudo a2ensite default-ssl
Reload Apache:
sudo service apache2 reload
Now visit https://yourdomain.com/owncloud if you didn’t move apache to your root, or https://yourdomain.com if you moved owncloud to your root directory. Using the drop-down menu, navigate to admin –> admin, and under the Security header, tick the Enforce HTTPS box.  Note that you will only be able to do this if you are connected with https (otherwise you’d lock yourself out!) All done. Now all your communications between the client machines and your server will be encrypted. If you try to visit the http version of OwnCloud, you will be redirected to https. If you don't already have a SSL certificate, you may want to generate your own and get it signed by CAcert for free. Hope you found that useful. If there’s anything else you’d like to know, leave a comment!
Comments
Great to hear you're getting
Copy data locally
Thanks to your tutorials I have owncloud 7 and squirrelmail installed and working on one Pi B and email server working on a second Pi B. The owncloud server is a little slow, but the email server is quite responsive. They've been working for a couple weeks now 24/7. I've shared owncloud accounts to family members and to my Android Tablet. Works great!
I'll pick up my new Pi B 2, with supposedly 6 times the performance, tomorrow. I'm going to install owncloud and squirrelmail on the new Pi B 2 to replace the slower Pi B. I have a 500GB drive attached to the current Pi B with the owncloud data on it (about 5 GB now).
I've been using the owncloud client on my Linux Mint main box to load up the owncloud. I'm not sure of the path it takes - does it go out through the internet then back through mydomain.com to the owncloud pi? That's a lot of unnecessary internet traffic!
So, my question is this: Is there an easy way to locally copy files to my owncloud hard drive (many GB to transfer), without using the owncloud client on another computer, and have the Pi owncloud recognize the files and update its database? What are the necessary steps?
Thanks!
Local copy
Local Copy
I locally copied a file to the owncloud hard drive /media/owncloud/data/mycloud/files/account/Documents (where the other data was synced from an owncloud client) and made sure that owner and group were www-data. I then restarted the apache server.
Note the link: /var/www/data -> /media/owncloud/data is /media/owncloud/data/mycloud/files/account/Documents
Checking the owncloud directory on the owncloud client computer doesn't show the file and there was no Sync Activity showing the new file.
So, it looks like owncloud doesn't see the new file that did not get there with an owncloud client. Unless I missed something?
was apache running at the time?
Sync problem
Yes, apache was running at the time I put the file in the owncloud hard drive.
Strange behaviour!
This is what I did.
I put the file onto the owncloud server home/pi directory and then copied it to the linked owncloud hard drive. My Android table got the synced file! My wife's laptop didn't get it nor did my main Linux box.
If it matters, I put the file into an owncloud sub account into which my tablet and my wife's computer "logs into". My main box logs into or is associated with the main administrative owncloud account.
apache restart error
When I restarted apache on the owncloud server, I get:
sudo service apache2 restart
[....] Restarting web server: apache2apache2: Could not reliably determine the server's fully qualified domain name, using 127.0.1.1 for ServerName
... waiting apache2: Could not reliably determine the server's fully qualified domain name, using 127.0.1.1 for ServerName
. ok
I may have a setting wrong somewhere?
ServerName
apache warning
"Did we discuss this before or was it someone else?" We might have, I'm retired, so I can't recall. ;)
Implemented fix by creating /etc/apache2/conf.d/httpd.conf file with contents:
ServerName localhost
Then restart apache2.
owncloud 8
I disconnected my working Pi B owncloud 7 server and installed owncloud 8 in my new raspberry Pi 2.
I finished the installation and when I try to access it at https://mydomain.com/owncloud I get an:
Internal Server Error
The server encountered an internal error and was unable to complete your request.
Please contact the server administrator if this error reappears multiple times, please include the technical details below in your report.
More details can be found in the server log.
I checked everything and am at a loss to fix this.
owncloud 8 error info
owncloud 8 "Internal Server Error"
cat /var/log/apache2/error.log gives:
[Wed Feb 11 19:15:16 2015] [error] [client MYIPADDRESS] script '/var/www/remote.php' not found or unable to stat
I didn't realise owncloud 8
Server error
I was distracted and messed up on the "Optional: Move OwnCloud to the Root Apache2 Directory" step, and the "insert /owncloud after /var/www" part. Something was switched around - I'm not really sure what I did.
It was easiest to start over. Now it is working great.
Since I now have 15 raspberry Pi's (12 Pi B and 3 PI 2 B), I can even rebuild a Pi in my sleep! ;)
There is an amazing performance improvement with owncloud in the Pi 2 B over the Pi B! The Pi 2 B is very hard to get right now. By luck I got three at my local Microcenter. They sold out of the 20 they had in a few minutes.
A friend is going to put a Minecraft Server on the Pi 2 B now that it has the ram and speed (quad core) to handle it. Check it out.
ownCloud improvements
/var/www/owncloudand just change the DocumentRoot if they want to serve owncloud on the root domain - it saves so much trouble if you end up wanting to change things in the future. I didn't know it was that easy at the time! I might write a new owncloud tutorial soon explaining some of the new features too, I noticed it has integrated Roundcube which will be cool to play around with! SamDocumentRoot
When I rebuilt I actually installed in /var/www/. What do you mean by "just change the DocumentRoot if they want to serve owncloud on the root domain"?
After installation, is it easy to move back to /var/www/owncloud?
Moving data
DocumentRootis/var/www/and you have owncloud installed in/var/www/owncloudthen yourdomain.com/owncloud/index.php will give you owncloud. If you changedDocumentRootto/var/www/owncloud/then you'd get owncloud at yourdomain.com/index.php. See here: https://samhobbs.co.uk/2014/01/multiple-websites-and-subdomains-with-ssltls-in-apache2-virtualhosts It's non-trivial but not too difficult to move the files. If you're going to do it make sure you stop apache during the process. SamIs there a benefit, other
Is there a benefit, other than personal satisfaction, of installing OwnCloud this way compared to running apt-get install owncloud? Maybe you wrote this up before that package was made available? Not trolling, honestly just curious. Thank you for your tutorials!
Yep, read this article
/usr/libif I remember correctly, and I wanted them all in/var/www. Some of the other packaging quirks were odd too. It's not the recommended way to install is ownCloud according to the developers, which is what swung it for me. As it turned out I think I accidentally made a good choice. Not so long ago there was a bit of an open source bust-up between the Ubuntu maintainers and the ownCloud developers (this isn't about raspbian specifically but it's still interesting and relevant). Basically, in Ubuntu the package is in the "universe" repository which is where all of the software that is free but not supported by canonical goes. So, someone uploaded a version of ownCloud and then didn't bother maintaining it, security vulnerabilities were discovered and patched by the ownCloud devs but not updated in the repo, and as a result the repo contained an insecure version for a while. The ownCloud devs asked canonical to remove it (since they knew it was insecure but didn't want to assume responsibility for the universe package), and canonical said it wasn't their problem either because it was in the universe repository... after a bit of toing and froing canonical uploaded a dummy package that disabled ownCloud. See also: http://m.slashdot.org/story/208949 I'm wary of the universe repository now, and I think this is a good example of why it's a good idea to stick to the official installation methods! SamGreat tutorial
Thanks for this, I was looking a setting up ownCloud on my MicroServer then came across this tutorial. Extremely easy to follow and worked first time!
Owncloud issues
Hi
I've followed your guide step by step and made sure I did everything correct, however, I have encountered a problem.
I've left owncloud in its own directory so the install will be /var/www/owncloud, the database is set up fine without any issues and the owncloud install connects fine to it.
The issue I've got is when it goes to log in I get the following error:
"File not found
The specified document has not been found on the server.
You can click here to return to ownCloud."
The browser address also shows pointing to http://**/owncloud/index.php/apps/files/ (** is my domain)
do you have any sugggestions on how to repair it? I'm running it on the raspberry pi B.Thanks.
Can you find the
/var/log/apache2/error.log) please? It will probably be more specific than the on-screen message. SamHey :) Thanks for the
Hey :) Thanks for the tutorial! :D It's very good!
But... what if I only want the external hard drive to own my files and my SD not? What can I do? :s
Does part 2 of extras not
Yeah well I think I doing it
Yeah well I think I doing it right...
My HDD is self-powered yes... :)
I just have a litle problem when I set the drive to be part of the automatic mounts of the linux system, when I start Raspberry with my HDD plugged in, I always have to plug my keyboard and press CTRL + D so that the system carries on loading...
Do you have any idea of how to deactivate that function so that my Raspberry will boot in such a way that I don't need to plug my keyboard and press CTRL + D?
Thanks anyway for the help!
Fábio
Maybe it's doing a fsck?
/etc/fstabSamThe FSCK fails with code 8...
The FSCK fails with code 8... Any solutions? :S
Depends, what's in /var/log
/var/log/fsck/checkfs? SamLog of fsck -C -R -A -y
Log of fsck -C -R -A -y
Sat May 30 14:07:50 2015
fsck from util-linux 2.20.1
dosfsck 3.0.13, 30 Jun 2012, FAT32, LFN
/dev/mmcblk0p1: 53 files, 2427/7161 clusters
fsck.ext4: Unable to resolve 'UUID=219d0724-9ca9-471d-9a25-b13c42fe6673'
fsck died with exit status 8
Sat May 30 14:07:50 2015
----------------
UUID probably doesn't match
/etc/fstabdoesn't match the drive. Please run these two commands: SamI can mount the drive but I
I can mount the drive but I want the raspberry pi to load everything automatically so I don't have to plug in my keyboard and press CTRL + D to cancel fsck repair (I think it is fsck repair :) ) :(
Add new comment