![]() OwnCloud is a free (libre), open source equivalent to DropBox. As well as the program you install on your server, it has free desktop sync clients for Linux, Windows and Mac, and apps for Android and iOS. I’m just going to cover the server side of things for your Pi in this tutorial, because the desktop client can be found in the Ubuntu repos, and the app is on the Play Store. If you want the Android app free of charge, then install it via F-Droid.
OwnCloud is a free (libre), open source equivalent to DropBox. As well as the program you install on your server, it has free desktop sync clients for Linux, Windows and Mac, and apps for Android and iOS. I’m just going to cover the server side of things for your Pi in this tutorial, because the desktop client can be found in the Ubuntu repos, and the app is on the Play Store. If you want the Android app free of charge, then install it via F-Droid.
First, install Apache 2 and some other bits.
These are all the bits you need to install before you can run OwnCloud.
sudo apt-get install apache2 php5 php5-gd php-xml-parser php5-intl
sudo apt-get install php5-sqlite php5-mysql smbclient curl libcurl3 php5-curl
Next, Download and Install OwnCloud
If you visit the Owncloud installation page here, you will find the installation file. Choose “Tar or Zip File” under the server heading. 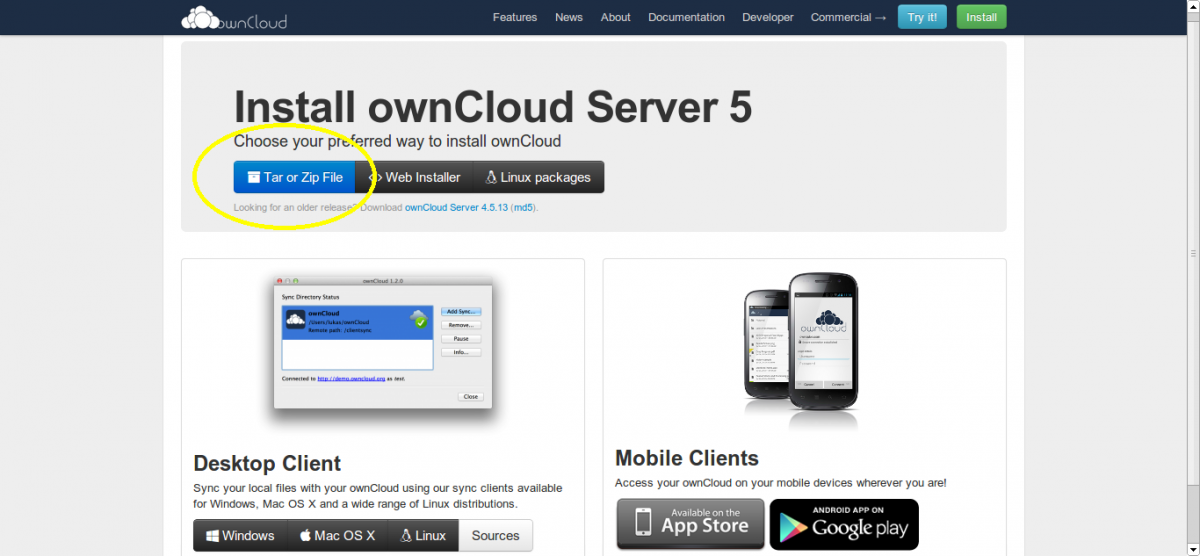 Now copy the link address of .tar.bz2 file (you can do this by right clicking and choosing “Copy Link Address” in Chrome or Chromium). At the time of writing, this address is http://download.owncloud.org/community/owncloud-5.0.12.tar.bz2, but it will change when a new version comes out, so it’s worth checking.
 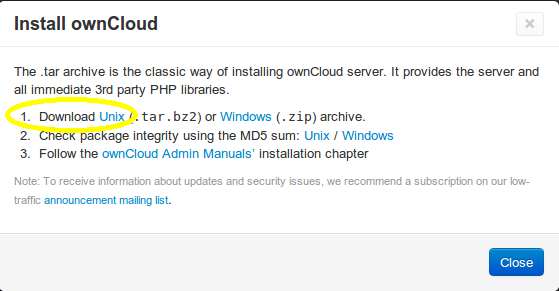 Save the address of the UNIX .tar.bz2 file (right click, copy link address in Chrome). Now, open a secure shell (SSH) into your Pi, and download the file:
wget http://download.owncloud.org/community/owncloud-5.0.12.tar.bz2
The zip file will be downloaded to your home directory (unless you were in some other directory before you ran that command, in which case it will be in there). Now extract the .tar file:
tar -xjf owncloud-5.0.12.tar.bz2
You will now have a sub-directory in your home directory called owncloud. Copy it to Apache’s data directory:
cp -r owncloud /var/www/
This will copy all your owncloud stuff into a directory at /var/www/owncloud, meaning that your owncloud website will be located at yourdomain.com/owncloud/.
Optional: Move OwnCloud to the Root Apache2 Directory
If you would like owncloud to be on the root of your domain (i.e. yourdomain.com takes you straight to owncloud) then you can move the contents of /var/www/owncloud up a directory into /var/www/ with the following command:
cd /var/www/
sudo find owncloud -maxdepth 1 -mindepth 1 -exec mv {} . \;
sudo rmdir owncloud
I got that handy tip from this website, check it out for a great explanation.
A Few Final Touches
Now, make sure that Apache owns all of those files you just added:
sudo chown -R www-data:www-data /var/www/
Now open your Apache virtual host file and change it to enable .htaccess files for OwnCloud (this is necessary so that OwnCloud can do things like override the global maximum file size for uploads):
sudo nano /etc/apache2/sites-enabled/000-default
Change AllowOverride None to AllowOverride All in the Directory /var/www/ section of the file. Now check if an .htaccess file for OwnCloud exists. If it doesn’t, create it:
cd /var/www/ #use /var/www/owncloud if you didn't move it to /var/www/
ls -al
#look for .htaccess. If it exists, skip the next two lines
sudo touch .htaccess
sudo chown www-data:www-data .htaccess
Now run the following two commands to enable some apache modules, and restart apache2:
sudo a2enmod rewrite
sudo a2enmod headers
sudo service apache2 restart
Port Forwarding and DNS
If you want to access your ownCloud installation from outside your LAN, you'll need to forward ports 80 and 443 (for HTTP and HTTPS) to the Pi from your router. If you haven't done this already, you may want to use my tutorials to set up a DNS A record to map your domain name to your public IP address, and make use of ddclient to update your DNS records when they change if you have a dynamic IP address.
Testing
Test your installation, by visiting your server’s URL. Either use http://yourdomain.com/owncloud if you didn’t move owncloud to Apache’s root directory, or http://yourdomain.com if you did. You should be greeted with an installation wizard. 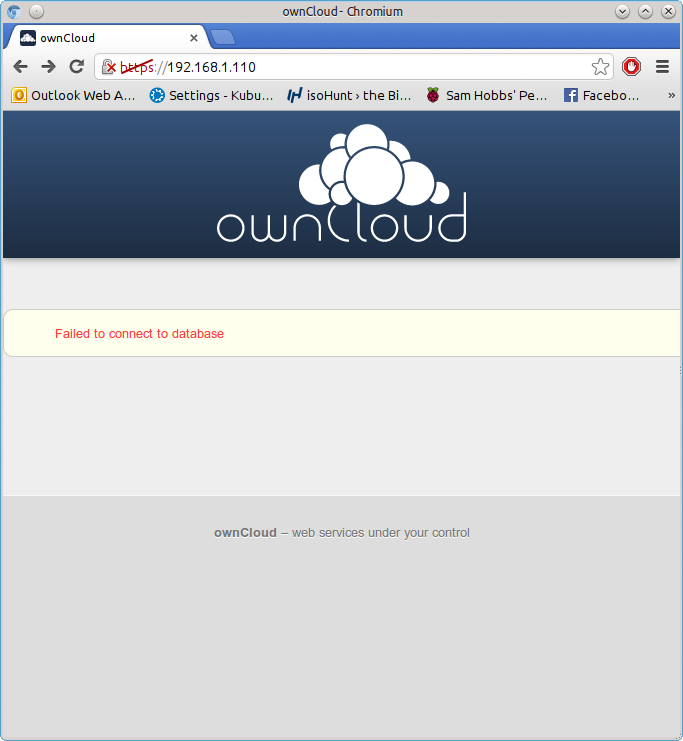 If you get an error about database drivers, then try installing php5-mysql again – for some reason, it didn’t install properly first time for me, although no errors were shown:
sudo apt-get install php5-mysql
sudo reboot
You should no longer see the error if you visit the page again.
Database Username and Password
The OwnCloud installation wizard will ask you for a database username and password. If you haven’t set up any other databases on this server before (and therefore don’t have a root database user and password) then you will have to create a root database username and password before you can continue. If you are already using software that uses databases (like WordPress) then you probably already have a database root username and password, and can skip this step. Install mysql server and client:
sudo apt-get update
sudo apt-get install mysql-server mysql-client
The package installation will bring up a configuration wizard. Enter the username you’d like to use, and a password. Write these down, you’ll need them later. Now you can complete the installation. Go back to your browser with the OwnCloud setup wizard, and choose a username and password for your OwnCloud user account. You also need to enter the database root username and password, and choose a name for the OwnCloud database (“owncloud” will do). The database location is localhost.
Some extras
1) Cut Page Loading Times with a PHP Cache
PHP is a server side scripting language. When you request a page on the server, the server has to compile the page from the PHP source. Because your Pi is such a low powered machine, this can be really slow. Luckily, there’s a PHP cache you can use that will store a pre-compiled copy of pages in your RAM after they have been visited already. This makes a MASSIVE difference – before installing the cache, it took 21 seconds to load the index page, afterwards a mere 7-8 seconds. Install it by using this command:
sudo apt-get install php-apc
Now restart the Apache web server using:
sudo service apache2 restart
The first time you visit a page may be slow, but if you navigate away and then come back to it you should notice a significant improvement. Thanks to Steve Riley at Kubuntuforums for this tip.
2) Put all your data on an external hard drive
If you have moved your Pi’s root filesystem to a USB flash drive then you may have enough storage to use OwnCloud as it is. However, one of the main advantages of using OwnCloud instead of Dropbox is that you can easily plug in as many hard drives as you like and wave goodbye to that 5GB storage limit. I attached a self-powered 500GB hard drive to mine, and it works beautifully. Remember, the Pi doesn’t have enough power to run a passport drive without an external hub to provide power. Before we start, format your hard drive with a journalling filesystem such as ext3 or ext4. First, make the directory ready to mount your drive:
sudo mkdir /media/owncloud
Plug in your drive to your Pi, and type:
sudo blkid
Make a note of the output for the device you want to mount. Here’s an example (it’s for one of my laptop’s partitions, hence /dev/sda6, yours will be a whole drive, e.g. /dev/sdX)
/dev/sda6: LABEL="Data" UUID="f052e620-9e88-4b19-9b9a-d6dce4d6603b" TYPE="ext4"
Now edit the file /etc/fstab, which controls how and where drives are mounted at boot.
sudo nano /etc/fstab
Edit the file so it looks something like this, but replace my UUID with yours and update the filesystem type from ext4 to whatever you are using if necessary:
proc            /proc           proc    defaults          0       0
/dev/mmcblk0p1  /boot           vfat    defaults          0       2
/dev/mmcblk0p2  /               ext4    defaults,noatime  0       1
UUID="96f64567-c459-4d3d-9f52-e6aabee544d2"     /media/owncloud         ext4    defaults    0       2
# a swapfile is not a swap partition, so no using swapon|off from here on, use  dphys-swapfile swap[on|off]  for that
Now reboot the Pi and check your drive is mounted properly:
cd /media/owncloud
ls -al
Stop Apache2:
sudo service apache2 stop
Now we need to move Owncloud’s data directory, and create some symbolic links so that the rest of Owncloud still knows where to look for data. Where you’re moving stuff from depends on whether or not you moved owncloud to Apache’s root (/var/www). If you did move it, then owncloud is currently installed at /var/www; if you didn’t move it then it’s in /var/www/owncloud. I’m going to assume that you did move Owncloud. If you didn’t, then you need to insert /owncloud after /var/www in each of these steps. Move /var/www/data to /media/owncloud:
sudo mv /var/www/data /media/owncloud/data
Create a symbolic link to the new owncloud directory.
sudo ln -s /media/owncloud/data /var/www/data
Now do the same for the config folder:
sudo mv /var/www/config /media/owncloud/config
sudo ln -s /media/owncloud/config /var/www/config
Now check that the ownership of the moved files is Apache (www-data): sudo chown -R www-data:www-data /media/owncloud Now start Apache2 again:
sudo service apache2 start
Any data you now upload should go in your external hard drive. I owe thanks to Steve Riley (again!) at OwnCloud forums for this one.
3) Force SSL (https) Connection
You can force your users to connect to OwnCloud using an HTTPS connection. Simply change the virtual hosts file for apache2 to enable .htaccess as before: open /etc/apache2/sites-available/default-ssl and change AllowOverride None to AllowOverride All under the Directory /var/www/. Make sure you have the line SSLEngine on, and your SSLCertificateFile and SSLCertificateKeyFile point to the certificates you’d like to use. Now enable the Apache SSL module:
sudo a2enmod ssl
Enable the SSL site:
sudo a2ensite default-ssl
Reload Apache:
sudo service apache2 reload
Now visit https://yourdomain.com/owncloud if you didn’t move apache to your root, or https://yourdomain.com if you moved owncloud to your root directory. Using the drop-down menu, navigate to admin –> admin, and under the Security header, tick the Enforce HTTPS box.  Note that you will only be able to do this if you are connected with https (otherwise you’d lock yourself out!) All done. Now all your communications between the client machines and your server will be encrypted. If you try to visit the http version of OwnCloud, you will be redirected to https. If you don't already have a SSL certificate, you may want to generate your own and get it signed by CAcert for free. Hope you found that useful. If there’s anything else you’d like to know, leave a comment!
Comments
Owncloud too slow
Can you help out , on how can I improve its performance... It's pretty slow takes lot of time loading pages
Boot to flash drive and use php-apc
What to do if Raspberry Pi dies
Hi,
I was wondering what should I do in case my Raspberry Pi dies? How am I going to access my data on the hard drive? I tried accessing the files through Windows and Linux but can't get in as I don't have permissions. Do I need to give the access to the Pi user via the command line or there is another procedure?
Thank you in advance
Chown or use root
kdesudo dolphinin KDE and then do whatever you need to do. If you're syncing your files with the owncloud desktop client then you'll have a copy on your laptop already though. SamEmail
Hi,
I successfully configured ownCloud per your instructions. Thank you! One question that is outstanding is email. ownCloud wants an email server to send out notifications and the base install (unless I did something wrong) does not support this. (Testing in the admin GUI spits a configuration error.) I know that you have instructions elsewhere here on Postfix for setting up a fully functional email system, but I really don't want that and just want a very light weight send-only configuration. Do you have a suggestion on how set that up?
Hi Jay,
Keep getting squirrelmail login instead of owncloud wizard
Hi Sam,
After closely following all the steps in setting up my own mailserver on my pi I'm following your guide to install owncloud on the same rpi. I'm stuck at the *testing phase* of your guide as I keep getting the squirrelmail login page at my domain instead of the owncloud installation wizard which should pop up as I've moved the owncloud directory contents to /var/www.
could this be a virtual user issue? I've read your page on that a couple of times and all the default and default-ssl settings include AllowOverride all and the .htaccess file exists. Do I need to create seperate virtual user blocks for squirrelmail and owncloud if I want to access squirrelmail at mail.domain.com and owncloud at domain.com?
thanks in advance! Your guide has helped me not only set up my own mailserver but also help me understand linux greatly!
Kind regards,
Martijn
Very likely a virtualhost issue
I tried adding a virtualhost
ls -l /etc/apache2/sites-available
total 16
-rw-r--r-- 1 root root 691 Sep 8 17:04 default
-rw-r--r-- 1 root root 7252 Sep 9 14:41 default-ssl
-rw-r--r-- 1 root root 695 Sep 9 14:51 rouvroije
ls -l /etc/apache2/sites-enabled
total 4
-rw-r--r-- 1 root root 1977 Sep 9 15:17 000-rouvroije
lrwxrwxrwx 1 root root 26 Sep 3 00:03 001-default -> ../sites-available/default
lrwxrwxrwx 1 root root 30 Sep 3 00:06 default-ssl -> ../sites-available/default-ssl
lrwxrwxrwx 1 root root 28 Sep 9 15:19 rouvroije -> ../sites-available/rouvroije
ls -l /var/www/
total 152
drwxr-xr-x 27 www-data www-data 4096 Sep 8 15:59 3rdparty
drwxr-xr-x 26 www-data www-data 4096 Sep 8 15:58 apps
-rw-r--r-- 1 www-data www-data 586 Sep 8 17:00 AUTHORS
drwxr-xr-x 2 www-data www-data 4096 Sep 8 15:58 config
-rw-r--r-- 1 www-data www-data 1283 Sep 8 17:00 console.php
-rw-r--r-- 1 www-data www-data 34520 Sep 8 17:00 COPYING-AGPL
drwxr-xr-x 16 www-data www-data 4096 Sep 8 15:59 core
-rw-r--r-- 1 www-data www-data 3899 Sep 8 17:00 cron.php
-rw-r--r-- 1 www-data www-data 23751 Sep 8 17:00 db_structure.xml
-rw-r--r-- 1 www-data www-data 179 Sep 8 17:00 index.html
-rw-r--r-- 1 www-data www-data 1281 Sep 8 17:00 index.php
-rw-r--r-- 1 www-data www-data 2595 Sep 8 17:00 indie.json
drwxr-xr-x 123 www-data www-data 4096 Sep 8 15:58 l10n
drwxr-xr-x 6 www-data www-data 4096 Sep 8 15:59 lib
-rw-r--r-- 1 www-data www-data 279 Sep 8 17:00 occ
drwxr-xr-x 2 www-data www-data 4096 Sep 8 15:58 ocs
drwxr-xr-x 12 www-data www-data 4096 Sep 9 14:16 owncloud
-rw-r--r-- 1 www-data www-data 1753 Sep 8 17:00 public.php
-rw-r--r-- 1 www-data www-data 1735 Sep 8 17:00 remote.php
-rw-r--r-- 1 www-data www-data 26 Sep 8 17:00 robots.txt
drwxr-xr-x 6 www-data www-data 4096 Sep 8 15:58 search
drwxr-xr-x 10 www-data www-data 4096 Sep 8 15:58 settings
-rw-r--r-- 1 www-data www-data 1406 Sep 8 17:00 status.php
drwxr-xr-x 2 www-data www-data 4096 Sep 8 15:58 themes
-rw-r--r-- 1 www-data www-data 149 Sep 8 17:00 version.php
I tried adding a virtualhost 'rouvroije' and followed your virtualhost file but 'sudo service apache2 restart' gives me the following error in its logs and won't start anymore (IP-ADRESS shows the server's correct external IP):
[Tue Sep 09 14:45:47 2014] [error] [client IP-ADRESS] File does not exist: /usr/share/squirrelmail/mail
[Tue Sep 09 14:45:54 2014] [error] [client IP-ADRESS] File does not exist: /usr/share/squirrelmail/owncloud
I'd like to use the rouvroije dot nl/mail for squirrelmail & rouvroije dot nl/owncloud for owncloud. I tried configuring this in 1 single site-enabled file by adding virtualhost-blocks for /mail and /owncloud as 'ServerAlias'. Am I going in the right direction here?
Thanks for your help!
The ServerAlias thing is just
/var/www/index.php): Open/etc/apache2/sites-available/rouvroijeand replace the contents with this (in nano you can delete whole lines with Ctrl+K):# custom VirtualHost configuration file for martijn # rewrite all HTTP traffic to HTTPS <VirtualHost *:80> ServerName rouvroije.nl ServerAdmin webmaster@rouvroije.nl DocumentRoot /var/www <IfModule mod_rewrite.c> <IfModule mod_ssl.c> <Location /> RewriteEngine on RewriteCond %{HTTPS} !^on$ [NC] RewriteRule . https://%{HTTP_HOST}%{REQUEST_URI} [L] </Location> </IfModule> </IfModule> </VirtualHost> <IfModule mod_ssl.c> <VirtualHost *:443> ServerName rouvroije.nl ServerAdmin webmaster@rouvroije.nl DocumentRoot /var/www # owncloud files are in /var/www <Directory /var/www/> Options Indexes FollowSymLinks MultiViews AllowOverride all Order allow,deny allow from all </Directory> # squirrelmail files are at /usr/share/squirrelmail Alias /mail /usr/share/squirrelmail <Directory /usr/share/squirrelmail> Options FollowSymLinks <IfModule mod_php5.c> php_flag register_globals off </IfModule> <IfModule mod_dir.c> DirectoryIndex index.php </IfModule> # access to configtest is limited by default to prevent information leak <Files configtest.php> order deny,allow deny from all allow from 127.0.0.1 </Files> </Directory> ErrorLog ${APACHE_LOG_DIR}/error.log LogLevel warn CustomLog ${APACHE_LOG_DIR}/ssl_access.log combined SSLEngine on #change this to your SSLCertificateFile /etc/ssl/certs/your-ssl-certificate.crt SSLCertificateKeyFile /etc/ssl/private/your-ssl-certificate-keyfile.key BrowserMatch "MSIE [2-6]" \ nokeepalive ssl-unclean-shutdown \ downgrade-1.0 force-response-1.0 # MSIE 7 and newer should be able to use keepalive BrowserMatch "MSIE [17-9]" ssl-unclean-shutdown </VirtualHost> </IfModule>Don't forget to edit the path to your SSL certificate and key. Now make sure you've enabled the necessary modules, and update apache2: You should now get owncloud on rouvrije.nl and squirrelmail on rouvroije.nl/mail. Let me know how you get on! SamWow Sam you hero! You made it
Wow Sam you hero! You made it dead easy to get owncloud working! But I can't seem to enter squirrelmail anymore as I keep getting owncloud at rouvroije.nl/mail. And I feel stupid to ask, but entering owncloud from www dot rouvroije.nl isn't being redirected to https. Could both be DNS issues?
access fromoutside network
Hi Sam,
Thanks for the great tutorial. I am afraid i must be missing something. When i access owncloud from withing the network (192.168.100.5/owncloud) it works. I have forwarded ports 80-443 on my router to 192.168.100.5. when i try to load owncloud from outside my network (xxxxx.dyndns.biz/owncloud) i get "This Webpage is not available". its not an issue with my isp blocking port 80 as i had post 80 forwarded to another device until and it worked. Any suggestions on what to check?
Thanks in advance
I don't think it's anything specific to this tutorial
found the issue
Hi Sam,
got to the bottom of it finally. I built this on a pi that was already running XBMC. Turns out XBMC has a built in firewall which was rejecting the connection. Works brilliantly now.
Thanks
Is it Raspbmc?
hadnt thought of that...
Good point Sam. To be on the safe side i have disabled the remote control function within XBMC.
Now that everything is working im loving it. I have a cloud with as much storage as i need! And with next to no cost! I wonder if you could point me in the right direction for the next part of the project. My idea is to set up a second pi in a remote location (my parents house) and have the two sync the data. The idea is simply so that if something had to happen and my pi and drive were destroyed i would have a full backup to fall back upon. Any ideas?
So far i have not transferred the data folder onto the hard drive as i am debating if i should transfer just the data folder or take the approach of booting from the hard drive (as you describe in https://samhobbs.co.uk/2013/10/speed-up-your-pi-by-booting-to-a-usb-fla…)
Thanks for the help
rob
I would boot from the hard
Migrating Owncloud
Hi Sam,
Me again. you may recall that i had installed my owncloud over an xbmc install. I am not slightly regretting it and considering migrating the install to Raspbian. all my owncloud data is saved on an external drive. Before i start i though i might ask your advise on the best way to go about migrating?
Thanks
Rob
I've never done it myself
When I access to Owncloud I
When I access to Owncloud I have this error: Can't write into config directory!
This can usually be fixed by giving the webserver write access to the config directory.
I made a symbolic link with mnt/nas/config and /mnt/nas/data, but now the HD is not mounted in /mnt/nas but in /mnt/owncloud
When I make ls-l I have this and the simbolic link is /mnt/nas
this is the output of ls-l:
total 16
lrwxrwxrwx 1 www-data www-data 15 Nov 2 20:46 config -> /mnt/nas/config
lrwxrwxrwx 1 www-data www-data 13 Nov 2 20:45 data -> /mnt/nas/data
drwx------ 2 www-data www-data 16384 Nov 2 21:05 lost+found
How I change the symbolic link?
Thank you
Symlink is a file
rm configwithout removing the files it links to. Then just make a new symlink. Did you change the mount location on purpose? You can control where drives are mounted in/etc/fstab. SamHi Sam,
Hi Sam,
thank you for your reply. I have a new distro of Raspbian installed in my Pi with any Dovecot. The mount location is correct for me. This is the file /etc/fstab:
proc /proc proc defaults 0 0
/dev/mmcblk0p1 /boot vfat defaults 0 2
/dev/mmcblk0p2 / ext4 defaults,noatime 0 1
/dev/sda1 /mnt/owncloud auto defaults,user 0 1
And this is the symbolic link to remove:
config -> /mnt/nas/config
lrwxrwxrwx 1 www-data www-data 13 Nov 2 20:45 data -> /mnt/nas/data
I remove config but the files it does not exist after I make sudo -i, rm config
Why use the -i option?
/root/) so that command was looking for the file/root/config, which does not exist. Here's the relevant section of the sudo manpageman sudo:‑i, ‑-login Run the shell specified by the target user's password database entry as a login shell. This means that login-specific resource files such as .profile or .login will be read by the shell. If a command is specified, it is passed to the shell for execution via the shell's ‑c option. If no command is specified, an interactive shell is executed. sudo attempts to change to that user's home directory before running the shell. The command is run with an environment similar to the one a user would receive at log in. The Command Environment section in the sudoers(5) manual documents how the ‑i option affects the environment in which a command is run when the sudoers policy is in use.Samcommand sudo rm data
command sudo rm data
and the files after remove is:
total 16
drwx------ 2 www-data www-data 16384 Nov 2 21:05 lost+found
so there aren't the folder data...
You still need to create the new symlink
ls -lwould be a lot more useful if I could see which directory you were in when you ran the command. SamNow I remade the symlink and
Now I remade the symlink and recopy the direcotry into my HDD.
Now, the output of ls -l is this:
lrwxrwxrwx 1 www-data www-data 20 Nov 2 21:14 config -> /mnt/owncloud/config
lrwxrwxrwx 1 www-data www-data 18 Nov 4 15:32 data -> /mnt/owncloud/data
drwx------ 2 www-data www-data 16384 Nov 2 21:05 lost+found
But owncloud do not start correctly:
Can't write into config directory!
This can usually be fixed by giving the webserver write access to the config directory.
I assigned the permissions for www-data group
The directory /var/www/owncloud, the output of ls -l is this:
lrwxrwxrwx 1 root root 20 Nov 2 21:08 config -> /mnt/owncloud/config
lrwxrwxrwx 1 root root 18 Nov 2 21:08 data -> /mnt/owncloud/data
-rw-r--r-- 1 www-data www-data 177 Nov 2 18:37 index.html
lrwxrwxrwx 1 root root 13 Nov 2 20:45 owncldata -> /mnt/nas/data
drwxr-xr-x 11 www-data www-data 4096 Nov 4 15:38 owncloud
Thank you Sam
Check permissions on external drive
This is the permissions in my
This is the permissions in my HDD
lrwxrwxrwx 1 www-data www-data 20 Nov 2 21:14 /mnt/owncloud/config -> /mnt/owncloud/config
lrwxrwxrwx 1 www-data www-data 18 Nov 4 15:32 /mnt/owncloud/data -> /mnt/owncloud/data
There's something wrong there
/mnt/owncloud/configto itself? I was expecting to see something like: ...and: When you were trying to delete the old symlink do you think you might have deleted the data directory by accident? Can you do: and and Please? Thanks! Samhello and thanks!
Hi there sam!
I've had my pi for over a year now and about 6 months ago dusted it off and really started using it.
Teamtalk servers, bittorrent sync, and web servers are just a few things i use it for.
About to add owncloud to the list!
Also very nice tutorials, this site is goin' in my bookmarks for sure!
may even consider writing about some of my experiences on a blog like this (i've found yours and other blogs like this to be extremely helpful!)
Thanks again for the awesome tutorials,
Blake
Add new comment