I recently purchased a VPN service from Private Internet Access (PIA), because I wanted to learn about openvpn and thought it would be a neat way to get an outside view of my network. At £25/year, I think PIA is great value. PIA provides a shell script that you can run to set up the OpenVPN to connect to their servers, but I wanted to know how to do it manually. It took me a while to figure out exactly how to connect to it using Kubuntu's Network Management widget, so hopefully this will save you some trouble. This method should be the same for any distribution using a recent version KDE's Plasma desktop.
Step 1: download and extract the configuration bundle
The configuration bundle contains a mixture of things you definitely need (PIA certificate), and things you might need (OpenVPN config files). It can be downloaded using the secure link below: https://www.privateinternetaccess.com/openvpn/openvpn.zip You'll need to keep these certificates & config files, so it's probably best to make a directory in your home and extract them there.
mkdir ~/VPN
cd ~/VPN
mv ~/Downloads/openvpn.zip ~/VPN/
unzip openvpn.zip
The following files should be extracted:
- ca.crt: this is PIA's certificate,
- crl.pem: this is a certificate revocation list
- various files like location.ovpn: these are ready made openvpn configuration files
Step 2: choose a server location
You can make a judgement on which server location is best for you based on this page: https://www.privateinternetaccess.com/pages/network/ Which domain is best for you will depend on your specific use case. Some things to think about are:
- Location based content filtering
- Required bandwidth
- Regional legal differences and censorship
Step 3: install necessary packages
If you try to set up an openvpn connection with network-manager without the network-manager-openvpn package installed, network manager will let you enter openvpn configuration details but won't let you use the connection. This is where I got stuck, because there was no "you need to install this package to use a VPN" notification, just a complete lack of response when clicking on the connection. So, install this package:
sudo apt-get update
sudo apt-get install network-manager-openvpn
From now on you have two choices for how you want to configure your VPN connection: one is really easy but won't teach you anything, and the other is still pretty easy but you might learn something. To jump to the really easy version, click here. Otherwise, continue reading...
Step 4: configure Network Management manually (recommended)
Click on the Network Management widget, and then select the spanner icon. From this window, you should be able to add a new VPN connection like in this image: 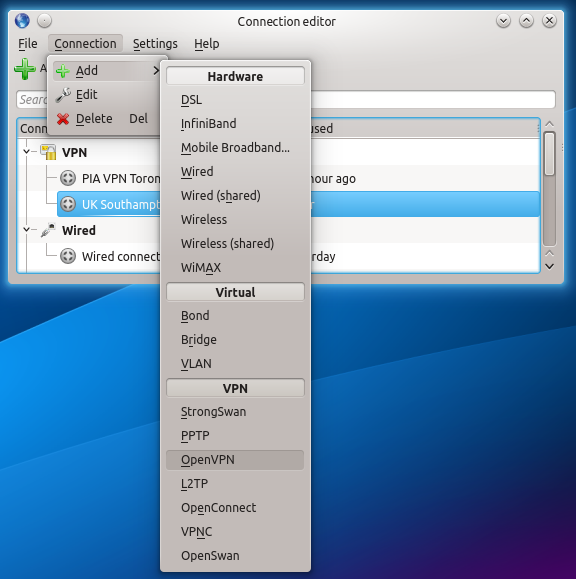 Next, change the VPN connection name to something useful, like "PIA Southampton", and change the gateway to the hostname of the location you chose in step 2. Click on the folder icon and choose the
 ca.crt file (from the zip you downloaded earlier) as the CA File, and then type in your Username and Password. 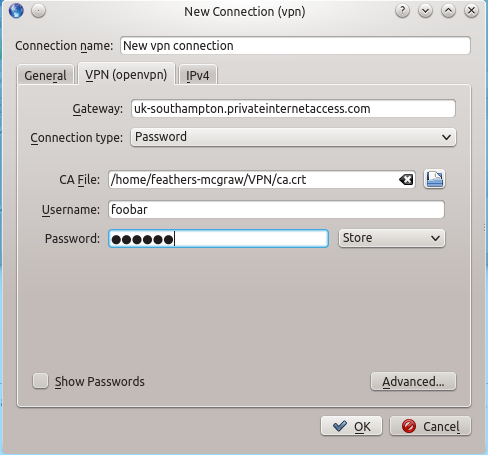 Click on the advanced button, and select Use LZO compression. You can set the gateway port to 1194, which is the "well known" port for OpenVPN connections. If you left this option set to "Automatic", the correct port would be detected, but it's probably best to set it explicitly. Similarly, set the custom renegotiation interval to 0.
 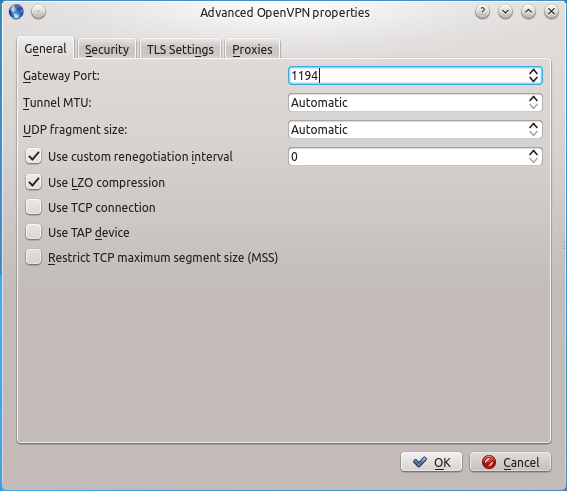 You can leave all of the settings on the general tab at their default settings.
 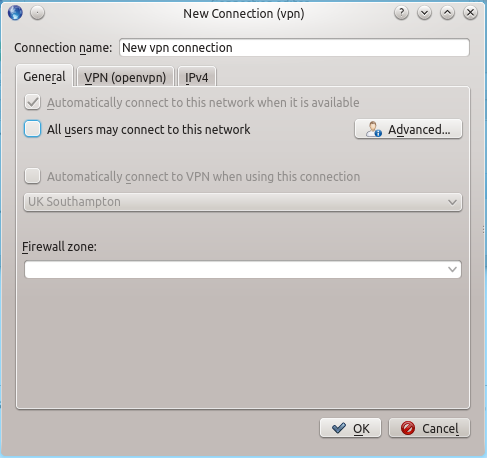 Same story on the IPv4 tab: leave all of these settings as they are.
 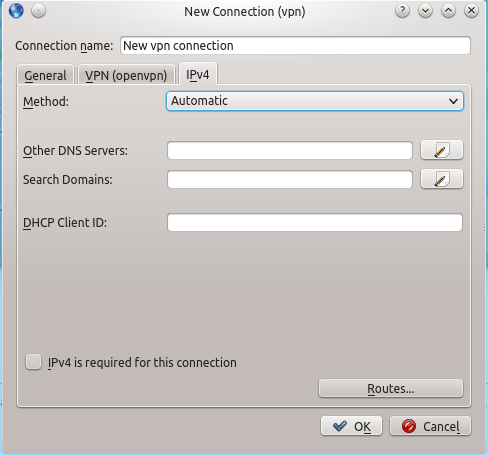 Now click on the Network Management widget one more time, and connect to the VPN connection you just added. If all goes well, you should be connected and you can move on to testing.
Notes on configuration files
I think it's always best to have an understanding of what GUI tools like the Network Management widget are doing "under the hood", so let's have a look at the configuration files it creates and edits. Since the Network Management widget only requires user privileges to use, I was expecting all of its settings to be located in the user's home directory, somewhere in /home/user/.kde/share/apps/networkmanagement. However, it seems that VPN connections added through the Network Management widget make changes at the root filesystem level. Take a look in /etc/NetworkManager/system-connections/:
ll /etc/NetworkManager/system-connections
You should many files owned by root in there. These files are created by a keyfile plugin, which writes the file in an .ini-style format containing [headings] with configuration settings relevant to that setting listed below. If you import one of those OpenVPN configuration files using the "easy" method, the file should look like this:
feathers-mcgraw@Hobbs-T440s:/etc/NetworkManager/system-connections$ sudo cat UK\ Southampton
[connection]
id=UK Southampton
uuid=<some-unique-string-set-by-NM>
type=vpn

[vpn]
service-type=org.freedesktop.NetworkManager.openvpn
comp-lzo=yes
port=1194
ca=/home/feathers-mcgraw/VPN/ca.crt
connection-type=password
password-flags=2
remote=uk-southampton.privateinternetaccess.com
reneg-seconds=0
If you added the file using the method I suggested, your file should look something like this:
feathers-mcgraw@Hobbs-T440s:/etc/NetworkManager/system-connections$ sudo cat Private\ Internet\ Access
[connection]
id=PIA VPN Southampton UK
uuid=<some-unique-string-set-by-nm>
type=vpn
permissions=user:feathers-mcgraw:;

[vpn]
service-type=org.freedesktop.NetworkManager.openvpn
connection-type=password
password-flags=1
remote=uk-southampton.privateinternetaccess.com
comp-lzo=yes
proto-tcp=no
tap-dev=no
reneg-seconds=0
port=1194
mssfix=no
username=<redacted>
ca=/home/feathers-mcgraw/VPN/ca.crt

[ipv4]
method=auto
ignore-auto-dns=true
Under the [connection] heading, you will find the following options:
- id is just a convenient label for the connection, used by the Network Management widget to identify the connection
- uuid is the Universally Unique Identifier of the connection
- type is VPN for obvious reasons. If this was a normal WiFi connection you might see something like
802-11-wireless - permissions determines whether this connection is available to all system users or just the person who added it. The manual method does not make the VPN available to all system users: if you would like to change this, then check the "All users may connect to this network" setting on the general tab.
The [vpn] heading contains the following options:
- service-type is self-explanatory.
- connection-type determines whether you are using certificates to identify yourself to the OpenVPN server or password authentication.
- password-flags controls what is done with your password. A value of 0 means that the system is responsible for providing and storing the secret, 1 means that a user session secret agent is responsible for providing and storing the secret, 2 means that the secret should not be saved and the user will be prompted for it each time, and 4 (not 3) means that a secret is not required and should not be requested from the user.
- remote is the domain name of the host you are connecting to.
- port is the port for the connection, customarily 1194 for OpenVPN.
- comp-lzo specifies whether or not to use LZO compression
- proto-tcp specifies whether to use TCP or not.
- tap-dev specifies whether or not to use a TAP device (a virtual ethernet adapter)
- mssfix determines whether a limit is set for the Maximum Segment Size (MSS) for TCP
- username is the username used for authentication.
- ca is the path to the certificate authority's cert, used to ensure that you are communicating with the correct server.
- reneg-seconds specifies a custom renegotiation interval.
The [ipv4] heading contains options related to DCHP and DNS when using IPv4. If you'd like to know more about these options, you can check this page.
Alternative "easy" configuration method
If you configured Network Management manually, ignore this section and continue to testing Click on the Network Management widget in the system tray, and then click the spanner icon. Now click File, and Import VPN, which will open a file browser. Select the configuration file for the server you would like to connect to (location.ovpn) and click Open. This will load the configuration file supplied by PIA; the only thing left to do is supply your username and password. Click on the Network Management widget again, and then click the spanner next to the VPN you just added. Type in your username and password, and then click OK. Done!
Testing
To see what your WAN IP address from the commandline, use this command:
wget -qO- ifconfig.me/ip
And to check which country your exit node is in, you can retrieve whois information with this command:
whois 1.2.3.4
...where 1.2.3.4 is the IP address you got from the previous command.
Useful links
It took me a long time to find some of this information. Here are a couple of links that I found particularly useful: Network Manager systems settings page on the GNOME Wiki Network Manager configuration settings specification on the GNOME developer pages Please leave a comment if you have useful information to add, or any questions.
Comments
cmd
Oh no, a GUI!!
Just kidding ;) try setting up your own OpenVPN server, it's awesome! But use easy-rsa and no GUI then, like here:
http://www.raspberrypi.org/forums/viewtopic.php?f=36&t=20916&start=50
Thanks for the mail server tutorial!
I know, right? (on a serious
NIC config?
Sam,
I didn't see any mention about how you have you connections configured. Bridged, bonded, solo???
I'm trying to set up a bonded-bridged connection in Kubuntu 14.04 but having trouble. Got it working with Ubuntu 12.04 server right away. Once I get those up and running, openvpn and PIA are next!
Honestly... I don't know :(
Got it...
I got the bonded/bridge working now with 14.04. I found this page which held the answer:
https://help.nceas.ucsb.edu/ubuntu_network_configuration
The bonding rules changed from 12.04 to 14.04 so I had a few things to change around. Since I have a server and desktop both with dual NIC's I figured bonding (aka port aggregation) was the best use of the network capabilities. Bridging was new to me but what I read about VPN said it was needed. I'm all set now and will dig into the openvpn/PIA set up next!
All the NICs
Round Robin...
I use the RR slash Round Robin slash Mode Zed bonding mode. It uses both NIC's when up and automatically reverts to a single connection if one fails. Speed when all is good - redundancy when things go South. Just last weekend I moved my office from one room to another in my house. After I hooked everything up and all was good (or so I thought) I took look at my switch and was surprised to see one of the server's NIC's was running at 10mbs instead of 1000mbs! After a little investigation, a bad cable made it into the waste bin and all was well. Point being: If I had left it to a single connection I might have been without a connection at all.
The real bonus for me is having both my desktop and server with dual NIC's and bonding I get 2000mbs between them when I'm working betwixt the two... :)
Redundancy
Add new comment