This tutorial will show you how to configure a caching BIND9 server on your local network, and configure an OpenWrt router to use it. This should result in slightly quicker DNS lookups, but to be honest, you may not notice a huge difference (my DNS lookups now take 30% less time, but I don't think this has made page loading noticeably faster). Here are a few situations where it could be particularly worthwhile:
- You have a large LAN with lots of clients, and you want to take some load off your router
- You are using something like modsecurity's real time RBL lookups and you want to reduce latency
- Your ISP's nameservers are slow but you would still like to use them
- You are a curious soul and you want to learn about DNS ;)
How DNS Caching Works
Every DNS record has a Time To Live (TTL), which describes how long the information in the record is valid for. Sites using dynamic DNS will have a short TTL (1800s, for example) because the IP address for the site changes often, whereas my server has a static IP address so it has a long TTL. After the first time a DNS lookup is made, a caching DNS server can store the record until the TTL expires so that a second request to a nameserver on the internet is not necessary. Pretty much every home router has a DNS resolver built in, but since routers typically have very little RAM these resolvers can't cache queries for long. The default cache size of OpenWrt's DNS resolver, dnsmasq, is 150 names. When you consider that loading a fairly typical website can involve making several DNS queries (one for the site, one for a CDN like cloudfront, one for a webfont or google API etc) and that DNS queries are also made during many other activities such as fetching email, 150 names doesn't go very far. The BIND9 daemon running on my server is currently using 43.5MiB RAM (resident size), which would be quite a chunk of the 128MiB my TP-Link WDR3600 router has. Setting up a local caching DNS server can take some load off your router, cache queries for longer, and save some bandwidth.
Choosing a Nameserver
One of the most important decisions you will have to make when configuring your DNS server is which nameserver you would like to get your information from. There's a handy tool called namebench that you can use to see which DNS server is fastest. Namebench is in the Ubuntu repos, so you can install it like so (on your desktop or laptop not the server, it's a graphical application):
sudo apt-get update
sudo apt-get install namebench
Then start it from the terminal by typing:
namebench
...which should bring up a GUI. Use the default options and let namebench do its thing: 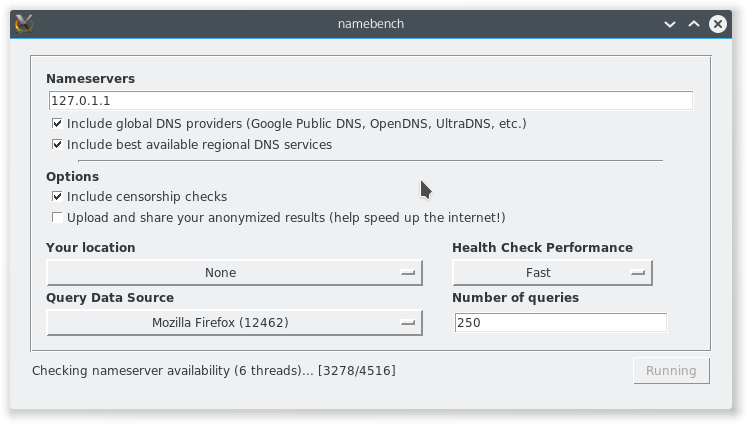 When it's done, it should open a results page in your web browser that will tell you how fast various nameservers are including Google's public DNS, OpenDNS, and your ISP's DNS server. My results showed that google's nameservers were fastest, but I chose OpenDNS because I don't want Google having all that extra information about me. Pick your poison :p
 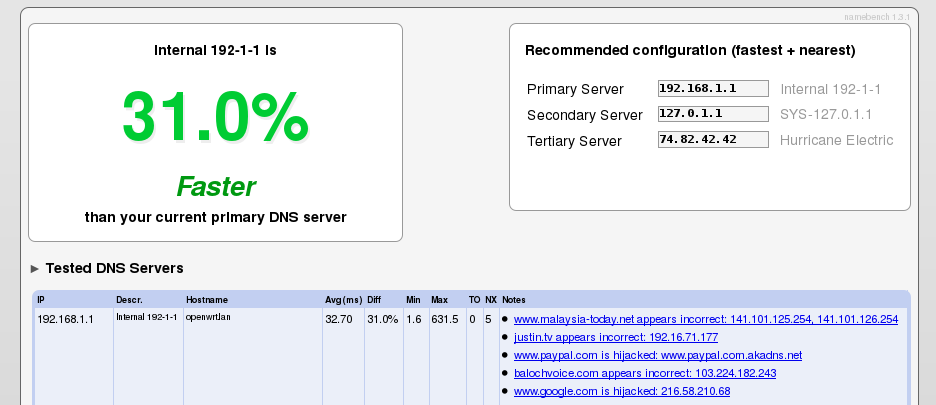 The OpenDNS nameservers are located at:
208.67.222.222
208.67.220.220
And the Google public DNS servers are at:
8.8.8.8
8.8.4.4
Configuring BIND9
First thing to do is install the DNS server software, BIND9:
sudo apt-get update
sudo apt-get install bind9 bind9-doc
Now we need to tell BIND to use the DNS servers we chose earlier. Open /etc/bind/named.conf.options in a text editor and replace the two IP addresses in the forwarders section:
forwarders {
        208.67.222.222;
        208.67.220.220;
};
Disable DNSSEC
Since opendns doesn't support DNSSEC, you will also need to disable it or your server's syslog will be flooded with messages like this:
validating @0x7f7e280ac760: 84.in-addr.arpa DNSKEY: got insecure response; parent indicates it should be secure
To disable DNSSEC, comment the following line in /etc/bind/named.conf.options:
dnssec-validation auto;
and add these two lines:
dnssec-enable no;
dnssec-validation no;
Here's a link to a well-written explanation of why opendns doesn't support DNSSEC.
Local network DNS configuration
If you want to add local network configuration for your LAN, change /etc/bind/named.conf.local by adding a new zone for resolving foo.lan:
zone "lan" {
        type master;
        file "/etc/bind/db.lan";
};
...and another for resolving reverse DNS lookups for the range of IP addresses in your LAN:
zone "1.168.192.in-addr.arpa" {
        type master;
        notify no;
        file "/etc/bind/db.192";
};
Now create a database for .lan domain using the .local file as a template:
sudo cp /etc/bind/db.local /etc/bind/db.lan
...and edit the file to look something like this:
;
; created 11/04/2015 - BIND data file for the .lan
;

; explanation of terms:
;  line 2 - samhobbs.lan.        - FQDN for the server in charge of this domain. must end
;                                  in a period
;  line 2 - root.localhost.      - email address of the person responsible for the domain,
;                                  use a period instead of @
;  line 9 - samhobbs.lan.        - again, the Name Server (NS) for this domain, ends in .
;

; line count starts with 1 below
$TTL    604800
@       IN      SOA     samhobbs.lan. root.localhost. (
                              2         ; Serial
                         604800         ; Refresh
                          86400         ; Retry
                        2419200         ; Expire
                         604800 )       ; Negative Cache TTL
;
@       IN      NS      samhobbs.lan.
@       IN      A       127.0.0.1
@       IN      AAAA    ::1

; below are the A records for .lan

samhobbs        IN      A       192.168.1.103
osmc            IN      A       192.168.1.131
rocki           IN      A       192.168.1.148
ROCKI           IN      A       192.168.1.148

; below are the CNAME record addresses (aliases)

; none
...and create another file from a template for reverse lookups:
sudo cp /etc/bind/db.127 /etc/bind/db.192
...and edit the details to suit your LAN:
;
; created 11/04/2015 - BIND reverse data file for .lan
;
$TTL    604800
@       IN      SOA     samhobbs.lan. root.localhost. (
                              1         ; Serial
                         604800         ; Refresh
                          86400         ; Retry
                        2419200         ; Expire
                         604800 )       ; Negative Cache TTL
;
@       IN      NS      samhobbs.lan.

; some reverse DNS records
; number is the last octet of the IP address (i.e. the part after the last period)

1       IN      PTR     openwrt.lan.
3       IN      PTR     samhobbs.lan.
131     IN      PTR     osmc.lan.
148     IN      PTR     rocki.lan.
Restart BIND
You can now restart bind9:
sudo service bind9 restart
If the restart fails, you may find useful errors in the syslog:
tail /var/log/syslog
For example, typos in the configuration file may result in something that looks like this:
Apr 11 17:14:43 samhobbs named[15173]: loading configuration from '/etc/bind/named.conf'
Apr 11 17:14:43 samhobbs named[15173]: /etc/bind/named.conf.options:20: missing ';' before '208.67.220.220'
Apr 11 17:14:43 samhobbs named[15173]: /etc/bind/named.conf.options:21: missing ';' before '}'
Apr 11 17:14:43 samhobbs named[15173]: loading configuration: failure
Apr 11 17:14:43 samhobbs named[15173]: exiting (due to fatal error)
Set the BIND server as the default nameserver for your system
A lot of tutorials will tell you to edit /etc/resolv.conf to set the local BIND instance as your default nameserver. However, if you look at that file you will notice it says specifically not to do that:
Dynamic resolv.conf(5) file for glibc resolver(3) generated by resolvconf(8)
DO NOT EDIT THIS FILE BY HAND -- YOUR CHANGES WILL BE OVERWRITTEN
The proper place to make the configuration change is in /etc/network/interfaces. Parameters to be passed to resolvconf can be placed here if they are prefixed with "dns-", for example "dns-search" is the search option described in the manual page for /etc/resolv.conf (see man 5 resolv.conf). Before editing, my /etc/network/interfaces looked like this:
# interfaces(5) file used by ifup(8) and ifdown(8)
auto lo
iface lo inet loopback

auto eth0
iface eth0 inet static
        address 192.168.1.103
        netmask 255.255.255.0
        network 192.168.1.0
        gateway 192.168.1.1
        broadcast 192.168.1.255
After adding BIND as the nameserver, it now looks like this:
# interfaces(5) file used by ifup(8) and ifdown(8)
auto lo
iface lo inet loopback

auto eth0
iface eth0 inet static
        address 192.168.1.103
        netmask 255.255.255.0
        network 192.168.1.0
        gateway 192.168.1.1
        broadcast 192.168.1.255
        dns-nameservers localhost
        #dns-search lan local samhobbs.co.uk
The commented dns-search line is there just as an example of how you can add other options - this particular option is useful if you wanted to be able to connect to devices on your LAN by finding them based on the hostnames they broadcast. To make these changes take effect, you need to bring your connection down and back up again. Be careful - if you've made an error in your /etc/network/interfaces file and you don't have physical access to the machine you could be locked out! Here's a command that will do both in one line:
sudo ifdown eth0 && ifup eth0
One example of a possible error that could stop eth0 coming back up cleanly is a mistyped subnet - I mistyped my subnet and got this error (the subnet should have been 255.255.255.0 not 225.225.225.0).
sam@samhobbs:~$ sudo ifup eth0
Error: an inet prefix is expected rather than "192.168.1.103/225.225.225.0".
Failed to bring up eth0.
If your connection came back up without issue, your /etc/resolv.conf should look something like this:
# Dynamic resolv.conf(5) file for glibc resolver(3) generated by resolvconf(8)
#     DO NOT EDIT THIS FILE BY HAND -- YOUR CHANGES WILL BE OVERWRITTEN
nameserver localhost
search lan local samhobbs.co.uk
Note, the search line will only be there if you used that option in /etc/network/interfaces.
Testing
A great tool for DNS troubleshooting and testing is dig. It's part of the dnsutils package, and can be installed like so:
sudo apt-get update
sudo apt-get install dnsutils
If you run two DNS lookups one after the other, you should now see that the second lookup is faster:
dig foo.com
dig foo.com
I haven't included the output above; the crucial line is near the end:
;; Query time: 285 msec
My second query returned results in 0 msec.
Configuring OpenWrt to use the local DNS Server
OpenWrt has its own DNS resolver, and provides an easy method in the LUCI web interface of changing the IP address of the nameservers for forwarding (this can be found under Network --> DHCP and DNS --> DNS forwardings). However, that doesn't do what we want - it merely means that clients will make requests to the router, which will forward them to your server. What we want to do is cut out the router altogether. Confusingly, OpenWrt's Unified Configuration Interface (UCI) stores settings for dnsmasq in /etc/config/dhcp however the original package configuration file is also installed at /etc/resolv.conf but is not actually used! Instead, a file /tmp/resolv.conf is created by UCI from the options in /etc/config/dhcp. The best way to get clients to use the local nameserver directly is to tell them to use it when they are assigned an IP address. Edit /etc/config/dhcp and add the last line:
config dhcp 'lan'
        option interface 'lan'
        option start '100'
        option limit '150'
        option leasetime '12h'
        option dhcpv6 'server'
        option ra 'server'
        list dhcp_option '6,192.168.1.103'
The line is a little cryptic, but list dhcp_option is a way of combining multiple DHCP options into one argument to be passed to dnsmasq, and the 6 is a code that means domain name server and is followed by the LAN IP address of your server (edit it to the appropriate IP address). Now power cycle your router (to force clients to request a new DHCP lease, which should make them use the new configuration), and you should see clients use the BIND nameserver without going through OpenWrt! You can check this by looking at the syslog in the web interface (status --> system log). When you load a web page, you shouldn't see DNS query information written to the log - if OpenWrt's forwarder is being used, you'll see messages like this appear:
Mon May 25 22:23:28 2015 daemon.info dnsmasq[2255]: query[A] www.gnu.org from 192.168.1.112
Mon May 25 22:23:28 2015 daemon.info dnsmasq[2255]: forwarded www.gnu.org to 208.67.222.222
Mon May 25 22:23:29 2015 daemon.info dnsmasq[2255]: reply www.gnu.org is <CNAME>
That's it! If you're stuck, let me know :)
Comments
what option to set ttl time
what option to set ttl time for few days instead of hours expired recieved from a forwarded server?
Are you saying you want to
Add new comment