 This is the third part of a five part tutorial that will show you how to install a full featured email server on your Raspberry Pi. This tutorial covers how to set up Webmail with Squirrelmail.
The parts are:
The Introduction & Contents Page (read first)
Raspberry Pi Email Server Part 1: Postfix
Raspberry Pi Email Server Part 2: Dovecot
Raspberry Pi Email Server Part 3: Squirrelmail
Raspberry Pi Email Server Part 4: Spam Detection with Spamassassin
Raspberry Pi Email Server Part 5: Spam Sorting with LMTP & Sieve
Installing Apache
If you don't already have apache installed (you might if you've followed my wordpress tutorial), then install it now.
sudo apt-get update
sudo apt-get install apache2
Enable the SSL apache module so that you can use HTTPS:
sudo a2enmod ssl
There are some "pre-made" virtualhost configurations that come with apache. This command will enable the "default-ssl" virtualhost, by creating a symbolic link from /etc/apache2/sites-available/default-ssl to /etc/apache2/sites-enabled/default-ssl:
sudo a2ensite default-ssl
Now reload apache to make the changes take effect:
sudo service apache2 reload
If you type the IP address or hostname of the pi into a web browser now, you should see the default Apache test page:  If you try the https version, you'll get a certificate error because you are using a self-signed SSL certificate. If you like, you can follow my CAcert tutorial to get a free SSL certificate for your domain, or you can just store an exception for the certificate and generate a proper one later.
  That's it for Apache. If you want to know more about setting up Apache for multiple websites, subdomains, and SSL configurations, I suggest you read my tutorial explaining Apache's VirtualHost files.
Installing Squirrelmail
Now we need to install squirrelmail:
sudo apt-get update
sudo apt-get install squirrelmail
The basic configuration for squirrelmail is really easy, and can be done with the setup script. To run the script, use this command:
sudo squirrelmail-configure
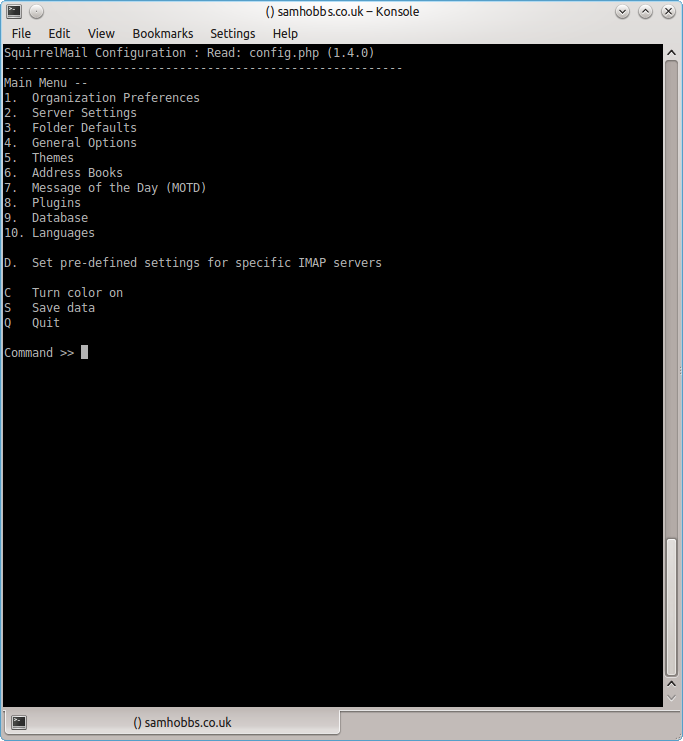 Choose “D” for pre-defined settings
 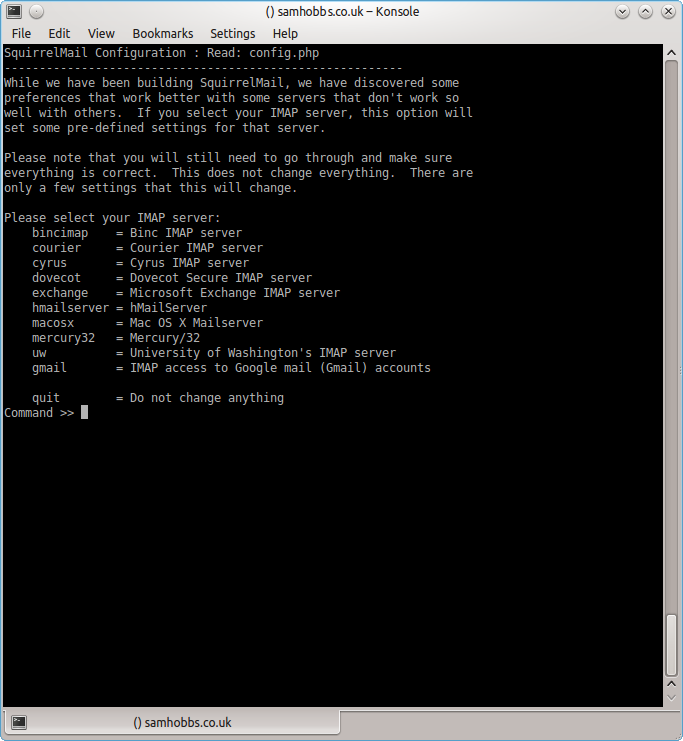 Now type “dovecot” and hit enter
 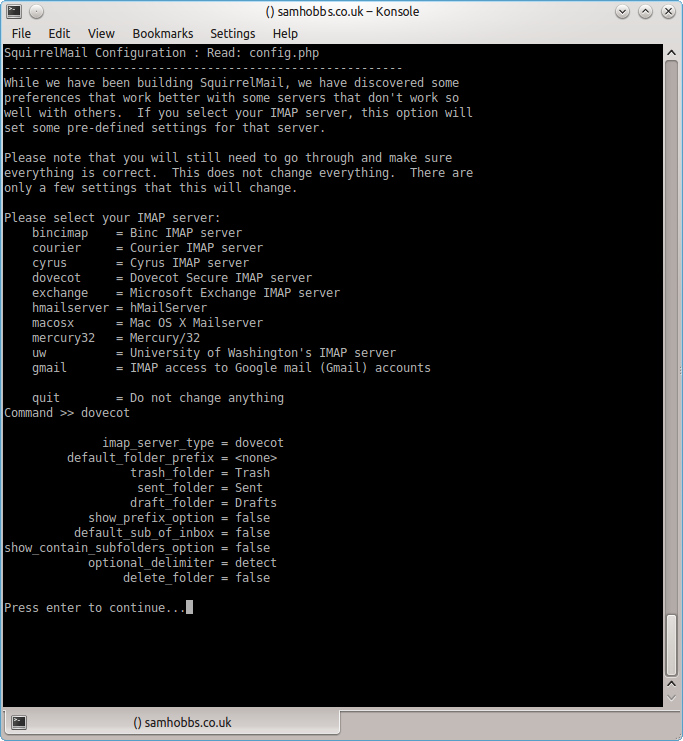 Press enter to continue, then save and quit (press Q and save when prompted, or press S then Q). The configuration script creates a configuration file for apache in
 /etc/squirrelmail/apache.conf. You need to create a symbolic link so that Apache2 will load your Squirrelmail apache configuration file when it starts up. On Raspbian Wheezy, the command is:
sudo ln -s /etc/squirrelmail/apache.conf /etc/apache2/conf.d/squirrelmail.conf
On Raspbian Jessie, the apache configuration directory structure is more like ubuntu, with separate folders for configuration files that are available and files that are enabled. This command will create a symlink from the directory where enabled configuration is stored, to squirrelmail's apache configuration file:
sudo ln -s /etc/squirrelmail/apache.conf /etc/apache2/conf-enabled/squirrelmail.conf
On a related note, there's a convenience command a2enconf that works similarly to a2ensite: it creates a symlink from the conf-available directory to the conf-enabled directory. You should use this in situations where config already exists in conf-available, e.g. sudo a2enconf squirrelmail would create a symlink for a file called squirrelmail.conf. Now reload Apache one more time so that it reads the config file we just symlinked:
sudo service apache2 reload
Now visit the IP address or hostname of your Pi again, but add /squirrelmail to the path, e.g. 192.168.1.174/squirrelmail, you should see the login page: 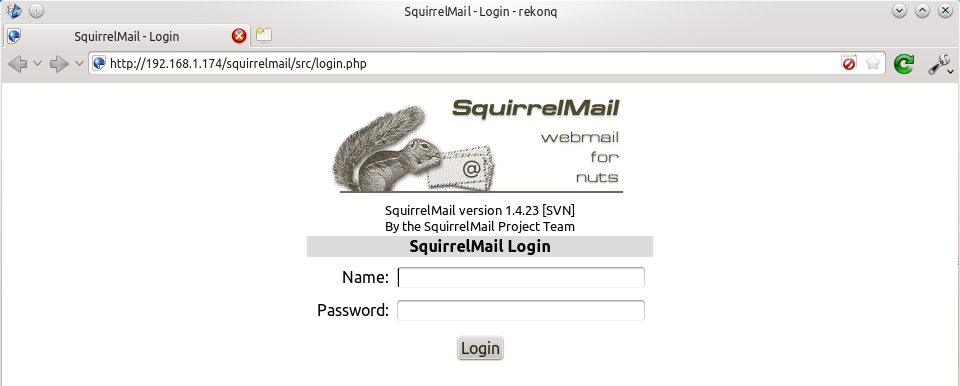 The squirrelmail configuration file just adds an alias that should affect every virtualhost, so if you install a wordpress site or something like that on your pi, you will be able to get to the squirrelmail login page by visiting yourdomain.com/squirrelmail.
Redirect http to https for secure login
Since you don't want to send your login details and confidential information over the internet without SSL, it's best to redirect all http URLs to https. The default squirrelmail apache configuration file at /etc/squirrelmail/apache.conf contains some rewrite rules we can use, we just need to uncomment them. Open the file and uncomment the lines by removing the # at the start of each so that it looks like this:
<IfModule mod_rewrite.c>
  <IfModule mod_ssl.c>
    <Location /squirrelmail>
      RewriteEngine on
      RewriteCond %{HTTPS} !^on$ [NC]
      RewriteRule . https://%{HTTP_HOST}%{REQUEST_URI}  [L]
    </Location>
  </IfModule>
</IfModule>
This configuration makes sure that the rewrite and ssl modules are enabled, and does nothing if they aren't. We already enabled the ssl module earlier, so all we need to do now is enable the rewrite module:
sudo a2enmod rewrite
And reload Apache:
sudo service apache2 reload
Now if you visit the HTTP page, you should be redirected to HTTPS.
Optional: Configuring Apache to serve Squirrelmail on a subdomain
If you would like to move the login page to the root of your domain (i.e. so that yourdomain.com would serve the login page for squirrelmail), or if you would like to serve it on a subdomain like mail.yourdomain.com, you can edit the configuration file. If not, you can skip this section. By default, this line in /etc/squirrelmail/apache.conf means that http://www.yourdomain.com/squirrelmail will load squirrelmail:
Alias /squirrelmail /usr/share/squirrelmail
If you would rather have webmail on a subdomain like mail.yourdomain.com then you could edit the /etc/squirrelmail/apache.conf file to look like this (comment out the rest):
<VirtualHost *:80>
  DocumentRoot /usr/share/squirrelmail
  ServerName mail.yourdomain.com


<Directory /usr/share/squirrelmail>
  Options FollowSymLinks
  <IfModule mod_php5.c>
    php_flag register_globals off
  </IfModule>
  <IfModule mod_dir.c>
    DirectoryIndex index.php
  </IfModule>

  # access to configtest is limited by default to prevent information leak
  <Files configtest.php>
    order deny,allow
    deny from all
    allow from 127.0.0.1
  </Files>
</Directory>
</VirtualHost>
Note that if you want to serve mail on a subdomain, then that subdomain needs a DNS record, so edit your records with your DNS provider accordingly. However, the virtualhost code above only does HTTP. You also want an HTTPS virtualhost for the subdomain on port 443:
<IfModule mod_ssl.c>
<VirtualHost *:443>
  DocumentRoot /usr/share/squirrelmail
  ServerName mail.yourdomain.com

<Directory /usr/share/squirrelmail>
  Options FollowSymLinks
  <IfModule mod_php5.c>
    php_flag register_globals off
  </IfModule>
  <IfModule mod_dir.c>
    DirectoryIndex index.php
  </IfModule>

  # access to configtest is limited by default to prevent information leak
  <Files configtest.php>
    order deny,allow
    deny from all
    allow from 127.0.0.1
  </Files>
</Directory>

ErrorLog ${APACHE_LOG_DIR}/error.log
LogLevel warn
CustomLog ${APACHE_LOG_DIR}/ssl_access.log combined

SSLEngine on
SSLCertificateFile    /etc/ssl/certs/your-ssl-certificate.crt
SSLCertificateKeyFile /etc/ssl/private/your-ssl-certificate-keyfile.key


</VirtualHost>
</IfModule>
If you use this configuration, the rewrite rules from the "rewrite to HTTPS" section (the ones from the default config file) won't work. If you want an HTTPS-only solution, you can replace the virtualhost for port 80 with this:
<VirtualHost *:80>
ServerName mail.yourdomain.com
<IfModule mod_rewrite.c>
  <IfModule mod_ssl.c>
    <Location />
      RewriteEngine on
      RewriteCond %{HTTPS} !^on$ [NC]
      RewriteRule . https://%{HTTP_HOST}%{REQUEST_URI}  [L]
    </Location>
  </IfModule>
</IfModule>
</VirtualHost>
As before, make sure you have the rewrite module enabled:
sudo a2enmod rewrite
Now reload apache:
sudo service apache2 restart
If you get an error like this:
[....] Restarting web server: apache2[Fri Dec 06 15:54:04 2013] [warn] _default_ VirtualHost overlap on port 443, the first has precedence
Then add NameVirtualHost *:443 to the start of the SSL VirtualHost block, i.e.:
NameVirtualHost *:443
<IfModule mod_ssl.c>
<VirtualHost *:443>
  DocumentRoot /usr/share/squirrelmail
  ServerName mail.yourdomain.com
...
For more info on HTTP and HTTPS VirtualHost configuration on Apache2, see this tutorial of mine. If all went to plan then you can navigate to mail.yourdomain.com and you should see the squirrelmail login page (you might need to forward some ports on your router if you haven't already - see the next section): 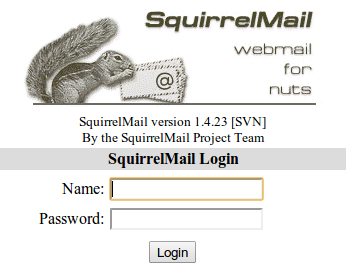
Port Forwarding
Squirrelmail will log in to your IMAP server on port 143 to display your emails. It doesn’t need to authenticate because it’s in your network (remember the permit_mynetworks parameter from the previous tutorials?). You don’t need to worry about it being an unencrypted connection, because the data isn't actually travelling over any insecure networks (the connection is internal). Similarly, you don’t need to open port 143 (“plain” imap without SSL/TLS) on your router because the connection happens within the Pi, and the content is actually served to you, the user, on port 443 (https). So you do need to open ports 80 and 443 for http and https like below: 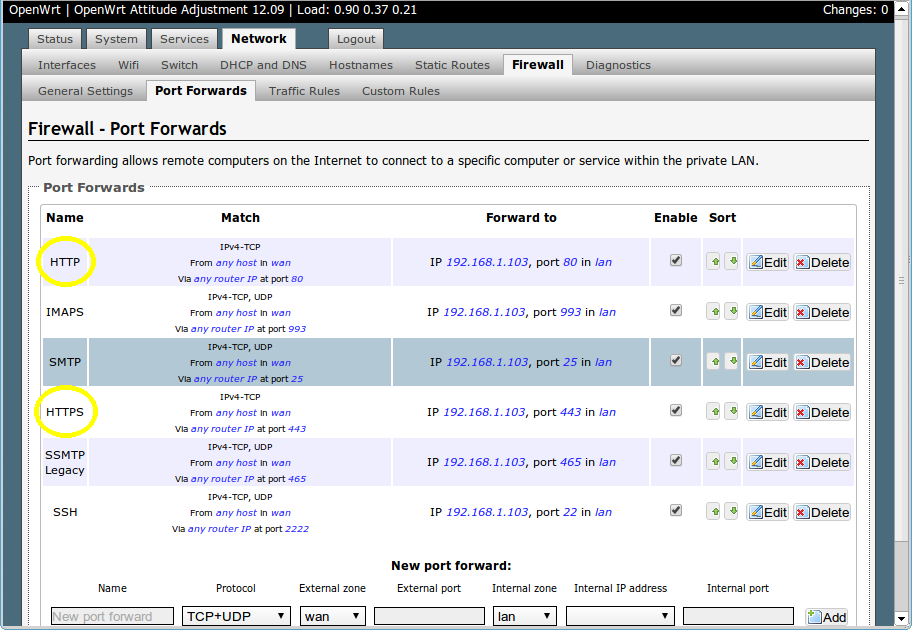
Testing
Before you start testing your webmail, make sure that the permit_mynetworks parameters are uncommented in your postfix confuguration file /etc/postfix/main.cf (in both your smtpd_recipient_restrictions and smtpd_helo_restrictions). Now reload your postfix configuration:
sudo service postfix reload
Try sending and receiving emails from within Squirrelmail. You should have no problems, but if you do please post a comment and I’ll try to help you out.
Customising the Squirrelmail Login
To customise the login page, run the configuration wizard:
sudo squirrelmail-configure
- Select “1″ (organisation preferences)
- Select “7″ and change to your domain (e.g. http://www.samhobbs.co.uk)
- Select “8″ and change to you/your organisation’s name
Squirrelmail Plugins
There are loads of plugins available for Squirrelmail, for all kinds of things. On most systems, these plugins are installed by downloading a .zip file to your server, unzipping the plugin to the right location and then tinkering with the settings manually. Thankfully, some of the most commonly used plugins are available from the Raspbian repositories, so installation is much simpler. Here is a list of the plugins in the repo:
- squirrelmail-compatibility
- squirrelmail-decode
- squirrelmail-locales
- squirrelmail-lockout
- squirrelmail-logger
- squirrelmail-quicksave
- squirrelmail-secure-login
- squirrelmail-sent-confirmation
- squirrelmail-spam-buttons
- squirrelmail-viewashtml
The one I think is most useful and the one I’m going to use as an example is lockout. To use the lockout package, we need to install the compatibility package, which basically makes sure that plugins built for different versions of squirrelmail can still work with the version you are running.
sudo apt-get update
sudo apt-get install squirrelmail-compatibility
Now we need to enable the plugin:
sudo squirrelmail-configure
- select “8″
- select “compatibility”
- select “S” (to save)
- select “Q” (to quit)
That’s all you need to do for the compatibility plugin. Now we can install the lockout plugin:
sudo apt-get install squirrelmail-lockout
Now for the configuration:
sudo squirrelmail-configure
Make sure that lockout is enabled Now we can manually edit some settings. Before starting, I like to back up the default config files for reference:
cd /etc/squirrelmail
sudo cp lockout-table.php lockout-table.php.BAK
sudo cp lockout-config.php lockout-config.php.BAK
Now edit the lockout-table.php file. Read the comments in the file for an explanation of how the table works. I wanted to disable logins for the user “admin”, so I commented out the examples at the end of the file and replaced them with this:
user: admin locked_out.php
Now edit lockout-config.php and set $use_lockout_rules = 1; to turn on lockouts. Now try and log in as the user you locked out, and you should get this message: “Access Denied / Please contact your system administrator”. We can also lock out IP addresses of users who enter incorrect username/password combinations repeatedly. To do this, open lockout-config.php and set $max_login_attempts_per_IP = '3:5:0'. The first number in this parameter is the number of incorrect attempts that are allowed before a ban. The second number is the time frame for these incorrect attempts, and the last number is the amount of time the ban lasts for when activated (0 is forever). So, the setting I gave you above means that anyone who makes 3 incorrect attempts to authenticate in 5 minutes is permanently banned. When a successful login is made, the count is reset to 0. Data on current bad login attempts and bans is stored here: /var/lib/squirrelmail/data/lockout_plugin_login_failure_information The plugin will add entries like this to keep track of bad logins:
999.999.99.99_login_failure_times=1386774015:1386774034:1386774053
999.999.99.99_TOO_MANY_FAILED_LOGIN_ATTEMPTS=PERMANENT
…where 999.999.99.99 is the offending IP address If you accidentally ban yourself, you’ll have to log in via SSH and edit this file to remove those lines. That’s it, you’re done! Have fun exploring the other plugins! The next two tutorials, Part 4 and Part 5 deal with spam detection and filtering.
Comments
Messed something up!
Hi Sam,
I messed something up somewhere! I tried reinstalling CAcert root and it created another root.txt file named root.txt.1 (I decided it is a duplicate so I didn't continue with the other steps...)
Next I looked at the /etc/squirrelmail/apache.conf file and thought I need my SSL certifcate paths in there. Then I used sudo a2enmod rewrite and reloaded apache2 instead of restarting it...Then I got loads of errors...see below:
admin@pi-box:~ $ sudo a2enmod rewrite
Module rewrite already enabled
admin@pi-box:~ $ sudo service apache2 reload
Job for apache2.service failed. See 'systemctl status apache2.service' and 'journalctl -xn' for details.
admin@pi-box:~ $ systemctl status apache2.service
● apache2.service - LSB: Apache2 web server
Loaded: loaded (/etc/init.d/apache2)
Active: active (exited) (Result: exit-code) since Sat 2016-02-27 14:20:10 UTC; 20h ago
Process: 20977 ExecReload=/etc/init.d/apache2 reload (code=exited, status=1/FAILURE)
Process: 525 ExecStart=/etc/init.d/apache2 start (code=exited, status=0/SUCCESS)
admin@pi-box:~ $ sudo systemctl status apache2.service
● apache2.service - LSB: Apache2 web server
Loaded: loaded (/etc/init.d/apache2)
Active: active (exited) (Result: exit-code) since Sat 2016-02-27 14:20:10 UTC; 20h ago
Process: 20977 ExecReload=/etc/init.d/apache2 reload (code=exited, status=1/FAILURE)
Process: 525 ExecStart=/etc/init.d/apache2 start (code=exited, status=0/SUCCESS)
Feb 28 10:41:33 pi-box systemd[1]: Reloading LSB: Apache2 web server.
Feb 28 10:41:33 pi-box apache2[20910]: Reloading web server: apache2 failed!
Feb 28 10:41:33 pi-box apache2[20910]: Apache2 is not running ... (warning).
Feb 28 10:41:33 pi-box systemd[1]: apache2.service: control process exited, code=exited status=1
Feb 28 10:41:33 pi-box systemd[1]: Reload failed for LSB: Apache2 web server.
Feb 28 10:43:56 pi-box systemd[1]: Reloading LSB: Apache2 web server.
Feb 28 10:43:57 pi-box apache2[20977]: Reloading web server: apache2 failed!
Feb 28 10:43:57 pi-box apache2[20977]: Apache2 is not running ... (warning).
Feb 28 10:43:57 pi-box systemd[1]: apache2.service: control process exited, code=exited status=1
Feb 28 10:43:57 pi-box systemd[1]: Reload failed for LSB: Apache2 web server.
admin@pi-box:~ $ sudo journalctl -xn
-- Logs begin at Sat 2016-02-27 14:19:56 UTC, end at Sun 2016-02-28 10:45:53 UTC. --
Feb 28 10:43:57 pi-box apache2[20977]: Apache2 is not running ... (warning).
Feb 28 10:43:57 pi-box systemd[1]: apache2.service: control process exited, code=exited status=1
Feb 28 10:43:57 pi-box systemd[1]: Reload failed for LSB: Apache2 web server.
-- Subject: Unit apache2.service has finished reloading its configuration
-- Defined-By: systemd
-- Support: http://lists.freedesktop.org/mailman/listinfo/systemd-devel
--
-- Unit apache2.service has finished reloading its configuration
--
-- The result is failed.
Feb 28 10:43:57 pi-box sudo[20965]: pam_unix(sudo:session): session closed for user root
Feb 28 10:45:09 pi-box dhcpcd[464]: eth0: fe80::1 router available
Feb 28 10:45:14 pi-box sudo[21044]: admin : TTY=pts/0 ; PWD=/home/admin ; USER=root ; COMMAND=/bin/systemctl status apache2.ser
Feb 28 10:45:14 pi-box sudo[21044]: pam_unix(sudo:session): session opened for user root by (uid=0)
Feb 28 10:45:14 pi-box sudo[21044]: pam_unix(sudo:session): session closed for user root
Feb 28 10:45:53 pi-box sudo[21058]: admin : TTY=pts/0 ; PWD=/home/admin ; USER=root ; COMMAND=/bin/journalctl -xn
Feb 28 10:45:53 pi-box sudo[21058]: pam_unix(sudo:session): session opened for user root by (uid=0)
lines 1-18/18 (END)
I deleted the SSL certificates section again in apache.conf and reloaded apache2 and then realised it should've been a restart...
Did I mess things up badly or is there a way to fix it?
Please advise.
Thx
Jo
syntax error
apache error log
Hi Sam,
here's the log:
[Fri Feb 26 20:13:03.216989 2016] [authz_core:error] [pid 18528] [client 192.168.1.100:44947] AH01630: client denied by server configuration: /var/www/owncloud/data/htaccesstest.txt
[Fri Feb 26 22:16:08.533482 2016] [:error] [pid 19263] [client 94.198.141.138:55807] script '/var/www/wp-login.php' not found or unable to stat, referer: http://courseworkresources.com/wp-login.php
[Sat Feb 27 08:21:51.011568 2016] [core:error] [pid 1164] [client 46.49.2.188:62927] AH00135: Invalid method in request \xb7\xc8\x12\x02pG\xa6\xfa
[Sat Feb 27 13:43:12.632908 2016] [authz_core:error] [pid 8792] [client 192.168.1.100:56665] AH01630: client denied by server configuration: /var/www/owncloud/data/htaccesstest.txt
[Sat Feb 27 13:43:46.784997 2016] [authz_core:error] [pid 8794] [client 192.168.1.100:56670] AH01630: client denied by server configuration: /var/www/owncloud/data/htaccesstest.txt
[Sun Feb 28 10:39:38.622132 2016] [ssl:emerg] [pid 976] AH02569: Illegal attempt to re-initialise SSL for server (SSLEngine On should go in the VirtualHost, not in global scope.)
It seems the SSLEngine On was the culprit, which I deleted already...Does that mean all my apache stuff is ok now?
Still can't figure out why I can't 'force' https...CAcert is installed common name and hostname is pi-box.co.uk...
Regards,
Jo
cacert on the client machine
CAcert installed on client machine?
Hi Sam,
I understand my Raspberry Pi to be the client machine? Is that correct?
Jo
In this case, the client is the machine with the browser
/etc/hostsfile on your router to make sure yourdomain.com resolves locally (on the LAN) as well as externally if you were having problems. Anyway, theNET::ERR_CERT_AUTHORITY_INVALIDerror wasn't caused by that, it was caused by the client machine not trusting the CAcert root certificate.- Make sure the CAcert root certificate is installed on the machine you're running the browser on (install it in the browser too if necessary - it may have a separate trusted certificate store)
- Use the same domain name in the URL to connect to squirrelmail as you put on the certificate.
SamCAcert installation
Hi Sam,
I don't know how to get to the Talk Talk router's /etc/hosts file...tried to ssh but nothing happened... have to google how to install certificate on browser (Chromium).
Thanks for all the support, I have to do a bit of research on these things to try and have a better understanding.
I have owncloud on this Pi and squirrelmail and I also want to host a website here eventually, so I'll keep digging until I understand it better.
All your help is always appreciated.
Thx.
Jo
/etc/hosts file
Hi Sam,
You must think I'm a total klutz by now, when the answer is right in front of me...
I thought /etc/hosts was afile on the router itself. Did some googling and found c:/windows/system32/drivers/etc/ had a hosts file. Tried it, but it then only takes me to my router's website i.e tal talk
Then I realised there's a /etc/ directory on my Pi...went to it and saw a hosts file...sudo nano and saw 127.0.01 pi-box and changed it to pi-box.co.uk
Now I get the pi-box.co.uk/squirrelmail bu the https still is crossed out...I need to focus on the CAcert now, but at least the domain name is there!
Regards,
Jo
hosts file
/etc/hostsfile on the router, and on the pi, and like you discovered there's a hosts file on windows too with a different name. The hosts file is the first place that a DNS resolver checks when looking up DNS records, before name servers on the internet are queried. Your router is a DNS resolver for the whole of your LAN (if your computer doesn't know the answer itself, it queries the router, which queries nameservers on the internet). I was saying you could edit the router's hosts file so that every machine on your LAN that asks what the IP address of yourdomain.com is will get the LAN IP instead of the WAN IP address on your DNS A record, which solves the problem with your pi not being accessible with the WAN IP from the LAN. Don't change any other computer's hosts file, and definitely don't change the first parts of the host file - the hostname there needs to match what's in /etc/hostname or some programs will misbehave. If you could get access to your router's hosts file, you could change it like this: SamRouter /etc/hosts file
Hi Sam,
What method can I use to access my router's /etc/hosts file?
Can't seem to find answers online...
Regards,
Jo
OpenWrt
OpenWrt
Hi Sam,
Thanks for that...I have a spare Talk Talk router. I might experiment with it using OpenWrt.
For now I'll just stick to using this Pi which has /etc/hosts updated.
Regards,
Jo
Apache2
Hi Sam,
I just wanted to install apache only so just followed the first few lines of the squirrelmail tutorial. All straightforward. But Firefox objects to https connection complaining that apache is using SSLv3. So in mods-enabled/ssl.conf I replaced SSLv3 in "SSLProtocol all -SSLv3" with TLSv1.2 as suggested in RFC 5246. But Firefox still complains (cache cleared first). I cannot find any reference to SSLv3 in the apache2 tree.
Where should I look next?
Thanks....John
PS: Note new email address - now on the Pi
Which OS and version of Firefox?
Apache
Hi Sam,
Since I did not know about Comodo, I did not study this particular article. I can see that I need to study this in detail to solve the https problem. I also should look at comments concerning Postfix and Dovecot. Hmmm. More work to do...
I now have a Raspberry Pi 3 with February 2016 version of Jessie which I am using for apache experiments. (Built-in Wifi only works correctly with "wireless-power off" inserted in /etc/network/interfaces for wlan0). Firefox v44.0.2 is running on my iMac with OSX 10.11.3
John
Apache https Firefox problem
Hi Sam,
Since there was no sign of SSLv3 being used in Apache2, I started looking elsewhere to find why Firefox was objecting about SSLv3. This command: openssl s_client -connect <host>:<port> -ssl3 was helpful. The problem was my router (DrayTek 2820Vn) which had firmware (August 2015 with SSLv3) pre-dating October 2015 changeover in Firefox . Upgrade to latest firmware: problem solved. Thought I would let you know that the problem was external to Pi installation.
John
shouldn't make a difference
Shoudn't make a difference
Hi Sam,
I didn't provide sufficient information. Your reply is correct, of course. Technical detail on DrayTek management, https://xxx.co.uk will access the router because its IP address is the same as xxx.co.uk (of course). This is because port 443 is the default https access port on the router. That's why it saw the SSLv3. I should have remembered that the default management access was 443. I changed this to 442 so now https://xxx.co.uk does correctly access the apache server and not the router server. The firmware needed to be updated anyway.
Pardon the confusion...
John
Ah, that makes sense
Makes sense...
Hi Sam,
The router's admin panel is WAN accessible but only through SSH and only from a named server (at my Univ) and only through a port that isn't 22. (This is needed in case of problems while I am away from home. There is an extensive CLI scheme.) The router is LAN accessible via http (not 80) and https (not 443 any longer) and 23 for continous monitoring of the ADSL line. I agree that the default settings on some routers is a disaster area. The DrayTek router has an excellent firewall and all blocked attempts are logged. (These logs are really interesting...)
Yes, the router forwards traffic to 80,443,22. This does not reach the router itself.
Thanks for the comments...John
squirrelmail max upload size?
Hi Sam,
Is there a quick way to increase the max upload file size for an attachment in squirrlmail.
I've updated max upload size in postfix, but it doesn't effect squirrelmail...
Thanks,
Jo
Hi,
setting both port 80 and 443 on squirrelmail
I got a question. When I setup the squirrelmail. I want to use both port 80 and 443. There is something strange. It seems to be already restatement. I post the error code as below.
● apache2.service - LSB: Apache2 web server
Loaded: loaded (/etc/init.d/apache2)
Active: failed (Result: exit-code) since Mon 2016-03-14 21:09:23 CST; 4s ago
Process: 4514 ExecStop=/etc/init.d/apache2 stop (code=exited, status=0/SUCCESS)
Process: 4689 ExecStart=/etc/init.d/apache2 start (code=exited, status=1/FAILURE)
===============================================================================================
If I just set only one-port 80, it's fine. If I set both of syntax together, it runs this matter. I post this syntax.
Alias /webmail /usr/share/squirrelmail
<Directory /usr/share/squirrelmail>
Options FollowSymLinks
<IfModule mod_php5.c>
php_flag register_globals off
</IfModule>
< IfModule mod_dir.c>
DirectoryIndex index.php
</IfModule>
# access to configtest is limited by default to prevent information leak
<Files configtest.php >
order deny,allow
deny from all
allow from 127.0.0.1
</Files>
</Directory>
# users will prefer a simple URL like http://webmail.example.com
#<VirtualHost *:80,443 >
# DocumentRoot /usr/share/squirrelmail
# ServerName mail.jeffhost.idv.tw
#</VirtualHost>
<VirtualHost *:80>
DocumentRoot /usr/share/squirrelmail
ServerName mail.jeffhost.idv.tw
<Directory /usr/share/squirrelmail>
Options FollowSymLinks
<IfModule mod_php5.c>
php_flag register_globals off
</IfModule>
<IfModule mod_dir.c>
DirectoryIndex index.php
</IfModule>
# access to configtest is limited by default to prevent information leak
<Files configtest.php>
order deny,allow
deny from all
allow from 127.0.0.1
</Files >
</Directory >
</VirtualHost >
<IfModule mod_ssl.c >
<VirtualHost *:443 >
DocumentRoot /usr/share/squirrelmail
ServerName mail.jeffhost.idv.tw
<Directory /usr/share/squirrelmail >
Options FollowSymLinks
<IfModule mod_php5.c >
php_flag register_globals off
</IfModule>
<IfModule mod_dir.c >
DirectoryIndex index.php
</IfModule >
# access to configtest is limited by default to prevent information leak
<Files configtest.php>
order deny,allow
deny from all
allow from 127.0.0.1
</Files>
</Directory>
ErrorLog ${APACHE_LOG_DIR}/error.log
LogLevel warn
CustomLog ${APACHE_LOG_DIR}/ssl_access.log combined
SSLEngine on
SSLCertificateFile /etc/ssl/certs/your-ssl-certificate.crt
SSLCertificateKeyFile /etc/ssl/private/your-ssl-certificate-keyfile.key
</VirtualHost>
</IfModule>
# redirect to https when available (thanks omen@descolada.dartmouth.edu)
#
# Note: There are multiple ways to do this, and which one is suitable for
# your site's configuration depends. Consult the apache documentation if
# you're unsure, as this example might not work everywhere.
#
<IfModule mod_rewrite.c>
<IfModule mod_ssl.c>
<Location /squirrelmail>
RewriteEngine on
RewriteCond %{HTTPS} !^on$ [NC]
RewriteRule . https://%{HTTP_HOST}%{REQUEST_URI} [L]
</Location>
</IfModule>
</IfModule>
========================================================================================
This is original syntax only port 80.
Alias /webmail /usr/share/squirrelmail
<Directory /usr/share/squirrelmail>
Options FollowSymLinks
<IfModule mod_php5.c>
php_flag register_globals off
</IfModule>
<IfModule mod_dir.c>
DirectoryIndex index.php
</IfModule>
# access to configtest is limited by default to prevent information leak
<Files configtest.php>
order deny,allow
deny from all
allow from 127.0.0.1
</Files>
</Directory>
# users will prefer a simple URL like http://webmail.example.com
<VirtualHost *:80,443>
DocumentRoot /usr/share/squirrelmail
ServerName mail.jeffhost.idv.tw
</VirtualHost>
# redirect to https when available (thanks omen@descolada.dartmouth.edu)
#
# Note: There are multiple ways to do this, and which one is suitable for
# your site's configuration depends. Consult the apache documentation if
# you're unsure, as this example might not work everywhere.
#
<IfModule mod_rewrite.c>
<IfModule mod_ssl.c>
<Location /squirrelmail>
RewriteEngine on
RewriteCond %{HTTPS} !^on$ [NC]
RewriteRule . https://%{HTTP_HOST}%{REQUEST_URI} [L]
</Location>
</IfModule>
</IfModule>
How to change the default user "pi" to the other name?
Hi Sam,
I had refer to the other article to modify it. But, I got a problem, PID running by "pi" and lots of pi running process. I use root to modify it. The OS underlying process pi is still there. It seems not easy to modify to the other name.
you can replace the user pi
Error on SquirrelMail
Hello Sam,
I have checked the "Tell Dovecot where your mailbox is" section in part 2 as you said but I keep on getting the same error!
ERROR:
ERROR: Could not complete request.
Query: SELECT "INBOX"
Reason Given: [SERVERBUG] Internal error occurred. Refer to server log for more information. [2016-03-22 13:44:24]
As I said before, this only happens in the INBOX folder! What should I do now?
Are you absolutely sure the
/var/log/mail.logorsudo journalctl -u dovecot)? SamLine was repeated
Hello Sam,
The line was repeated at the end!
Thanks a lot,
Mónica
Hi Sam,
Hi Sam,
I got a issue on squirrelmail sending mail via SMTP. I see the port squirrelmail using port 143 for IMAP and port 25 for SMTP. The current I can send mail out but can't receive mail. No matter phone or desktop mail client I can't receive any mail. The other issue is that I can't send mail via squirrelmail. The apache2 will show up the www-data this user continuing send mail to itself. It seems polling my web server. Why www-data will do this and how to stop or handle this matter?
This is the squirrelmail error code:
ERROR
Message not sent. Server replied:
Connection refused
111 Can't open SMTP stream.
I check via using "sudo squirrelmail-configure" to see SMTP settings. I know I don't have port 25 for using and I have been checking via "netstat" there are any port 25 on screen. I post the main.cf under below. After I do the step 4 and step 5, there are so many matters. Wish your help.
# See /usr/share/postfix/main.cf.dist for a commented, more complete version
# Debian specific: Specifying a file name will cause the first
# line of that file to be used as the name. The Debian default
# is /etc/mailname.
#myorigin = /etc/mailname
smtpd_banner = $myhostname ESMTP $mail_name (Raspbian)
biff = no
# appending .domain is the MUA's job.
append_dot_mydomain = no
# Uncomment the next line to generate "delayed mail" warnings
#delay_warning_time = 4h
readme_directory = no
# TLS parameters
smtpd_tls_cert_file=/etc/ssl/certs/jeffhost.crt
smtpd_tls_key_file=/etc/ssl/private/jeffhost.key
smtpd_use_tls=yes
smtpd_tls_session_cache_database = btree:${data_directory}/smtpd_scache
smtp_tls_session_cache_database = btree:${data_directory}/smtp_scache
# See /usr/share/doc/postfix/TLS_README.gz in the postfix-doc package for
# information on enabling SSL in the smtp client.
smtpd_relay_restrictions = permit_mynetworks permit_sasl_authenticated defer_unauth_destination
myhostname = mail.jeffhost.idv.tw
mydomain = jeffhost.idv.tw
alias_maps = hash:/etc/aliases
alias_database = hash:/etc/aliases
myorigin = /etc/mailname
mydestination = $myhostname, raspberrypi, localhost.localdomain, localhost
#relay_domains =
#relayhost =
mynetworks = 192.168.0.0/24 127.0.0.0/8
recipient_delimiter = +
inet_interfaces = all
inet_protocols = ipv4
home_mailbox = Maildir/
mailbox_command =
mailbox_transport = lmtp:unix:private/dovecot-lmtp
smtpd_recipient_restrictions = permit_sasl_authenticated, permit_mynetworks, reject_unauth_destination
smtpd_helo_required = yes
smtpd_helo_restrictions = permit_mynetworks, permit_sasl_authenticated, reject_invalid_helo_hostname, reject_non_fqdn_helo_hostname, check_helo_access hash:/etc/postfix/helo_access
smtpd_sasl_type = dovecot
smtpd_sasl_path = private/auth
smtpd_sasl_auth_enable = yes
smtpd_tls_auth_only = yes
mailbox_size_limit = 51200000
message_size_limit = 10240000
111 Can't open SMTP stream
Hello,
The server was running great but now it says this message!
Message not sent. Server replied:
Connection refused
111 Can't open SMTP stream.
I know it has something to do with SMTP, but I double-checked and the port 25 is open! What's wrong?
Thanks,
Mónica
Add new comment